Hero Me Gen5 - Base 7 - Mosquito Hot End Light and Tiny w/25mm Fan and PC4-M10
thingiverse
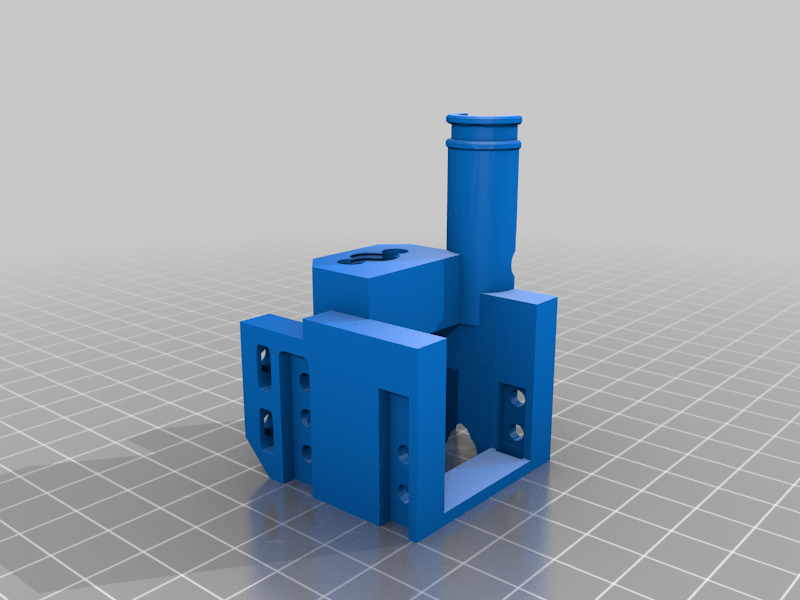
Hi, I hope you find this useful! I remixed the Hero Me Gen5 - Base 7 for the Mosquito hot end to be light, tight and tiny by using Slice Engineerings 25mm hotend fan. I also included an M10 Installation tool and Plunger to help apply downward pressure on the M10 coupler to easily position and screw it into the threaded hole correctly. This base is lighter, more compact and utilizes a tiny 25mm hot end fan like the one from Slice Engineering and a PC4-M10 coupler instead of a PC4-M6 coupler. Make sure to use a PC4-M10 coupler that allows the PTFE tube to be pushed all the way through the coupler and mount block so it meets flush with the top of the mosquito's cold end. This allows for very smooth transition of the filament from the tubing all the way down to the hot end.. I have tested both Capricorn and typical White PTFE Tube in this and at least for me, they both fit all the way down to the top of the mosquitos frame through the hole in the mount block, but YMMV and you may still need to make the center hole under the coupler on the mount block a bit larger depending on the PTFE tube you use.. Assembly: ======== Base and Mosquito: -------------------------- You should be able to insert the Mosquito with the Fan already attached, through the opening in the bottom of the modified base housing. M10 coupler: ----------------- Get the M10 coupler started straight in the threaded hole with your fingers. Make sure it's straight! Then, push the M10 Installation tool all the way down over the coupler so it's flat on the mounting block and then insert the Plunger so you can apply downward pressure on the coupler and turn the M10 installation tool to screw the coupler all the way in until it stops. Printing: I used supports only on the underside of the actual mount block. Everything else "should" print fine with no supports. UPDATED: 8-31-2021 ------------------------------ I realized that sometimes it was hard to get the coupler to screw into the threads far enough to hold it in place with just your fingers, so this is my solution: I uploaded a new M10 Installation tool. I made it hollow in the center and provided a Plunger tool to insert into it to allow you to put downward pressure on the M10 coupler as you start to screw it into the mount block the first time. Just put downward pressure on the Plunger, keep the installation tool straight and flat on the mounting block and turn the installation tool to get the coupler started straight into the threads.
With this file you will be able to print Hero Me Gen5 - Base 7 - Mosquito Hot End Light and Tiny w/25mm Fan and PC4-M10 with your 3D printer. Click on the button and save the file on your computer to work, edit or customize your design. You can also find more 3D designs for printers on Hero Me Gen5 - Base 7 - Mosquito Hot End Light and Tiny w/25mm Fan and PC4-M10.