Hero Me Hinged
thingiverse
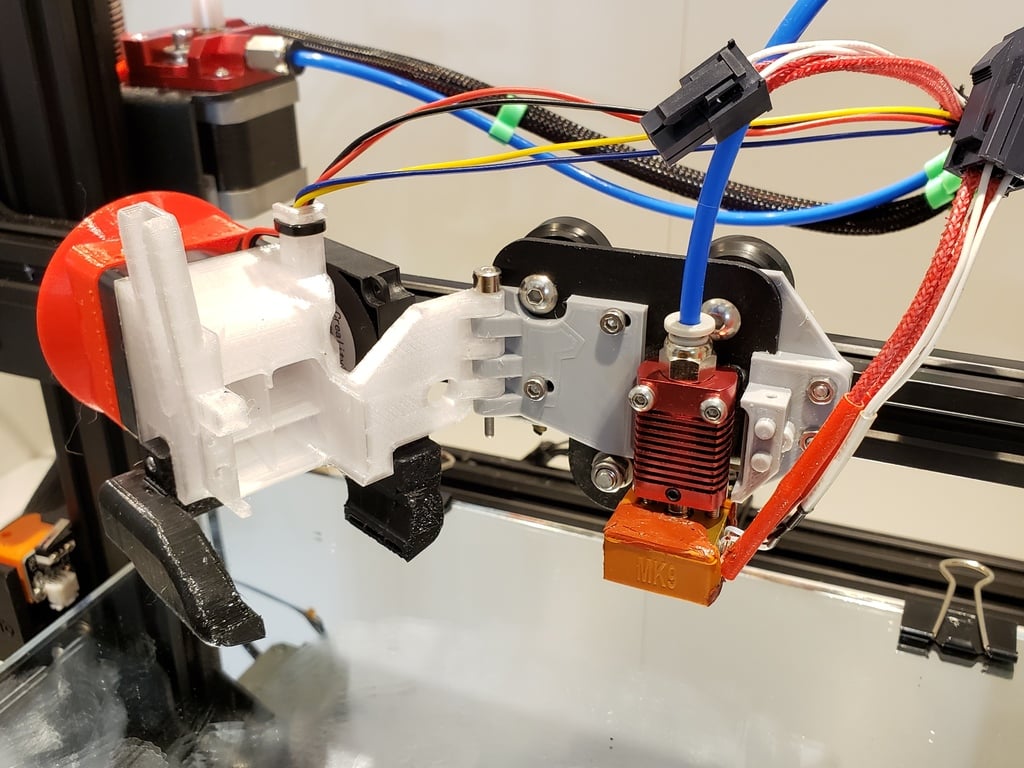
I was looking for a solution to readily change hot ends as I changed print material; without clean outs, nozzle changes... As a single machine owner I found the process cumbersome when changing back and forth between PLA, PETG, wood pla.....I use four different hot end arrangements, each for specific filaments. The addition of the hinge and the wire quick connect (heating element and temperature sensor) made this much easier then full disassembly. The Body and part cooling duct have additional clearance from the hot end and cooling fins. The part cooling duct is still being refined. This uses the stock fans. 4/26/20: I added a quick connect splice to the bowden tube to ease hot end swap out I used this one from Amazon https://www.amazon.com/gp/product/B07SWRST2N/ref=ppx_yo_dt_b_asin_title_o09_s00?ie=UTF8&psc=1 This set up ahas about 50 hours printing and I am leaving As-Is, perhaps with a modification to come to the parts cooling duct. 8/23/2020: Purchased Parts List: 1) 2 each SS M3 x 8 socket head screws to attach hinge side to the carriage https://www.amazon.com/gp/product/B071KBVZVV/ref=ppx_yo_dt_b_search_asin_image?ie=UTF8&psc=1 2) 2 each SS M3 x 8 button head screws AND nuts to attach the front and rear right side of the base to the carriage. https://www.amazon.com/gp/product/B07KW2N9RD/ref=ppx_yo_dt_b_search_asin_image?ie=UTF8&psc=1 Please note that button heads could be used for both without a problem, while i believe the socket heads would not provide enough clearance behind the carriage. 3) I cut a 40 mm piece from K&S 3/32 stainless steel rod #87133 and attached a 3/32 Dubro hobby collar to make the hinge pivot. Collar: https://www.amazon.com/Du-Bro-Plated-Brass-Dura-Collar-12-Pack/dp/B0006NAVLE/ref=sr_1_3?dchild=1&keywords=3%2F32+dubro+collar&qid=1598195264&sr=8-3 Rod: https://www.amazon.com/Precision-Metals-87133-Stainless-Carded/dp/B00FG1LVVK/ref=sr_1_2?dchild=1&keywords=K%26S+3%2F32+stainless+rod+87133&qid=1598195433&sr=8-2 Please note- this is what I had on hand- one could use 1/8 or whatever as a hinge pin as long as drilling out the hinge is matched to the same diameter. 4) 1 each Hitch pin or hair pin clip Hillman #882591 1/16 inch by 1 5/16inch. I sourced locally at Home Depot or lowes in a 2 pack. From Amazon for 20 https://www.amazon.com/Hillman-Group-43321-062-Inch-16-Inch/dp/B00IN75R64/ref=sr_1_2?dchild=1&keywords=the+hillman+group+hitch+pin+.062&qid=1598195835&sr=8-2 If i were to buy again I would purchase this set maybe: https://www.amazon.com/VIGRUE-Hairpin-Assortment-Fastener-Multiple/dp/B081NDZK3P/ref=sr_1_21_sspa?dchild=1&keywords=the+hillman+group+hitch+pin+.062&qid=1598196057&sr=8-21-spons&psc=1&spLa=ZW5jcnlwdGVkUXVhbGlmaWVyPUEzNzRFREZXRzMwMCZlbmNyeXB0ZWRJZD1BMDg4MTMzMDNQRjlYRFFGRUU5VzMmZW5jcnlwdGVkQWRJZD1BMDc0MTQ3MjFPSDAyWFVYRjBEN0smd2lkZ2V0TmFtZT1zcF9idGYmYWN0aW9uPWNsaWNrUmVkaXJlY3QmZG9Ob3RMb2dDbGljaz10cnVl 5) 5 Set) Molex 4 Pin Black Connector 13A 4.20mm, w/18-24 AWG Pin Mini-Fit Jr https://www.ebay.com/itm/5-Set-Molex-4-Pin-Black-Connector-13A-4-20mm-w-18-24-AWG-Pin-Mini-Fit-Jr/401546215995?_trkparms=aid%3D111001%26algo%3DREC.SEED%26ao%3D1%26asc%3D20160908105057%26meid%3D6b5e62c213bf4b3d9f1223144a93908b%26pid%3D100675%26rk%3D5%26rkt%3D15%26mehot%3Dnone%26sd%3D300746028245%26itm%3D401546215995%26pmt%3D0%26noa%3D1%26pg%3D2380057%26brand%3DMolex&_trksid=p2380057.c100675.m4236&_trkparms=pageci%3A8c2ca1a7-e554-11ea-b4cc-96f85edc4688%7Cparentrq%3A1bea831f1740a4b4f2b867d1ffff96b4%7Ciid%3A1 6) I used Dirko HT to provide extra insulation to the heating block. I struggled to keep temperatured above 250 c without it and the boot. Note- I had this all ready as it is what i use to repair my Stihl weed wacker and chainsaw engines. https://www.amazon.com/Oilpan-Sealant-Dirko-HT-Red/dp/B0074HPKPM/ref=sr_1_2?dchild=1&keywords=dirko+ht&qid=1598196319&sr=8-2 7) MK-9 silicon boot https://www.amazon.com/CCTREE-Printer-Heater-Silicone-Creality/dp/B07CN7KH31/ref=sr_1_3?dchild=1&keywords=mk9+silicone+boot&qid=1598196528&sr=8-3 8) 2 each ss m2 x 4 socket head screws to attach parts cooling fan to body. 9)
With this file you will be able to print Hero Me Hinged with your 3D printer. Click on the button and save the file on your computer to work, edit or customize your design. You can also find more 3D designs for printers on Hero Me Hinged.