Hex-bit storage 8x3 + handgrip
prusaprinters
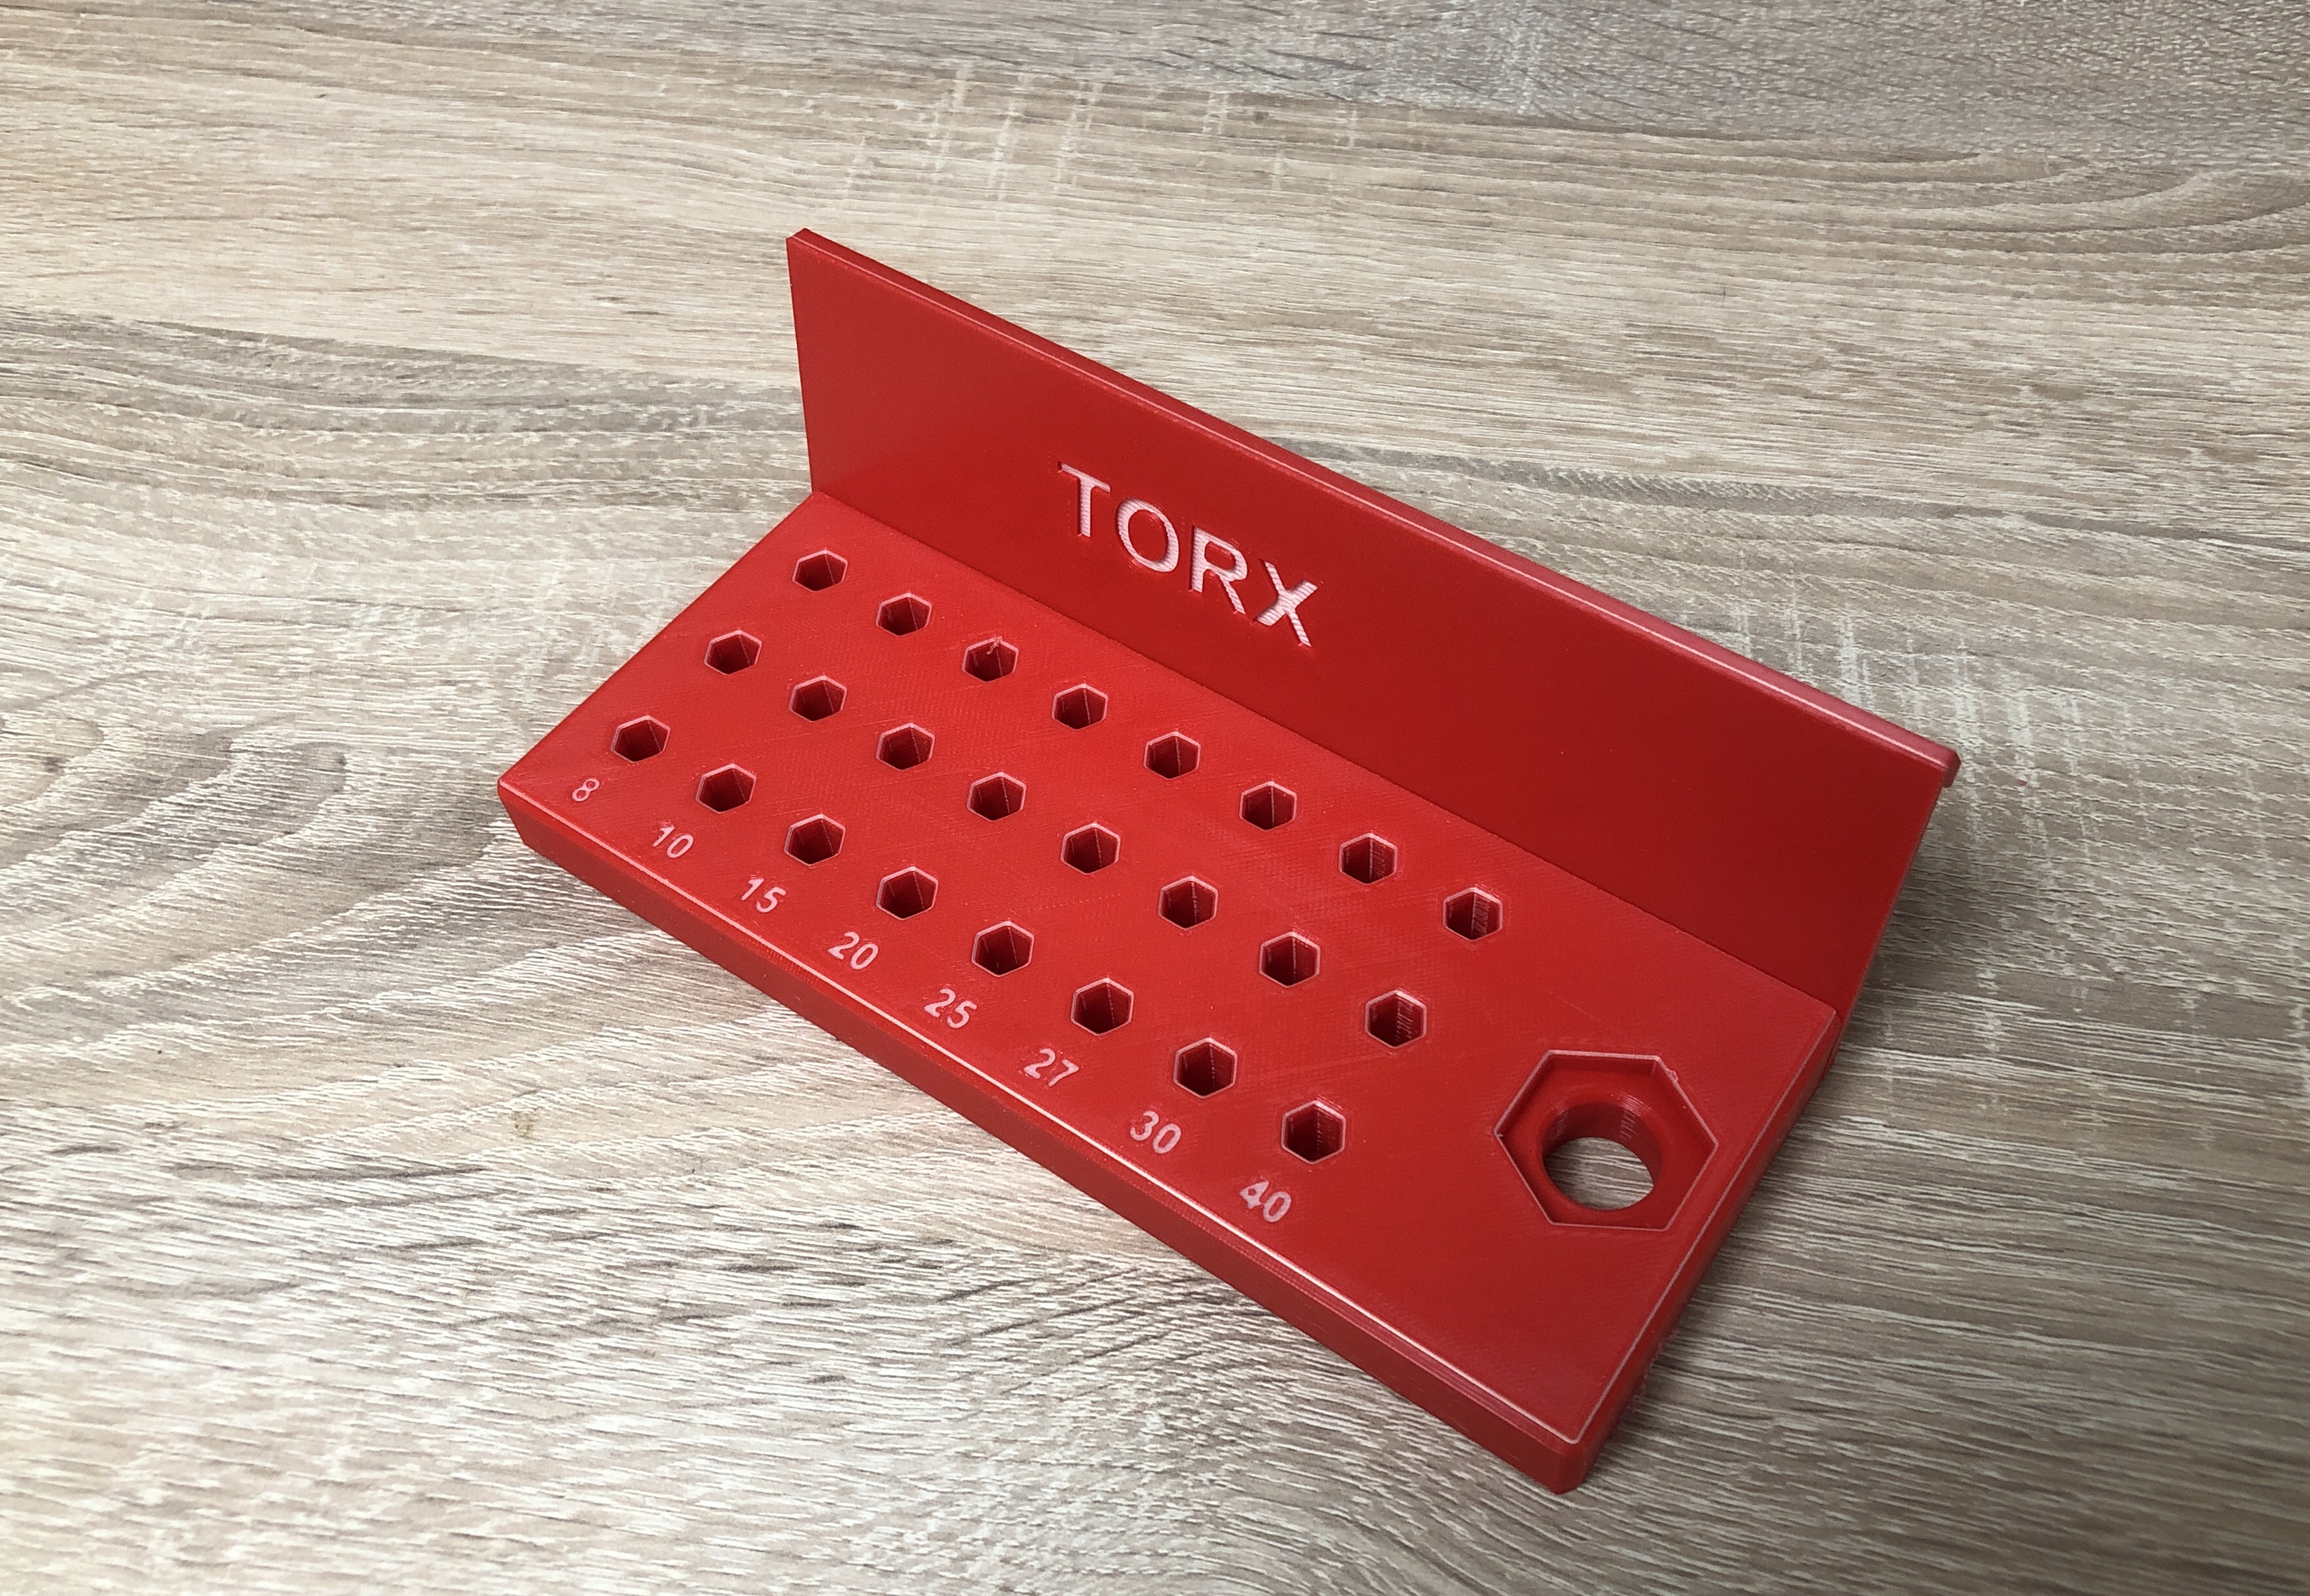
<h3>English</h3><p><strong>(Deutsche Beschreibung siehe unten)</strong></p><p>I offer the hex-bit-storage in several <a href="https://www.prusaprinters.org/de/social/182402-makerl1969/collections/121458">variations</a>:</p><ul><li>This version offers room for 8 x 3 bits <strong>and </strong>for the Wera Rapidaptor<br>(If you have no use for the Rapidaptor, see the other variations below)</li></ul><p>Other variants are:</p><ul><li><a href="https://www.prusaprinters.org/de/prints/136269-hex-bit-holder-8x3">8 x 3 bits only</a></li><li><a href="https://www.prusaprinters.org/de/prints/136404-hex-bit-holder-7x3">7 x 3 bits only</a></li></ul><p>All variants offer additional options regarding labeling. The labeling follows this scheme:</p><ul><li>The back describes the bit assortment:<ul><li>Torx</li><li>Allen</li><li>Phillips</li><li>…</li></ul></li><li>On the bits storage is a label for the size of the bit on <strong>each column</strong>!<ul><li>So it's intended, that you place bits of the same size in one column.</li><li>In the back rows you place the longer bits and in the front rows the shorter ones.</li></ul></li></ul><p><strong>If there is a demand for specific labels or customized sizes (9x3, 8x4, etc.), please let me know in the comments. I will see what can be done.</strong></p><p>The backs fits on all french cleat systems which are at least 6mm strong.</p><p> </p><h4>Calibration</h4><p>Print the 1x1 scaling model at first an test the fit of your hex bits. Optimze the fitting to your needs by adjusting the <strong>scale factor </strong>in your slicer.</p><p>If you have found the right scale factor that suits you, then apply it to all prints on <strong>all</strong> dimensions (including z) - <strong>even on the french cleat holder, so the width and the position of the screw holes stills fits to the hex bit storage .</strong></p><p>The z dimension needs also adjustment, so you still have a 45° angle for the french cleat!</p><p> </p><h4>Assmbly</h4><p>Use two wood screws 3,0mm x 10mm oder 3,0mm x 12mm to mount the pieces together. Then hook the assembly to your french cleat wall.</p><p> </p><h4>Print instructions</h4><h5>Material</h5><p>I printed with PLA, which absolutely hits all reqirements for my basement workshop.</p><h5>Infill</h5><p>10% infill is the minimum setting. The transition from the infill to the top solid layers is rather hard for the printer because of the many interruptions in the diagonal due to the hex bit holes. So the print needs several layers to recover a smooth surface.</p><p>I recommend 15% infill. There are no difficulties to be expected.</p><h5>Supports</h5><p>No supports needed!</p><h5>Warping</h5><p>If you have trouble with warping I recommend "Micky Mouse Ears" on the four corners.</p><p> </p><p>================================================================</p><p> </p><h3>Deutsch</h3><p>Ich biete den Hex-Bit-Halter in verschienden <a href="https://www.prusaprinters.org/de/social/182402-makerl1969/collections/121458">Varianten </a>an:</p><ul><li>Diese Variante bietet Platz für 8 x 3 Bits <strong>plus </strong>dem Wera Handhalter “Rapidaptor”</li></ul><p>Weitere Varianten sind:</p><ul><li><a href="https://www.prusaprinters.org/de/prints/136269-hex-bit-holder-8x3">8 x 3 Bits <strong>ohne </strong>zusätzliche Aufnahme für einen “Rapidaptor”</a></li><li><a href="https://www.prusaprinters.org/de/prints/136404-hex-bit-holder-7x3">7 x 3 Bits <strong>ohne </strong>zusätzliche Aufnahme für einen “Rapidaptor”</a></li></ul><p>Für sämtliche Varianten gibt es verschiedene Optionen bzgl. der Beschriftung. Die Beschriftungen folgen dabei diesem Schema:</p><ul><li>Die Rückwand beschreibt das Bit-Sortiment:<ul><li>Torx</li><li>Inbus</li><li>Kreuzschlitz</li><li>…</li></ul></li><li>Der Bithalter beschriftet die jeweilige Größe der Bits <strong>je Spalte</strong>! <ul><li>In einer Spalte müssen also Bits der gleichen Größe platziert werden. Hinten z.B. die langen Bits und vorne die Kurzen.</li></ul></li></ul><p><strong>Falls es zusätzliche Wünsche für spezielle Beschriftungen oder Sondermaße (9x3, 8x4, …) gibt, bitte in den Kommentaren anfragen. Ich werde sehen, was sich machen lässt.</strong></p><p>Die “Rückwände” sind mit allen gängigen French Cleat Systemen kompatibel, die mindestens 6mm stark sind.</p><p> </p><h4>Kalibrierung</h4><p>Das 1x1 Scale Modell bietet sich an, um die Passung des gedruckten Modells mit den eigenen Bits zu testen. Anpassungen an die eigenen Wünsche lassen sich dann leicht mittels <strong>Skalierungsfaktor </strong>im Slicer realisieren.</p><p>Der so ermitellte Faktor wird für den eigentlichen Druck auf <strong>alle </strong>Dimensionen angewendet - <strong>auch beim Cleat-Halter, damit dieser in der Breite und Abständen der Schraubenlöcher noch zum Hex-Bit-Halter passt!</strong></p><p>Die z-Dimension muss ebenfalls gleichermaßen angepasst werden, damit der 45° Winkel für die French Cleat Halterung erhalten bleibt.</p><h3> </h3><h4>Zusammenbau</h4><p>Die Bithalterung und die Rückwand (French Cleat Halterung) werden mit zwei Holzschrauben 3,0 x 10mm oder 3,0 x 12mm verbunden.</p><h3> </h3><h4>Druckeinstellungen</h4><h5>Material</h5><p>Ich habe mit PLA gedruckt. Für meine Anforderungen (Kellerwerkstatt ohne viel direkte UV-Einstrahlung) absolut ausreichend.</p><h5>Infill</h5><p>Der Druck gelingt auch mit 10% Infill, aber beim Übergang vom Infill zu den oberen Deckschichten kommt es aufgrund der vielen Unterbrechungen in der Diagonalen zu relativ vielen Löchern und losen Filament-Fäden in den ersten Schichten. Um das alles wieder auszugleichen, braucht es einige Layers.</p><p>Deswegen empfehle ich 15% Infill. Die zusätzliche Druckzeit hält sich in Grenzen und die Top Layers gelingen ohne Probleme.</p><h5>Supports</h5><p>Keine Stützstrukturen!</p><h5>Warping</h5><p>Um Warping entgegen zu wirken, empfehle ich “Micky Mouse Ohren” an den Ecken.</p>
With this file you will be able to print Hex-bit storage 8x3 + handgrip with your 3D printer. Click on the button and save the file on your computer to work, edit or customize your design. You can also find more 3D designs for printers on Hex-bit storage 8x3 + handgrip.