Hex Tie
thingiverse
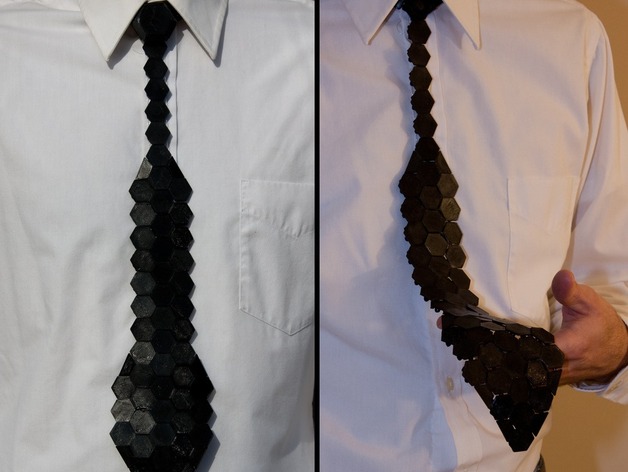
Unlike 3d printed ties that are hinged and move unnaturally, this design drapes more like cloth by using hexagons strung together with thread. Use different color hexes to create patterns! Instructions NOTE:I recommend using mono-filament or cloth thread to string everything together. Purists can use ABS thread, but the tie will be more fragile. See the bottom note for how to make ABS thread. From here on, we'll just call it all "thread". The parts are sized in multiples of .4mm, so you may get best results with .2mm or .4mm layer height printing. Since only the flat surface is visible, additional resolution doesn't really add anything other than time. 1) Figure out how long of a tie you want to make in cm. Divide by 2, and that's how many hexes you should print for the center column. E.g., for a 44cm tie, print 22 hexes for the center column. 2) Figure out how you want the "fat part" of the tie to look. You will probably want 2 columns on either side of the center column, with some taper (see pictures). Estimate the number of hexes you will need for one side (I used a column of 13, and an outer column of 3 on each side for a total of 26) and print that many. Arrange the results on a flat surface to verify the count, adjust as necessary, and print enough for the other side. 3) Arrange the tie hexes in the shape you want, FLAT SIDE DOWN. Don't forget about the half-hexes, which usually start & end the side-columns. Note that the bottom edge of the tie should be a flat side of the hex, not a hex point. Count the number of places that you could put a half hex around the edge and print that many half-hexes. If you followed my design above, you will need 8 (4 per side). 4) Tie your thread to the flat edge of one hex using a good knot, and run the thread up through the center column of hexes. Leave plenty of extra thread at the top, so you can tie it to the hub piece, later. Loop the thread through the last hex loop a few times just to hold things in place. DO NOT pull the thread super tight, leave it a little loose so the tie can flex. 5) Thread the side columns in the same manner. When they're done, place them side-by-side (so your tie is face down), and thread them together back & forth through the side loops on the hexes. 6) Put on a dress shirt and measure around your neck in cm with the collar up. Divide by two and that is how many square pieces you will need. Print 4 solids and the rest hollow to save plastic, plus the two clips (end pieces). 7) Arrange the neck pieces, FLAT SIDE DOWN on a flat surface. Clip, two solids, the hollows, two solids, clip. Tie your thread do the clip loops, thread through all the pieces, and tie a temporary knot on the other end (so you can undo to add/remove pieces if needed). Do the top & bottom with separate threads, just in case. 8) Print the center hub and the hex column. Glue the hex column to the center of the flat side of the hub (using acetone, if available), so that the points of the column are pointing at the flat edges of the hub (ie, rotate the column 30 degrees with respect to the hub). In other words, the column should be on the opposite side of the hex that has the block with three holes. The points on the hex column should be pointing up and down relative to the tie. 8) Try on the neck strap. The two ends should snap into the center hub at an angle, so the straps + tie make a Y shape (see pictures). If it is too tight or too loose, add/remove pieces as necessary. When it's right, redo the temporary knot with a permanent knot. Note that the hub should be closest to your neck, with the column facing out. 9) Use temporary knots to tie the tie to the hub. Check the length of the tie. If it's not right, then adjust as necessary by adding/removing hexes at the top. When you are satisfied put in the permanent knots. 10) Print the tie cover, flat side down. It snaps over the hex column, and is meant to resemble the tie knot. Congratulations, you are done! For more interesting ties, use different color hexes and make a pattern! Appendix: If you want to be a purist and have the entire thing be ABS (see the last photo!), then you can make ABS thread to use in place of thread. Do this by raising your print head high enough so you can easily reach in under it. Set your printer to extrude a lot of filament (30mm?) . As the filament starts to come out, grab the end and pull gently at a constant rate. The idea is to make a thin thread that is of uniform thickness. You may have to experiment before you get the right thickness, but when you have it, it should be flexible enough to tie into a small knot, yet strong enough to hold the weight of the hexes. Note that using mono-filament will result in a SIGNIFICANTLY stronger tie. Having done both, I recommend the mono-filament approach.
With this file you will be able to print Hex Tie with your 3D printer. Click on the button and save the file on your computer to work, edit or customize your design. You can also find more 3D designs for printers on Hex Tie.