Hexagonal Precision Bass Guitar
prusaprinters
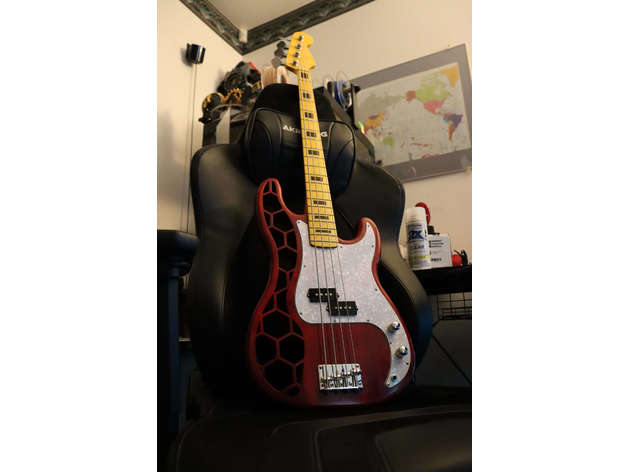
<p>This is a custom precision bass guitar body. After printing a custom Stratocaster that I found, I decided I wanted to try making my own guitar and since there wasn't a bass available to download, I figured I'd give a try at making that.</p><p>Here is a list of all the parts I used to build the bass apart from the printed body:</p><p> </p><figure class="table" style="width:551px;"><table style="background-color:rgb(255, 255, 255);border:1px solid rgb(242, 242, 242);"><thead><tr><th>Neck</th><th>AmazonSmile - Happy nest 4 String 20 Fret Bass Neck Replacement Maple Wood Bass Neck Repair Part (Yellow) -</th></tr></thead><tbody><tr><td style="border-bottom:1px solid rgb(242, 242, 242);height:3.5em;padding:0px 0px 0px 1rem;">Tuners</td><td style="border-bottom:1px solid rgb(242, 242, 242);height:3.5em;padding:0px;">AmazonSmile: Metallor Vintage Open Gear Machine Heads Tuners Tuning Pegs 4 In Line Right Hand Guitar Parts Replacement for P Bass J Bass Chrome 4PCS: Musical Instruments</td></tr><tr><td style="border-bottom:1px solid rgb(242, 242, 242);height:3.5em;padding:0px 0px 0px 1rem;">Bridge</td><td style="border-bottom:1px solid rgb(242, 242, 242);height:3.5em;padding:0px;">AmazonSmile: Metallor Hard Tail Fixed Bass Guitar Bridge Compatible with 4 string Jazz Bass or Precision Bass Style Bass Guitar Top Load Chrome.: Musical Instruments</td></tr><tr><td style="border-bottom:1px solid rgb(242, 242, 242);height:3.5em;padding:0px 0px 0px 1rem;">Strap Buttons</td><td style="border-bottom:1px solid rgb(242, 242, 242);height:3.5em;padding:0px;">AmazonSmile: 2pcs Silver Metal Strap Lock Buttons End Pins with Mounting Screws For Electric Acoustic Guitar Bass Ukulele: Musical Instruments</td></tr><tr><td style="border-bottom:1px solid rgb(242, 242, 242);height:3.5em;padding:0px 0px 0px 1rem;">Neck Plate</td><td style="border-bottom:1px solid rgb(242, 242, 242);height:3.5em;padding:0px;">AmazonSmile: Fender American Standard Bqass Neck Plate - Chrome: Musical Instruments</td></tr><tr><td style="border-bottom:1px solid rgb(242, 242, 242);height:3.5em;padding:0px 0px 0px 1rem;">Loaded Pickguard (Not the one I used, but similar)</td><td style="border-bottom:1px solid rgb(242, 242, 242);height:3.5em;padding:0px;"><a href="https://www.ebay.com/itm/Bass-Loaded-Pickguard-For-Fender-Precision-Bass-PB-P-Bass-Guitar-Parts-White/203170570190?hash=item2f4de8dfce:g:OlAAAOSwgsxaYAl8">https://www.ebay.com/itm/Bass-Loaded-Pickguard-For-Fender-Precision-Bass-PB-P-Bass-Guitar-Parts-White/203170570190?hash=item2f4de8dfce:g:OlAAAOSwgsxaYAl8</a></td></tr><tr><td style="border-bottom:1px solid rgb(242, 242, 242);height:3.5em;padding:0px 0px 0px 1rem;">Strings</td><td style="border-bottom:1px solid rgb(242, 242, 242);height:3.5em;padding:0px;">AmazonSmile: Ernie Ball Regular Slinky Nickel Wound Bass Set, .050 - .105: Musical Instruments</td></tr></tbody></table></figure><p> </p><p>Notes:</p><p>Not completely necessary, but its better to add a few more wall perimeters to enhance strength. Another thing I did when slicing the parts was to add dynamic infill to where I knew there would be higher stress from bridge screws and such. I used prusa slicer for this and it worked well in my favor to keep print times down, but print strength high.</p><p> </p><p>Post-Printing</p><p>Step 1: Joining surface sanding</p><p> </p><p>After printing everything, start by sanding all the joining edges to a flat, rough finish using something along the lines of 100 grit sandpaper. You want to prep the surface for the next step of gluing.</p><p> </p><p>Step 2: Epoxy Joining</p><p> </p><p>After sanding and cleaning off all the remaining dust, you want to use a quick-setting 2-part epoxy to join the parts. Start by joining the respective left and right pieces and then continue by joining the top to the middle, then the middle to the bottom. Quickly mix the epoxy evenly and spread an even, full covered layer on one of the joining edges. Insert the necessary alignment dowels to the glued part and attach it's respective sister piece. Once aligned, hold or clamp in place the two pieces until the epoxy is fully dry. Don't worry too much about overflow, we can clean that up in the next step, plus it means you have full coverage.</p><p> </p><p>Step 3: Full Body Sanding</p><p> </p><p>Now that you have all the pieces joined and the epoxy is all dry, now it's time to start on the initial full surface sanding. This is where we will smooth out any large layer gaps, epoxy spill-out, and small misalignments. You can do this part by hand if you want, or use something like an electric palm sander. Just be careful to not put too much pressure with the electric sander so as not to sand straight through the outer walls of the print. Continue sanding using 100-200 grit sandpaper until you smooth out all the rough parts of the piece.</p><p> </p><p>Step 4: Body Filler</p><p> </p><p>At this point the body is at a fairly smooth and consistent texture. You may notice some small areas where the print may have missed some extrusion or you may have sanded a bit too much. This is where the body filler comes in. I've been using just a simple wood putty to remedy this. Just find any of those areas that need filling and fill-away. Once the filler dries, give the area another good sanding to smooth it out even with the rest of the body.</p><p> </p><p>Step 5: Priming</p><p> </p><p>This is the point where you get to see how good a sanding job you really did. Clean off the part of any remaining dust particles and finger greases. Now, using a can of filler primer, give a few nice, even coats to the body as per the instructions on the can.</p><p> </p><p>Step 6: More Sanding</p><p> </p><p>Now's when the real smoothing comes in. Using an increasing grit, start with something like a 200-300 grit and move up to about a 500-600 grid to get a more smooth surface for painting.</p><p> </p><p>Step 6: Paint and Clear Coat</p><p> </p><p>Get your favorite color of spray paint and a clear coat and follow it's instructions to get the desired outcome.</p><p> </p><p><br/> </p>
With this file you will be able to print Hexagonal Precision Bass Guitar with your 3D printer. Click on the button and save the file on your computer to work, edit or customize your design. You can also find more 3D designs for printers on Hexagonal Precision Bass Guitar.