Hi-Capa Kit Phase1
thingiverse
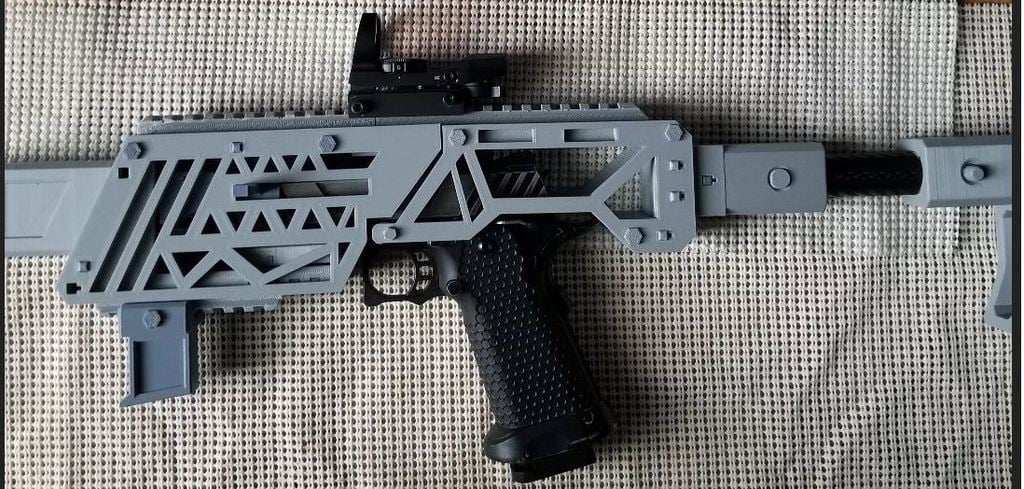
Wanted a kit that would work with my Jag Arms GMX 2 Hi-capa. Here is a kit where the only tools needed to make this are a punch (must be smaller than 5mm) and a small hammer (I use pliers and it works fine). I advise to print out the Initialmountproof.stl first before anything else to make sure that the kit will be compatible. Once that is done, download the zip files as it is a long list of parts. Instructions and more to come. For the most up to date files and such check out my google drive https://drive.google.com/drive/folders/1L9BXRhwCrfEHVmL6z7Gi2POaukX_-JD7?usp=sharing ---------------------THIS DOES NOT INCLUDE------------------------- -Muzzle Device Insert -Stock -Handstop -hi-capa Some quick Q&A Q: Why is this kit so bulky? A: ~16mm from the bottom of the hi-capa lower to the bottom of the frame of the kit. and only 10mm gap between the kit and the hi-capa slide. So technically speaking it is not bulky. Q: Why does the kit attach via a picatinny rail and not directly to pistol? A: 1. The picatinny rail allows users to have a picatinny rail on the pistol for additional accessories whenever the kit is not attached 2. The picatinny rail helps keep with the goal of the kit to be minimal in the amount of tools required for this kit. 3. The picatinny rail allows users to print and test the essential mounting component to see if the kit is compatible or not. Helping end user save time and filament. Q: Why a skeleton body? Can we get a blank body? A: The skeletonized body allows users to test the kit early on as this is the Phase1 kit with minimal usage of filament while having some flare. Blank body is TBD as certain parts I will not be posting as I plan to sell iterations of this kit. Q: What tools are required? Hardware? A: Tools: a punch smaller than 5mm and a hammer / pliers. I say pliers because I use pliers when I take this kit apart seeing that it can poke some of the pins. No extra hardware is required, just the proper amount of pins. You will probably need sandpaper for certain areas of the print to ensure proper fitment. Please make sure that your printer is accurate to .1mm. Q: Will this fit on my XYZ Hi-capa? A: Testing has only been done with a Jag Arms Hi-capa GMX 2. please note that the picatinny mount attaches to the lower frame. So please test with the initial picatinny mount to ensure fitment before all else. Q: Do I need to modify my hi-capa? A: Only need to remove front ironsight post and pin that holds in your slide. Nothing else. If this kit does not fit your Hi-capa , DO NOT modify your hi-capa in attempts to fit this kit. Q: Attachments? A: TBD, but feel free to use my other files for making rail mounted accessories. Q: Any warnings when assembling this kit? A: Few. 1. Ensure that your printer is accurate to .1mm I cannot stress that enough or else fitment will be off. 2. The pins for the picatinny mount are 2.9mm going into a 3mm hole. Ensure that when installing your rail slot lines up perfect or very close or you may damage the pins, this can lead to problems. I like using the pliers to insert these pins. 3. You may want to look into short stroking your hi-capa in the possibility that the slide hits the back of the frame. This is a possibility, but from the consistent testing I have found the probability of this being an actual problem inconclusive. 4. Your rear irons may graze against the frame. This is something I cannot control as not everyone has the same hi-capa as me.
With this file you will be able to print Hi-Capa Kit Phase1 with your 3D printer. Click on the button and save the file on your computer to work, edit or customize your design. You can also find more 3D designs for printers on Hi-Capa Kit Phase1.