Hictop Dual Extrusion with mostly stock parts
thingiverse
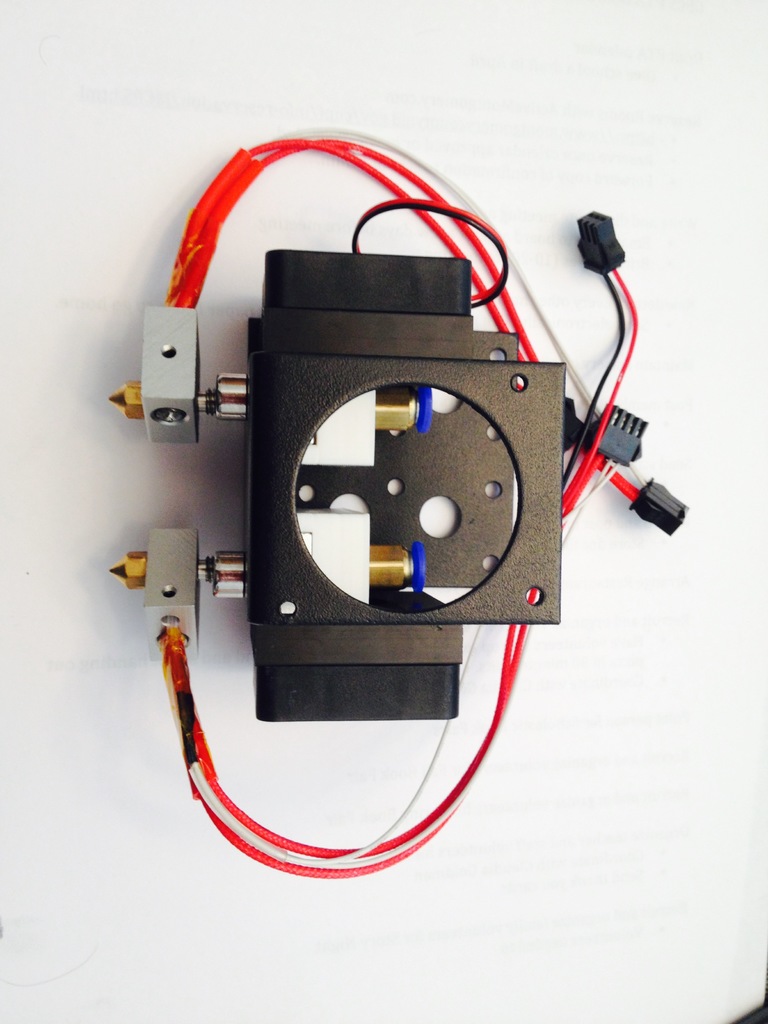
I purchased several Hictop Prusa i3s (3DP-11) and replaced the hotends on two of them with E3D V6s. This led to having some leftover stock parts, so I decided to tinker with them before throwing them away. Upon experimenting, I found that it would be relatively simple to upgrade these stock components for dual extrusion. The sole challenge in this system is that it requires Bowden extruders. However, these are quite easy to print and assemble or purchase directly. I used the following model: https://www.thingiverse.com/thing:1318849 If you want to make the most of your stock parts, consider trying this alternative: https://www.thingiverse.com/thing:2070374 Here's a step-by-step guide to completing the upgrade: 1. Remove everything from the X-carriage. 2. Print one of the "jigs". These jigs are based on my x-carriages (your results may vary), but their purpose is to help line up the spots where you need to drill. Use a punch or another tool to mark the holes. 3. Drill two holes in the carriage (6 mm). Along with drilling the holes, I also enlarged the heat break hole. This allows you to fully remove the new hotend by simply removing one M6 bolt that holds on the aluminum block. Position the new hotend so the heater and thermistor wires face towards the right front, making it easier to remove that bolt. 4. Print out the hotend Bowden blocks. These are designed to be tapped for M6 PTFE couplers. You'll need one standard and one mirrored version. 5. Put X-carriage back on. 6. Rewire everything. You'll need to connect a stepper motor at E1, the E1 heater, fan, and thermistor. Hictop uses JST-XHP connectors for the motor and thermistor on their control boards. 7. Adjust nozzle height. This can be tricky. I set up everything on the left extruder and slowly lowered it onto a pre-leveled glass build plate, while leaving the right nozzle and heat break loose in the aluminum block. The challenge lies in tightening the set screw. The threads on the heatbreak make the whole assembly want to move slightly. Try twisting things until you have the set screw tightened and both nozzles are just touching the build plate. 8. Determine your offset. There may be both X and Y offsets. In my case, everything was aligned very nicely in Y, and the X offset was approximately 35 mm. You can get a rough estimate with calipers and obtain exact numbers with some test prints. 9. Update firmware. I'll provide you with a link to mine shortly (latest Marlin). Note that you may have to modify the E-steps. 10. Print some stuff. https://youtu.be/ImFsGOO7b-8
With this file you will be able to print Hictop Dual Extrusion with mostly stock parts with your 3D printer. Click on the button and save the file on your computer to work, edit or customize your design. You can also find more 3D designs for printers on Hictop Dual Extrusion with mostly stock parts.