Hinged Chest with Working Lock and Wood Texture
prusaprinters
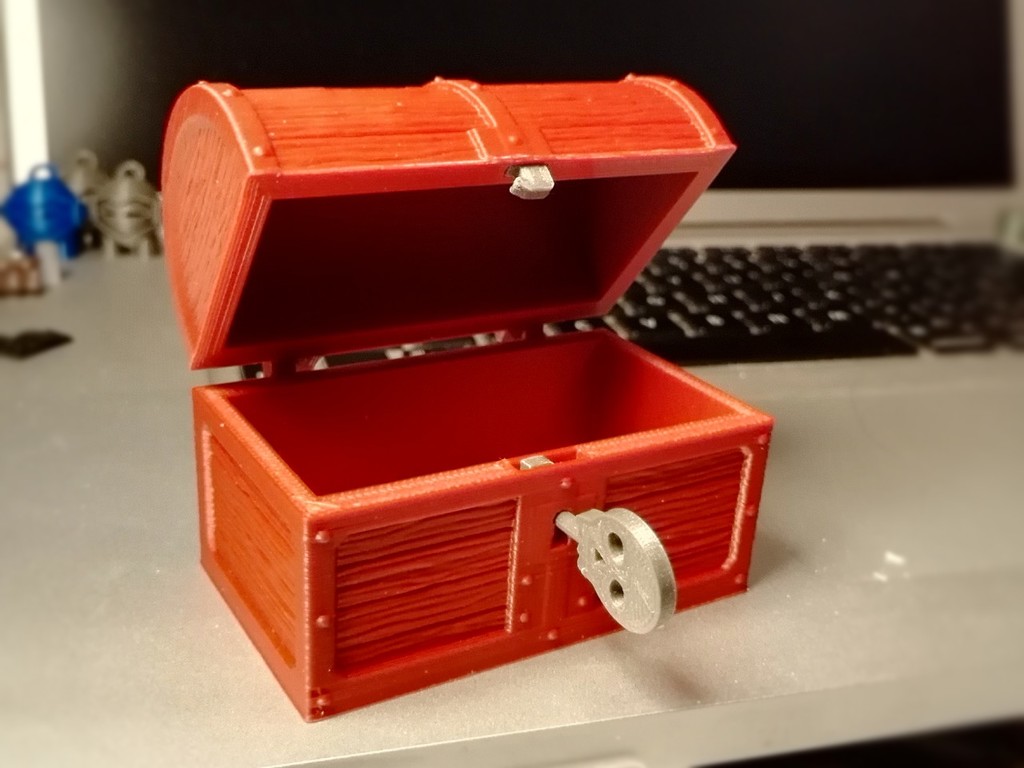
<p><strong>The main publishing location for this model is on GitHub. </strong><a href="https://github.com/DrLex0/print3D-hinged-locked-treasure-chest">Go to the GitHub page of this model</a> for the latest updates and more detailed instructions.</p><p>Go to my site for <a href="https://www.dr-lex.be/3d-printing/models.html">an overview of my other models</a>. Only a few of them are published on Printables.</p><p><i>(You might find this same model on Printables under a different name. This is the original. This is a remix of 2 models that currently are only on Thingiverse, see links below.)</i></p><p>My godson has some kind of obsession with collecting small things in small chests, and he wanted a chest with a working lock. So, for his next birthday I took <a href="https://www.thingiverse.com/thing:27635">athey's Small Hinged Treasure Chest</a> and applied the following upgrades:</p><ol><li>Added a lock mechanism. Of course it is the most basic lock possible with only one possible key and picking it is trivial, but it is functional.</li><li>Spiffed up the overall looks with extra details like the excellent wood texture from the <a href="https://www.thingiverse.com/thing:1585586">OpenForge Wooden Floors by devonjones</a>.</li><li>Made the hinge slightly beefier to reduce the risk of it breaking.</li></ol><p>To unlock the chest, rotate the key counter-clockwise and open the lid while keeping the key turned. The lock cannot be left in the open position, closing the chest automatically locks it. <a href="https://youtu.be/TNOXzw1voPk">This video demonstrates how the chest works</a>.</p><p>I made 4 different key designs, although the skull key might be the most popular with little (and big) children by far :)</p><p>Don't print this as one of the first things you have ever printed. At the least, print some accuracy and overhang tests and make sure they check out right.</p><h3>Recommended Print Settings</h3><p>Again, <a href="https://github.com/DrLex0/print3D-hinged-locked-treasure-chest#printing">more details are on the GitHub page</a>.</p><p>You should print the ‘easy’ lid model, this has slightly less usable inner volume but is much less prone to cause warping and prints failing.</p><p>If you're not yet 100% familiar with what your printer can handle, print the lower chest and lid separately. This is a lengthy print, and especially the lid can sometimes cause problems. You wouldn't want the entire print to fail due to a problem with only the lid.</p><p>Settings:</p><ul><li>0.2 mm layer height for the chest and lid,</li><li>0.1 mm layer height for the lock parts and keys,</li><li>2 perimeters for the overall model, although it is best to use 4 perimeters for the regions around the hinges (see below).</li><li>Infill doesn't matter much, I used 20%.</li><li>No supports needed, especially not if you print the ‘easy’ variant of the lid.</li></ul><p>When using PrusaSlicer, you can rely on modifiers to increase the number of perimeters around the regions of the hinges.</p><figure class="image image_resized" style="width:50%;"><img src="https://media.printables.com/media/prints/224713/rich_content/6a59c188-7654-40ea-8fa2-2bfad172620f/perimeters.png#%7B%22uuid%22%3A%22ac701148-fbec-4559-8fb7-2bb2c11ef8ca%22%2C%22w%22%3A1000%2C%22h%22%3A640%7D"></figure><p>3MF files and pre-sliced files for the i3 MK3S are provided, they include this perimeters tweak as well as some variable layer height to get a nicer finish on the lid. You can adjust the 3MF files to match your particular printer.</p><p>The regular size chest is 76×51×58 mm.</p><p>If you want to print the chest at 200% size, print the models with <strong>Size200</strong> prefix. These are already upscaled to 200% (meaning about 152×102×116 mm), and have been modified with reduced wall thickness and appropriate tolerances for the size. You may need to experiment with various infill settings for the ‘Size200-Latch_lower’ part to end up with something that has the right amount of springiness.</p><h3>Assembling</h3><p>Push the hinges into each other. (If things break while doing this, you will have problems with many other prints as well, and you need to work on improving layer adhesion.)</p><p>Make sure to remove any traces of a ‘squashed’ first layer (elephant's foot syndrome) on the latches and hole in the lid, through sanding or scraping with a knife. Try hooking the latches into each other with your hands: they shouldn't easily slip out of each other. If they get unhooked easily, try to adjust the hook shape with a knife.</p><p>If the latches are too thick to fit in the slots, sandpaper is your friend, or you could print them again scaled down slightly in the Z axis to make them thinner.</p><figure class="image image-style-align-center image_resized" style="width:50%;"><img src="https://media.printables.com/media/prints/224713/rich_content/e6da5d24-4f86-45e2-b2e5-36a7367605de/assembly.jpg#%7B%22uuid%22%3A%22d7a4505b-46a6-4c1b-bda2-bd7f8b226fa2%22%2C%22w%22%3A1280%2C%22h%22%3A960%7D"></figure><p>The lower latch (long piece) must be mounted in the chest with the hook pointing to the right, and the top perfectly flush with the edge (simply pushing it in on a flat table should do the trick). If you cannot push it deep enough, scrape off some material from the bottom end.</p><p>The latch in the lid must have its hook pointing to the left, and ideally the edges of the square part should be flush with the bottom edge of the lid. If the lock doesn't catch, you either need to pull this latch out again by a fraction of a millimeter, or shave off a bit of material with an X-acto knife.</p><figure class="image image-style-align-center image_resized" style="width:50%;"><img src="https://media.printables.com/media/prints/224713/rich_content/6280d7fc-d9c8-4d80-befa-fc29c7bd0d1e/assembled.jpg#%7B%22uuid%22%3A%2207cb7bfc-50a0-4cab-9dbf-17c57b819204%22%2C%22w%22%3A1024%2C%22h%22%3A768%7D"></figure><p>If the lid doesn't close easily due to the latch bumping against the top edge of the chest, try sanding or scraping a bit of material from the front edge of the latch.</p><p>When printed accurately at the original scale of the model, the parts should fit tightly enough that no glue is required. If they are too loose, apply either glue or strips of tape as shown in the image below.<br>The advantage of not using glue is that the latches will pop out of their sockets if the chest is pulled open with excessive force, instead of breaking and leaving bits behind that are impossible to repair. In other words, you need to make a choice between a chest that is harder to open without a key but will be broken if someone does manage to open it; or a chest that is easier to open but can be repaired if needed. After all this is just a toy, not a secure storage device!</p><figure class="image image-style-align-center image_resized" style="width:50%;"><img src="https://media.printables.com/media/prints/224713/rich_content/7ac12838-d04e-402c-8717-82887d232aa0/glue.png#%7B%22uuid%22%3A%223c20c85d-d835-451a-96fe-89641bbe1e0d%22%2C%22w%22%3A247%2C%22h%22%3A640%7D"></figure>
With this file you will be able to print Hinged Chest with Working Lock and Wood Texture with your 3D printer. Click on the button and save the file on your computer to work, edit or customize your design. You can also find more 3D designs for printers on Hinged Chest with Working Lock and Wood Texture.