Hinges for 3D Models
cults3d
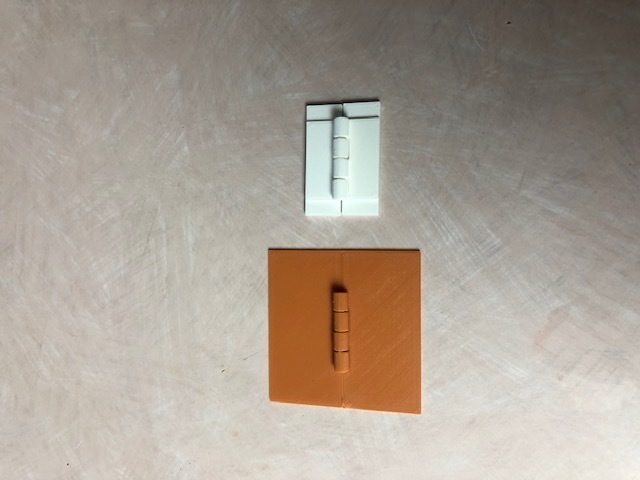
Butt and Built-in hinges 6/23/2020 Designed by JWizard Thank you for choosing JWizard’s 3D Models and Designs! This package contain’s JWizard’s Butt and Built-in hinge designs. Included in this package are the Openscad source code that can be modified to your needs. Our hinges differ from other hinges in that they were not design to screw into wood. You can add holes to the butt hinge to screw it into wood if you like. However these hinges were designed to be fused into 3D projects that must open and close. The hinge designs include callable Openscad modules that create butt and built-in hinges that you can add to your project. A butt hinge shows the mounting hardware on the outside. You will see the entire hinge. The built-in hinge only shows the cylinder since all of the mounting hardware is internal to the designed piece. These hinges are designed using JWizard’s custom hinge routines. An example usage of the built-in hinge is the Eleni’s Hinge Box project which uses Hinge-builtin-3.scad. Eleni’s Hinge Box is also available for download. A photo was included to illustrate the usage of the hinge. Additional photos have been presented that illustrate both butt and built-in hinges in several sizes. The following Files are included: Hinge-builtin-2.scad Hinge-builtin-3.scad (same has builtin-2 but with deeper mounts) Hinge-butt.scad How to use JWizard’s Butt and Built-in hinges in your project: Note: Both butt and built-in hinges include a sample function call. If you want to see the function call, you can remove the comments in the module. When using these hinge modules in your project, you must comment out the sample call. Copy the Openscad modules to the same directory as your project Include the module you want to use in your project like the following: include <./hinge-builtin-2.scad>; or include<./hinge-builtin-3.scad>; or include<./hinge-butt.scad>; Save and name your project before calling the modules. Before the call you can rotate and translate the hinge(s) into the correct location as desired. Translate([ ]) Rotate([]) Then you call the module in your project replacing the parameters x,y and z with your values. hinge(x,y,z); The parameters x,y and z are the magnification. We have created hinges with values x,y,z=1 and x,y,z=2. Decimal values can be used if desired. Hinges with magnification of x,y,z=1 are tiny. Included in the photos is a tiny white hinge using magnification of x,y,z=1. Eleni’s hinge box was created with x,y,z=2 magnification. Placement of the hinge on a box: If you are going to create a box like Eleni’s Hinge Box that uses built-in hinges, here is how we inserted the hinges: Create a cube Hollow out the cube Cut the cube into 2 parts with a .25mm gap between them. Cut rectangle(s) through the design where you want to insert the hinge(s) into your design. You should be able to look through the rectangle(s). The rectangle must be slightly larger than the hinge. This will allow the hinge to move freely when attached to your design. Put the hinge(s) into the rectangle(s). There should be a small a gap around the hinge within the rectangle. Connecting the hinge to your design. Create a rectangle that can be placed over each pair of hinge mounts covering the rectangle openings. This step attaches the hinge mounts to your project! The rectangle(s) should only touch two of the mounts on the side of the hinge and the rest of your design moving away from the cylinder. The rectangle should be level with your design so that you will only see the cylinder of the hinge. The rectangle(s) should be close to the cylinder leaving a small gap, but they should not touch the cylinder or they will not move freely. Materials used to create model in photo: 3D Solutech Orange PLA filament Prusa White filament Prusa Silver filament Idea’s: This design will work well with many size modifications uniformly on the x, y and z axis’s. If you increase the size of the x (x-axis) without changing the y and z axis, this will spread out the hinge and this is undesirable. This will leave gaps in your hinge cylinder. You can experiment changing the x,y and z function call parameters to see what works best for your project. You may want to adjust the depth of the built-in hinge mount points so that they align properly with your design. The hinge-builtin-2scad and hinge-builtin-3.scad files are commented so you can identify the code for the mount points. The hinge-builtin-3.scad file has greater mount point depth than the hinge-builtin-2.scad code. The butted hinge only needs to make contact with your design. You can adjust the height as you deem appropriate. Choose the appropriate hinge module for your project. Conclusion: Let us know how you like JWizard’s Butt and Built-in Hinges. Please post your makes and share your comments! Follow us so that you will be notified when we release our next 3D model or design. Thank you for your support, JWizard
With this file you will be able to print Hinges for 3D Models with your 3D printer. Click on the button and save the file on your computer to work, edit or customize your design. You can also find more 3D designs for printers on Hinges for 3D Models.