HL2 The Borealis (Aperture's Healy-class Icebreaker)
prusaprinters
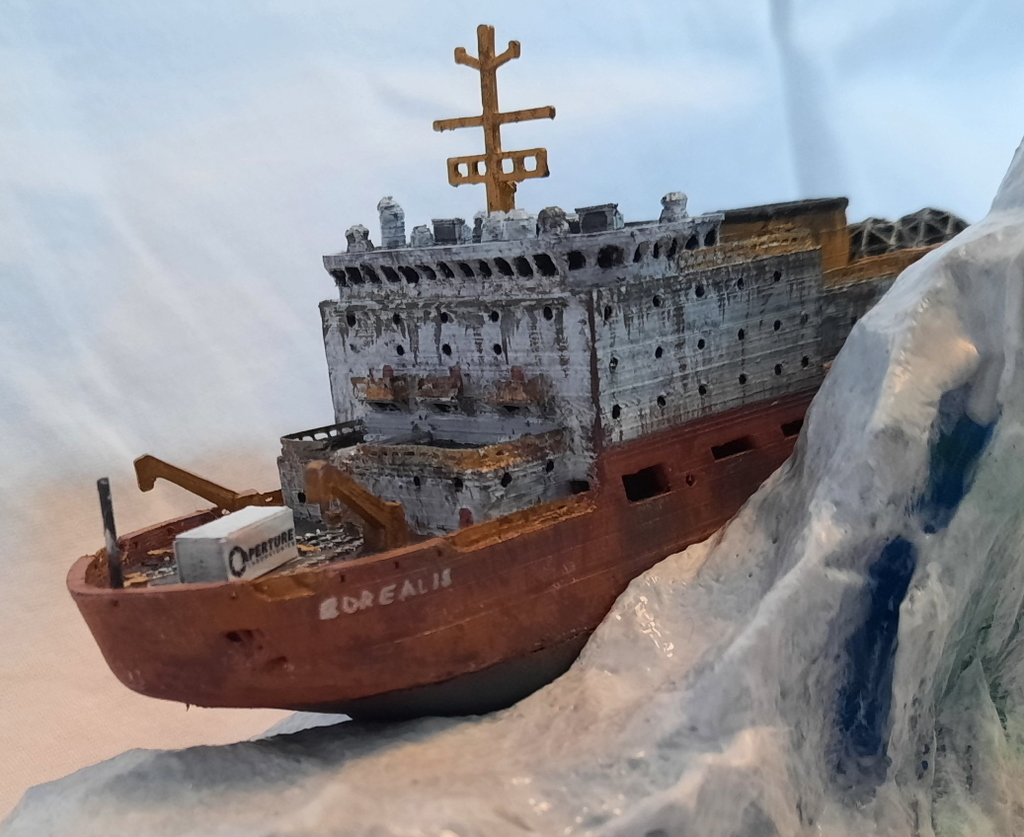
<blockquote><p><i>"It's... </i><a href="https://half-life.fandom.com/wiki/Borealis"><i>the Borealis</i></a><i>?"</i></p><p><i>"Good god."</i></p><p><i>"What? The Borealis? It's real?"</i></p></blockquote><p>Well it sure is now.</p><p>More exactly the version seen in Half Life 2 Episode 2, which is heavily based on the USCGC Healy icebreaker instead of the Polar-class ones.</p><p>I suppose it's not a too far fetched idea that Aperture acquired the ship at some point and made extensive modifications to it for the teleportation experiment. Since we never see the rear of the ship, nor was it ever defined by Valve, I've extrapolated what could've possibly been there. That includes two smaller Enrichment Spheres on top to house two black holes and an Aperture themed landing pad at the end, along with some brand containers seen on deck and a different crane layout.</p><p>And of course the ice mountain it ended up inside.</p><p>The rough scale of the model at default size is about 1:620.</p><p><a href="https://imgur.com/a/ydam4ty">Imgur album with more project photos.</a></p><p>I've also used a few other models to aid in the making:</p><ul><li><a href="https://www.thingiverse.com/thing:2641548">Small compressed Titanic and scale example of the iceberg</a> as a base to work from for the terrain</li><li><a href="https://www.thingiverse.com/thing:1561981">20ft shipping container model</a> as the Aperture Laboratories containers</li><li><a href="https://www.thingiverse.com/thing:3997246">Boat Propeller for 8 mm diameter shaft</a> as the two ship props</li></ul><h3>Print Settings</h3><p><strong>Rafts:</strong></p><p>No</p><p><strong>Supports: </strong></p><p>No</p><p><strong>Resolution:</strong></p><p>Various</p><p><strong>Infill: </strong></p><p>7</p><p><strong>Notes:</strong></p><p>Printed everything at 0.12, except the propellers at 0.08, guardrails at 0.2 and the terrain at 0.32.</p><p>I've exported several options for printing:</p><h4>borealis_extras_ship_and_terrain</h4><p>The entire thing, more as a reference.</p><h4>borealis_*</h4><p>The<i>intended</i> way to print it, with all parts printing supportless and most in best strength configuration on FDM.</p><ul><li>Terrain<ul><li>borealis_iceterrain</li></ul></li><li>Above waterline<ul><li>borealis_mainbody (ship hull without details)</li><li>borealis_guardrail (print multiples of these, cut them up and glue onto the ledges around the ship)</li><li>borealis_gantrycranes (add the large one to the very rear of the ship and two to the side walkway below the funnel)</li><li>borealis_cranes (two on the front deck two on the rear deck)</li><li>borealis_mast (glue on top of the bridge)</li></ul></li><li>Below waterline<ul><li>borealis_keel</li><li>borealis_propellers (<strong>print with a brim</strong>, glue to borealis_keel behind rudder)</li></ul></li></ul><h4>borealis_extras_ship</h4><p>The ship with full details if your printer can handle it somehow.</p><p>Print separately:</p><ul><li>borealis_iceterrain</li></ul><h4>borealis_extras_ship_no_keel</h4><p>Same as above but without the keel, for suportless printing at least on the main hull level. Details are on but will need supports and will likely be very fragile.</p><p>Print separately:</p><ul><li>borealis_keel</li><li>borealis_iceterrain</li></ul><h3>Post-Printing</h3><p><strong>Ice Terrain</strong></p><p>Printing out the terrain with white filament works well enough, but I've attempted an interesting technique which turned out really well, and it goes a bit like this:</p><ul><li>mix wood glue with a dark cyan shade of paint</li><li>apply with brush onto terrain, making stabs to get the sharp texture</li><li>wait till dry, then repeat with lighter tones (I made 4 coats total: dark blue, light blue, gray, white)</li><li>after the last coat dries paint the white parts with white paint directly to have them appear more matte (snow isn't glossy)</li></ul><p>And that's pretty much it.</p><p><strong>Lighting</strong></p><p>So I didn't really design the model with lighting in mind (to have it print as a shell I mean), but was something I attempted afterwards.</p><p>Anyhow the process was along the lines of this:</p><ul><li>use black PLA as it has lots of pigment and doesn't let light through as easily</li><li>print the main body and keel sections without bottom layers (or without infill and replace it with supports if your slicer allows that)</li><li>clear out infill</li><li>paint both sides silver, as the reflectivity tends to stop light bleed</li><li>paint and weathering the pieces separately</li><li>drill out holes (or in the case of square ones, get a square file, heat it up and melt the opening, I don't see how one can cut out that shape at this scale otherwise)</li><li>add hot glue to the inside to diffuse the light</li><li>place led lights behind the glue</li></ul><p>A better method would involve using optic fiber filaments to get best results with the round windows, but that's far more tedious.</p><p><strong>Decals</strong></p><p>There is an enclosed decals.pdf which contains an example of the Aperture Laboratories logo for the containers.</p><p>I would suggest printing it on A4 cardstock, then gluing it to the containers with superglue. There are a few sizes of decals in case any of you decides to print in other scales or print on other paper sizes.</p>
With this file you will be able to print HL2 The Borealis (Aperture's Healy-class Icebreaker) with your 3D printer. Click on the button and save the file on your computer to work, edit or customize your design. You can also find more 3D designs for printers on HL2 The Borealis (Aperture's Healy-class Icebreaker).