Ho/Oo LNER J50 Locomotive / 1942 Thomas
prusaprinters
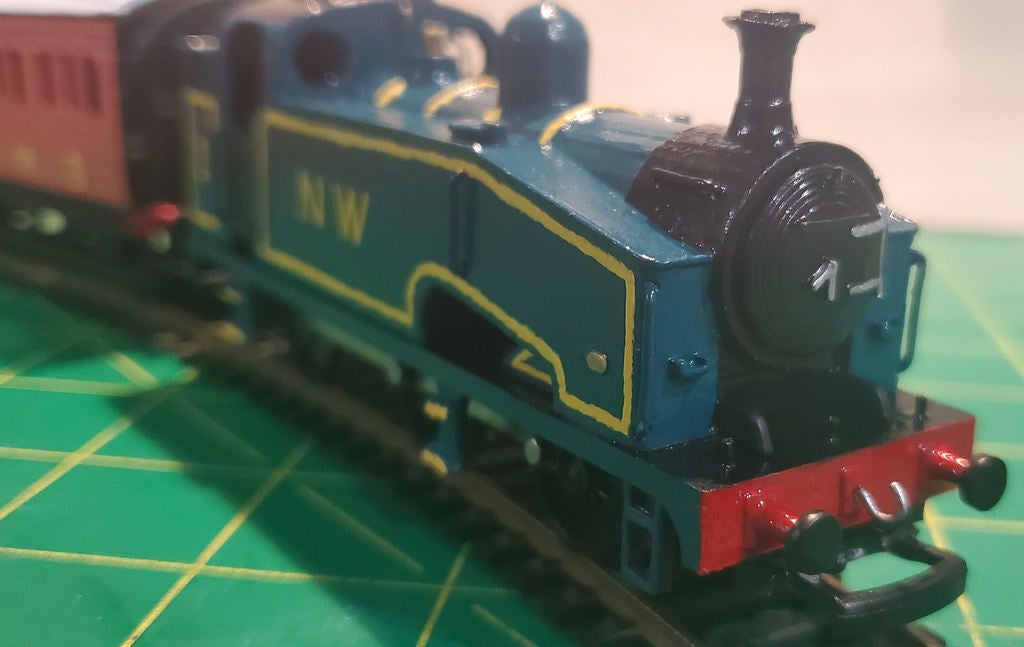
<p>This project started with me wanting to make an interpretation of the Rev.Awdrys 1942 Thomas he made for his son Chrisitfer. this would be the basis for the engine that would become Thomas in the Railway Series. the toy had a striking resemblance to an LNER J50, it was when the second book in the RWS Thomas The Tank Engine he would become an E2 Locomotive.</p> <p>The smokebox door is removable, if you want to have a face on it you can do what I did. I used the face from Agepbiz's Thomas model on Thingiverse ( <a href="https://www.thingiverse.com/thing:2331999">https://www.thingiverse.com/thing:2331999</a> ), Please look at his model it's very well made and all of his designs are very interesting.</p> <p>the coach is a custom 3d printed piece based on the Hornby 4 wheel coach. I will NOT upload my designer for it because I took the design straight from the model. if I change my mind I will add a link. if you want to make your own, please order from Hornby or your local model retailer if they have them in the stalk.</p> <p>the wagon is by Cameo. they made it for their son when they got a Ho/Oo Thomas. it really nice once you get it right. mutch more of a kit build with everything printed 2D on the print bed. ( <a href="https://www.thingiverse.com/thing:324771">https://www.thingiverse.com/thing:324771</a> )</p> <p>if you don't have a Duck chassy go online and check <a href="https://www.amazon.com?linkCode=ll2&tag=thingiverse09-20&linkId=e4759bff1fa9a55a0f897d801ce2d765&language=en_US&ref_=as_li_ss_tl"> </a><a href="https://www.amazon.com?linkCode=ll2&tag=thingiverse09-20&linkId=e4759bff1fa9a55a0f897d801ce2d765&language=en_US&ref_=as_li_ss_tl"> Amazon</a>, eBay, Bachmann, or your local retailer.<br/> I ordered my chassy from Bachmann's spare parts. I also recommend removing the eye mech.</p> <h3> Print Settings</h3> <p><strong>Printer Brand:</strong></p> <p>Prusa</p> <p><strong>Printer:</strong></p> <p>i3 MK3 MMU 2</p> <p><strong>Rafts:</strong></p> <p>No</p> <p><strong>Supports:</strong></p> <p>Yes</p> <p><strong>Resolution:</strong></p> <p>0.1 or less</p> <p><strong>Infill:</strong></p> <p>less then 10%</p> <p><strong>Notes:</strong></p> <p>Print every part on the flattest surface, except the face. print the face at a 45 deg angle, there should be a surface at this angle to use.</p> <p>add support blockers to the outside to save time and material. you primarily need it on the inside of the model, steps on the footplate, and the smokebox/face.</p> <p>if you designed extra detailing feel free to set it as a remix to share it with others who wish to print a more accurate model.</p> <h3> Post-Printing</h3> <p><strong>assembly</strong></p> <p>after you print the parts you will need to remove the supports.</p> <p>you will notice that there are holes all over the model. these are for paper clips that will act as handrails, lamp irons, whistles, safety valves, and general support during assembly.</p> <p>as you cut the general support pegs from the paper clips make sure that about 1/8 in or 3-5mm. this will help you put the top part on correctly. the rest of the lengths is up to you.</p> <p>for the safety valves, I used some small finishing nails I had with some track nails. you can try using paperclips if you don't have nails that will work.</p> <p>the whistle I recommend you take one end of the paperclip and bend it on itself. this is to give it some thickness, then bend it to a 90deg angle. it should look like a flat whistle from head-on.</p> <p>how you finish the model is up to you. you can smooth it out add the details then paint, or just add the details and paint.</p> <h3> How I Designed This</h3> <p><strong>Designing</strong></p> <p>I used side views of the J50 with a side view of ducks chassy. I traced the image of the J50 and extruded it. then made more sketches and extruded repeat.</p> <p>my first one was too thin, the next was too fat, the 3rd was much better and closer. that's when I started adding details to give some life to the model.</p> <p>I made a painted version of it. shortly after I made another that was better painted and prepared beforehand. I highly recommend applying primer or filler putty then sand it smooth.</p> <p>once your done painting your model, add wights to help give it wight. I recommend 4 7Gm wights to improve performance and capacity to pull/push. simular with any rolling stock you print just with 2 7Gm wights.</p> Category: Hobby
With this file you will be able to print Ho/Oo LNER J50 Locomotive / 1942 Thomas with your 3D printer. Click on the button and save the file on your computer to work, edit or customize your design. You can also find more 3D designs for printers on Ho/Oo LNER J50 Locomotive / 1942 Thomas.