Hobbyking / Starmax Piper J3 Cub 1400mm Replacement Parts
thingiverse
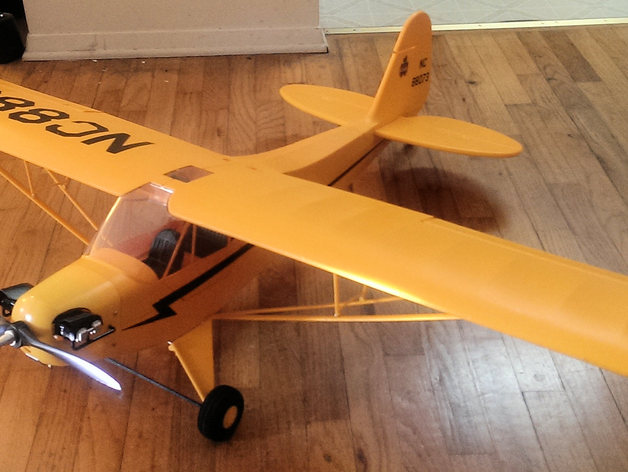
This model gets very good reviews for its flight characteristics but it has a few weak points. As I built it, I designed some parts to address these areas. Then, as I crashed it, I also added some replacement parts. These parts should also work for the L-4 Grasshopper sold by Hobbyking as it is the same model with a different paint job. If you don't own a printer, you can upload the files to me via 3Dhubs and I can print them and ship them to you: https://www.3dhubs.com/trenton/hubs/cbl. (Or you can choose from other printers in your area on 3Dhubs and save on shipping.) My replacement and improvement pack consists of: Landing Gear Left, Right, and Cover - The main parts of the landing gear are two triangular pieces of thin plastic. They will break. I've made reinforced replacements for them. Landing Gear Cross Brace - If you are not worried about the scale look, you can print this using Ninjaflex Semiflex and string it between the two axles to act like a giant rubber band / shock absorber. It is designed to replace all the fiddly little springs and flimsy plastic parts which look like they will break if you sneeze on them. Landing Gear Hold Down Plate - The front of the landing gear, which consists of the metal bar that also serves as the axles, is "attached" to the plane by pressing it into a plastic slot. It is likely that during a rough or uneven landing, this will come out and the landing gear will fold backward and shear off, probably ripping off your wing supports along the way. This part and three small screws should save you from that. Landing Gear Mounting Plate - This is the plastic part that is embedded in the foam underbelly to which the landing gear is mounted. There is no reason to use my version over the stock, it only serves as a replacement if yours is damaged. My version is identical to stock except for the addition of the three holes used for mounting the Landing Gear Hold Down Plate. Elevator Bridge Stiffener - The elevator is just foam, and the control horn attaches to the right side of the elevator. The skinny bit of foam that connects the left and right sides of the elevator (the bridge) is too flexible, so the right side is going to actuate more than the left. I'm no aerospace engineer, but I think that is a bad thing. Glue this stiffener to the under side of the elevator and you won't have to find out how bad. Battery Cover - The stock one is probably fine, but I chiseled away some of the height of the battery compartment in order for the battery to actually fit, which left the front of the cover (the part held by a tab) too loose. If you are in a similar pickle, this thing is for you. Wing Latch - This is the clear plastic part that gets sandwiched between the two wing halves. It forms the top of the cockpit and the sun roof. Its main function in the model is to provide a tab that fits into a slot in the front of the cockpit in order to hold down the front of the wing. My version should be more or less identical to stock and is only needed if yours is broken. Wing Struts - The plastic pieces that brace the main wing. I broke up the main strut on each side into three pieces so they will fit on most print beds. Skis! - These worked great on icy-crusted snow. However, they may be too small for deep, fluffy snow. Thanks to the built-in leaf springs, they are designed to be used without the need for external springs to keep them level during flight. Hub Cap / Wheel Nut - You know, the plastic part that holds the wheel on. I gave up style for functionality on this one. Instead of saying "CUB" on it, I made it 2mm thicker with a "+" slot on it so that you can use a flat-head screwdriver or even a coin to tighten it. Hub Cap Cub - A more stock rendition of the hub cap with the "CUB" text on it. Wing Strut Anchor - The plastic part that gets glued to the underside of the main wing to which the wing struts are attached. If that doesn't make sense, just look at the part and you'll get it :) These should be pretty close to stock except I did not bother with the slight curve to the top surface. Tail Strut Anchor - Same thing as the Wing Strut Anchor, only smaller. These go on the horizontal and vertical wings as mounting points for the springs that supposedly reinforce this section. These are pretty close to stock except I beefed up the loop in the hopes that this will actually be printable. I haven't tried it yet. Steering Holder - This clips on to the bottom of the rudder to steer the rear wheel. Mine should be pretty near to stock. EDIT 1/17/2016 Renamed "Landing Gear Mounting Plate" to "Landing Gear Hold Down Plate" EDIT 1/18/2016 Added "Landing Gear Mounting Plate" and "Wing Latch" EDIT 1/19/2016 Added "Landing Gear Left, Right, and Cover" EDIT 1/21/2016 Added "Landing Gear Cover with Mount Right" and "Landing Gear Cover with Mount Left" EDIT 1/23/2016 Added "Wing Strut Left (A)", "Wing Strut Left (B)", "Wing Strut Left (C)", "Wing Strut Inclined Left", "Wing Strut Right (A)", "Wing Strut Right (B)", "Wing Strut Right (C)", "Wing Strut Inclined Right" Modified "Landing Gear Mounting Plate". Increased depth of landing gear / strut mounting area by 0.4mm to match original. EDIT 1/29/2016 Added "Ski Main Left", "Ski Main Right", and "Ski Tail". EDIT 2/5/2016 Added "Hub Cap", "Hub Cap Cub", and "Wing Strut Anchor" EDIT 2/13/2016 Added "Tail Strut Anchor" and "Steering Holder" Re-uploaded "Ski Tail" with the correct orientation for printing (on its side). Printing and Installation Landing Gear Left, Right, and Cover Print these fairly solid. You will need one Left, one Right, and two Covers. If you don't need the mounts for the flimsy springs of the stock suspension, then the plain cover works for both sides if you flip it over. If you are going for the scale look and need the mounts, you will need to print one of each "Landing Gear Cover with Mount". After printing, install the left and right sides into the wire frame just like the stock parts. There is no need to glue these - simply install the cover with three M3 x 6 screws (or shorter) and Bob is your uncle. Landing Gear Cross Brace Print in Ninjaflex Semiflex. You will probably need to rotate by 45 degrees to fit on print bed. Print it solid, and I suggest a minimum of 1.5mm of shell so the brace prints as long continuous rubber "threads". In other words, cross hatching would be weaker. To install, simply remove the wheels, slide onto one axle, then stretch it and slide over the other axle. Landing Gear Hold Down Plate Print solid. ABS would probably be best. Put it in place. The side with the bump goes down over the bar to keep it down inside the channel. Mark the locations of the holes. Drill slightly smaller holes than the screws you intend to use. I used 3mm button heads. Landing Gear Mounting Plate Print this solid. In ABS, mine weighed just slightly less than stock. You will need to use support. To install, simply glue in place. White Gorilla Glue worked for me. Elevator Bridge Stiffener Print solid, ABS would probably be best. Remove the rudder and elevator. Glue the stiffener to the underside of the elevator. White Gorilla Glue works like a champ. Clamp it in place as it dries. Be careful to protect the top side of the elevator from the clamp. I used binder clips and they left grooves. Once dry, put it all back together. Battery Cover Print this as light as you dare, preferably in ABS. You will need support (for the tab). I used a 0.5mm shell thickness (one layer), a top/bottom thickness of 1mm, and a fill density of 10%. After it is printed, trial fit it. If it works for you, remove the magnet from the old foam cover and glue it in place on the new cover. It's best to clamp it in place as it dries. I used White Gorilla Glue for this, but just about anything would work. Wing Latch Print solid. You will probably want to use support unless you want to try to bridge the top. Install just like the original. Wing Struts You will need to print parts A, B, C, and Inclined for each side. Parts A, B,and C will need to be glued together in some way, either by traditional glues, epoxies, or acetone if you print with ABS, which I recommend. You will want to print these pretty solid. I would use support for part A. You may also find it beneficial to have your fan turn on for the last layers of all the parts because they have some small details (like loops) that will become blobs without it. I wouldn't use the fan all the time, however, as it will make the parts want to warp. Skis Print all three skis on their sides with support. At least two shells is recommended, but you can use about 10% fill. All three are bolt-on replacements for the stock wheels. As always with 3D printing, it might be necessary to drill the mounting holes out bigger after printing. Hub Cap / Wheel Nut Print solid, no support needed. Since it is a small part, I suggest printing in a lower temperature with the fan on. You might also need to add a brim to get good adhesion to the bed. I made mine using PET since I found ABS to be too soft so that the slots would get easily mangled by the screwdriver. You can probably use PLA too in a pinch. Wing Strut Anchor Print solid with support. I haven't printed these yet. I think ABS would be fine. You will probably have to have your fan kick on for the top part (mounting tabs). I used White Gorilla Glue to mount my originals, which I have yet to have to replace (knock on wood). Tail Strut Anchor Print solid with support. I haven't printed these yet. I think ABS would be fine. You will probably have to have your fan kick on for the top part (mounting loop). I used White Gorilla Glue to mount my originals, which I have yet to have to replace (knock on wood). Steering Holder Print solid with no support. Install just like stock.
With this file you will be able to print Hobbyking / Starmax Piper J3 Cub 1400mm Replacement Parts with your 3D printer. Click on the button and save the file on your computer to work, edit or customize your design. You can also find more 3D designs for printers on Hobbyking / Starmax Piper J3 Cub 1400mm Replacement Parts.