Hood for BCN3D Sigma R17
thingiverse
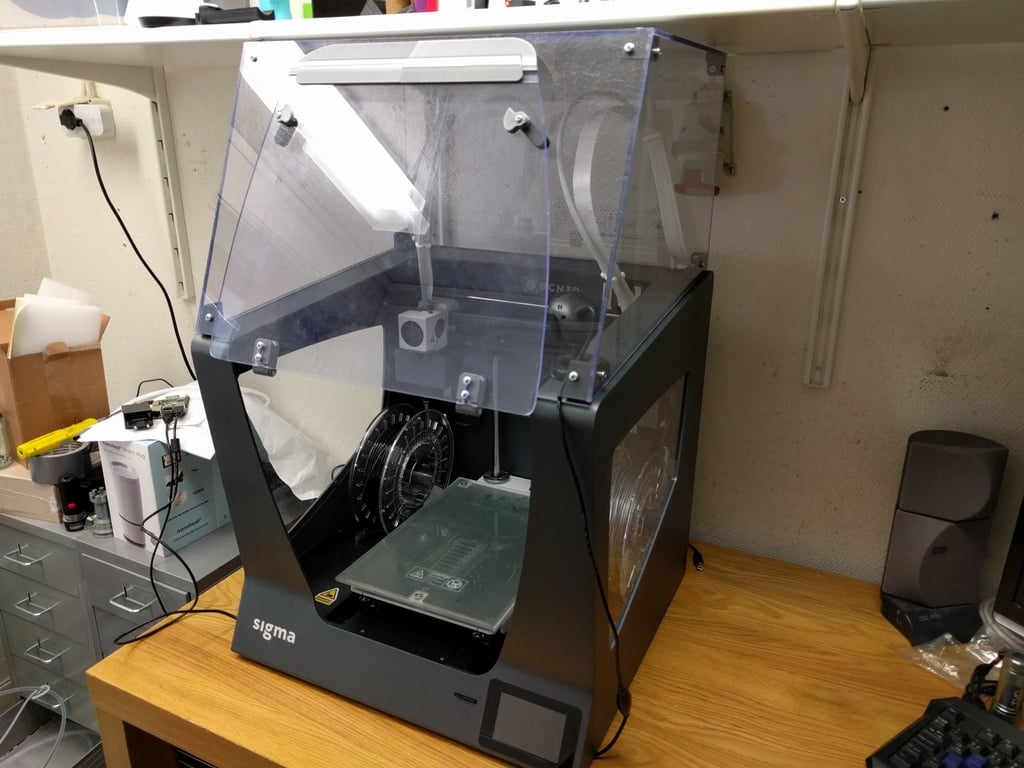
ATTENTION!!!I just saw that I included the wrong drawings in my first update. I made two versions of this and the first version was too low in my opinion. Due to this I made a version 2. I by accident attached version 1 here in the beginning. Don't build after those if you downloaded that. Now I have attached the correct drawings for Version 2. Check, so you have the VER2 drawings before you begin the build. Regarding the 3D models I shall be the correct version 2 from the beginning. It is OK to build after the drawings that is added now. I have double checked them with my hood. If you have any issues during this build Write a comment and I help you as fast as I can. Any feedback is always appreciated! :-) Im really sorry for the inconveniance!! This is a Hood for the BCN3D Sigma R17 printer. Included is Drawings for the plastic glas. A sheet of 1200 x 800 x 4 mm is enough for one hood. http://www.biltema.se/sv/Bygg/Ovrigt/Plastglas-2000030030/ For the door I have made a drawing that can be printed on a A3 paper and it will be scale 1:1. Print two of this and cut it out with a scissor and tape the two parts together. Then you can use it draw the out lines on the plastic glas. ATTENTION!: Wait to drill the holes for the hinges on the door until you have assembled the whole hood. The heigth may need to be adjusted to get the best fit of the door. I had to remove about 4-5mm in top of the door to get the best fit. When it comes to the drawings. Yes they are ugly. I have not spent any time to make them good looking sort to say. But all the important measurements are there. Measurements are done from edges that I think is easy to measure from. I recommend to cut the part from the sheet before marking the holes. Use a pointy thing to mark the spot where the hole shall be. This makes it much easier to drill. Use a regular SHARP 4.5mm drill to make the hole. Use a jig saw to cut out the parts. Use a blade that cut both when it goes up and down then it will be really nice cuts. DO NOT REMOVE the protective plastic that is on both sides of the plastic sheet until you have drilled and cut out the part. In other case you will scratch the surface. When it comes to the "side plate" they look the same so it is the same drawing for both left and right side. Following parts do you need to print two pieces of. Corner bracket_ver2 Hinge part1_ Hinge part 2 Material to print the brackets in: Use whatever material you like. :-) I used PLA. For the brackets with "bottom bracket" in the beginning of the file name there is a small round cutout underneath. In this it shall be a rubber like foot. See link for picture. https://www.jula.se/catalog/bygg-och-farg/beslag/inredningsbeslag/skap-laddampare/damplinser-319069/ Screws that are used is M4 10mm long screws and nuts. All screws are the same length. For the locking parts two self threading screws is used. Diameter 2,9mm and a length of 15mm. To handle the curved surface in the lower part of the door I have made a printed part that is just squeezed on to the lover part of the door. It is in two parts so it can fit on the print bed. No glue is needed. To lock the door there is a left and right locking part. It is made of two parts that are screwd together with one screw. Check that you have them on correct side before screwing them together or they won't close correct. Left side is closing counter clockwise and right side closes clockwise. When it is closed you shall be able to read the logo THD on both sides. I hope that you all think this is fun to build! :-)
With this file you will be able to print Hood for BCN3D Sigma R17 with your 3D printer. Click on the button and save the file on your computer to work, edit or customize your design. You can also find more 3D designs for printers on Hood for BCN3D Sigma R17.