Horizontal expansion calibration tool
thingiverse
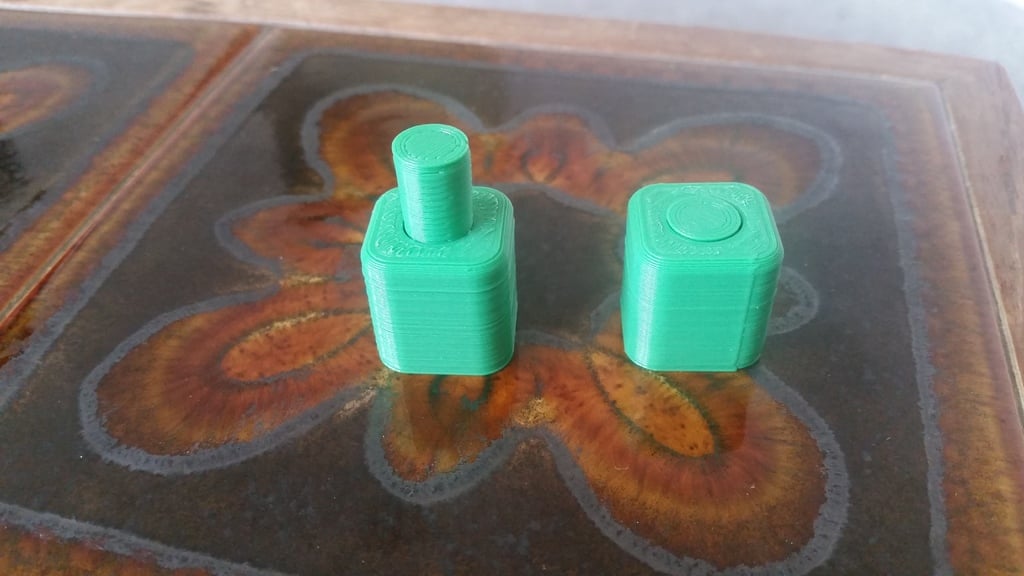
In an ideal world, a 10 mm hole and a 10 mm post would fit together perfectly. However, in reality, some level of inaccuracy is always present due to horizontal expansion (HE) - the plastic expanding laterally during extrusion causes the wall to become slightly thicker than intended. You can correct for this by using the "Horizontal Expansion" setting under "Shell" in Cura. This print was designed to help determine what value should be set. If your printer delivers a positive HE, you'll want to set a negative one to cancel it out, and vice versa. The post tapers from 10 mm to 9 mm over a length of 20 mm, with 1 mm gradations along the way (barely visible in the photo on the right). The block contains a hole that fits perfectly around the post. Assuming your printer's HE is between -0.25 and 0.25 mm, and the X and Y axes are consistent, print both parts and insert the small end of the post into the large end of the hole. If there's "flash" around the base where it was stuck to the build plate, you can scrape it off (only relevant for HE < 0). The post should fit evenly if not, you may need to tune your surface quality first or sand them a bit. If the post fits perfectly, you have zero horizontal expansion. If it goes partway in, you have positive HE; if it goes through and sticks out the other side, you have negative HE. Note that "flash" can catch on the edge and keep it from going through. To quantify the HE: First, how far does the post go in? In my case, it went 8 mm (12 mm still sticking out - see photo, left side). Considering the small end of the post, we have a nominally 9 mm circle. It reached a depth where the hole size is nominally 40% from 10 mm down to 9 mm, so 9.6 mm. But the post touches the sides, so altogether we have 0.6 mm that's not in the design file. Now consider a cross-section after splitting the print in half from the top. HE affects both sides of the post and hole - four places total. So the printer is producing 0.15 mm (0.6 mm / 4) of HE on every wall. The hole closes in by 0.15 mm on each side, making a 9.6 mm hole actually 9.3 mm. The post expands by 0.15 mm on each side, making a 9 mm post really 9.3 mm. If your post goes through and sticks out the other side, your printer is producing negative HE, and you can do the same calculations based on where the nominally 10 mm end winds up. In my case, setting "Horizontal Expansion" in Cura to -0.15 mm to compensate produced the print on the right, where the post fits almost perfectly into the hole. Note that if you change settings (filament, temperature, etc), your printer's HE value may also change, so you'll want to repeat this calibration with new settings.
With this file you will be able to print Horizontal expansion calibration tool with your 3D printer. Click on the button and save the file on your computer to work, edit or customize your design. You can also find more 3D designs for printers on Horizontal expansion calibration tool.