Hot End Enclosure, for Reach3D Printer
thingiverse
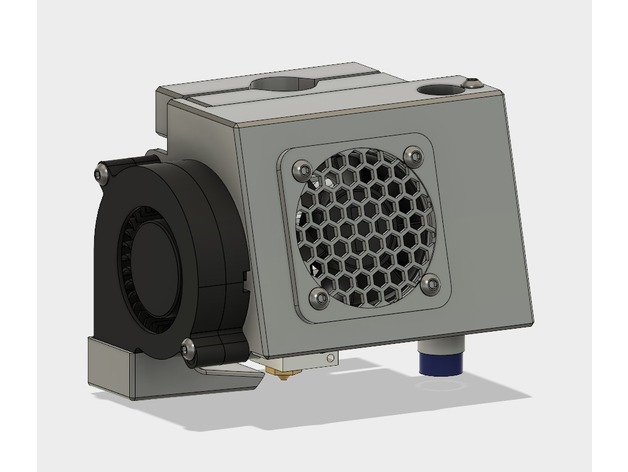
Hot End Enclosure for the Reach3D Printer, by Ashaman This enclosure will make your Reach3D Printer look great, and it helps with cooling your hot end and your prints! It also works with all of the following configurations: stock hot end, stock proximity sensor, E3D v6 hot end, BLTouch and 50x15mm radial fan. IMPORTANT: not all parts has been tested properly, and multiple people has tested different configurations. Creator has not tested all parts. Stock configuration BOM: Printed parts: Hot End Enclosure Main Body.stl Standard Hot End Clamp with Nutinsert.stl Fan Shroud for Stock Heatbreak.stl Proximity Sensor Block.stl Fan Guard Honeycomb.stl or Fan Guard Circles.stl Hardware: 1 pcs. M3x20 and M3 nut (clamping sensor) 1 pcs. M3x40, M3 locknut and M3 normal nut (adjusting sensor height) 2 pcs. M3x20 and 2pcs. M3 nuts (attaching hot end clamp to main enclosure body) 2 pcs. M5 nuts (for the hot end clamp, attaching to the carriage) 4 pcs. M3x25 (attaching fan duct and fan guard) 2 pcs. M3x20 and 2 pcs, M3 nuts (radial fan) BLTouch configuration BOM: Printed parts: Hot End Enclosure Main Body.stl Standard Hot End Clamp with Nutinsert.stl Fan Shroud for Stock Heatbreak.stl BLTouch block.stl Fan Guard Honeycomb.stl or Fan Guard Circles.stl Hardware: 2 pcs. M3x10 and 2 pcs.M3 nuts (attaching BLTouch to printed block) 1 pcs. M3x40, M3 locknut and M3 normal nut (adjusting sensor height) 2 pcs. M3x20 and 2pcs. M3 nuts (attaching hot end clamp to main enclosure body) 2 pcs. M5 nuts (for the hot end clamp, attaching to the carriage) 4 pcs. M3x25 (attaching fan duct and fan guard) 2 pcs. M3x20 and 2 pcs, M3 nuts (radial fan) E3D v6 + proximity sensor configuration BOM: Printed parts: Hot End Enclosure Main Body.stl E3D Hot End Inner Clamp.stl E3D Hot End Outer Clamp.stl Proximity Sensor Block.stl Fan Guard Honeycomb.stl or Fan Guard Circles.stl (optional/for looks) Hardware: 1 pcs. M3x20 and M3 nut (clamping sensor) 1 pcs. M3x40, M3 locknut and M3 normal nut (adjusting sensor height) 2 pcs. M3x20 and 2pcs. M3 nuts (attaching hot end clamp to main enclosure body) 2 pcs. M5 nuts (for the hot end clamp, attaching to the carriage) 4 pcs. M3x10 and 4 pcs. M3 nuts (attaching fan guard, optional) 2 pcs. M3x20 and 2 pcs, M3 nuts (radial fan) E3D v6 + BLTouch configuration BOM: Printed parts: Hot End Enclosure Main Body.stl E3D Hot End Inner Clamp.stl E3D Hot End Outer Clamp.stl BLTouch block.stl Fan Guard Honeycomb.stl or Fan Guard Circles.stl (optional/for looks) Hardware: 2 pcs. M3x10 and 2 pcs.M3 nuts (attaching BLTouch to printed block) 1 pcs. M3x40, M3 locknut and M3 normal nut (adjusting sensor height) 2 pcs. M3x20 and 2pcs. M3 nuts (attaching hot end clamp to main enclosure body) 2 pcs. M5 nuts (for the hot end clamp, attaching to the carriage) 4 pcs. M3x10 and 4 pcs. M3 nuts (attaching fan guard, optional) 2 pcs. M3x20 and 2 pcs, M3 nuts (radial fan) First print test with enclosure:https://www.youtube.com/watch?v=3JLHq4nX5GU Mods and ads: 360 part fan duct by Tymmy:http://www.thingiverse.com/thing:2252109 Credit: BETA testing and E3D v6 + BLT pictures: http://www.thingiverse.com/Grogo666/about Print Settings Printer: Reach3D Printer Rafts: No Supports: No Resolution: 200 micron Infill: 35% Notes: Most parts should be orientated so no supports are needed, but some of the nut inserts might not print fine. I just cleaned them with a knife, no supports in printing. EXCEPTIONS THAT NEED SUPPORT: Parts Cooling Duct.stl Post-Printing Step 1 Print the parts you need for your configuration. (See the BOM-list in the description) Clean all the parts! (Make sure all the insert nuts can fit, as prints can have problem with this) Add the M5 nuts to the outer Hot End Clamp, (I melted mine in place with a soldering iron), like so: Step 2 Use the M3x20 screws and nuts to attach the Hot End Clamp to the Enclosure Main Body like so: Step 3 Add one M3 nut to the inside insert, for the bottom screw on the radial fan, (do this BEFORE adding the fan and fan shroud!) like so: Step 4 Add a M3 nut to the insert for adjusting the height of the sensor. Slide the Proximity Sensor from the top hole, down and through the Proximity Sensor Block. You might have to pry the "clamp split" apart, don't insert the screw first, do this after the sensor is at the right height! Add the M3x20 and M3 nut for clamping the sensor with the block. Add the M3x40 screw form the top, and add the M3 locknut as you screw it down. The locknut is there to keep the sensor form being pushed up, and only needs to be loose! Then thread the M3x40 through the block and the captive M3 inside. For best result, align the top of the threads on the sensor with the top of the block, and adjust the hight to roughly the middle of the slides. This brings you to roughly the right height. Step 5 Attach everything to the Reach3D printer! BLTouch, replace step 4 with this step Add M3x10 and nut to the "back" hole in the BLTouch (as oriantated in the first picture), make sure the nut has roughly 1.3mm form BLT surface, so it will be tight on the block, when it is time to slide it on. Insert the BLTouch in the bottom hole (see the first picture). Add a M3 nut to the insert for adjusting the height of the sensor. Add the M3x40 screw form the top, and add the M3 locknut as you screw it down. Then thread the M3x40 through the block and the captive M3. Now bring the BLT up to the block, and slide it on to the "back" M3 screw (see the second picture). Add M3x10 and nut to the "front" hole in the BLTouch. The gap from the top of the block and up might change from user to user, but start with around 3-4mm and see what works for you. E3D v6 Hot End Follow the steps above, but DON'T use the following parts: Fan Shroud for Stock Heatbreak.stl Standard Hot End Clamp with Nutinsert.stl Marling config for the BLTouch offset and bed probe position: '#define X_PROBE_OFFSET_FROM_EXTRUDER 30 // X offset: -left +right [of the nozzle]' '#define Y_PROBE_OFFSET_FROM_EXTRUDER -26 // Y offset: -front +behind [of the nozzle]' // Set the boundaries for probing (where the probe can reach). '#define LEFT_PROBE_BED_POSITION 38' '#define RIGHT_PROBE_BED_POSITION 180' '#define FRONT_PROBE_BED_POSITION 5' '#define BACK_PROBE_BED_POSITION 160' M851 Z-2.25 / M501 (need to adjust for your adjusted height offeset)
With this file you will be able to print Hot End Enclosure, for Reach3D Printer with your 3D printer. Click on the button and save the file on your computer to work, edit or customize your design. You can also find more 3D designs for printers on Hot End Enclosure, for Reach3D Printer.