"Hot End" Tensegrity
prusaprinters
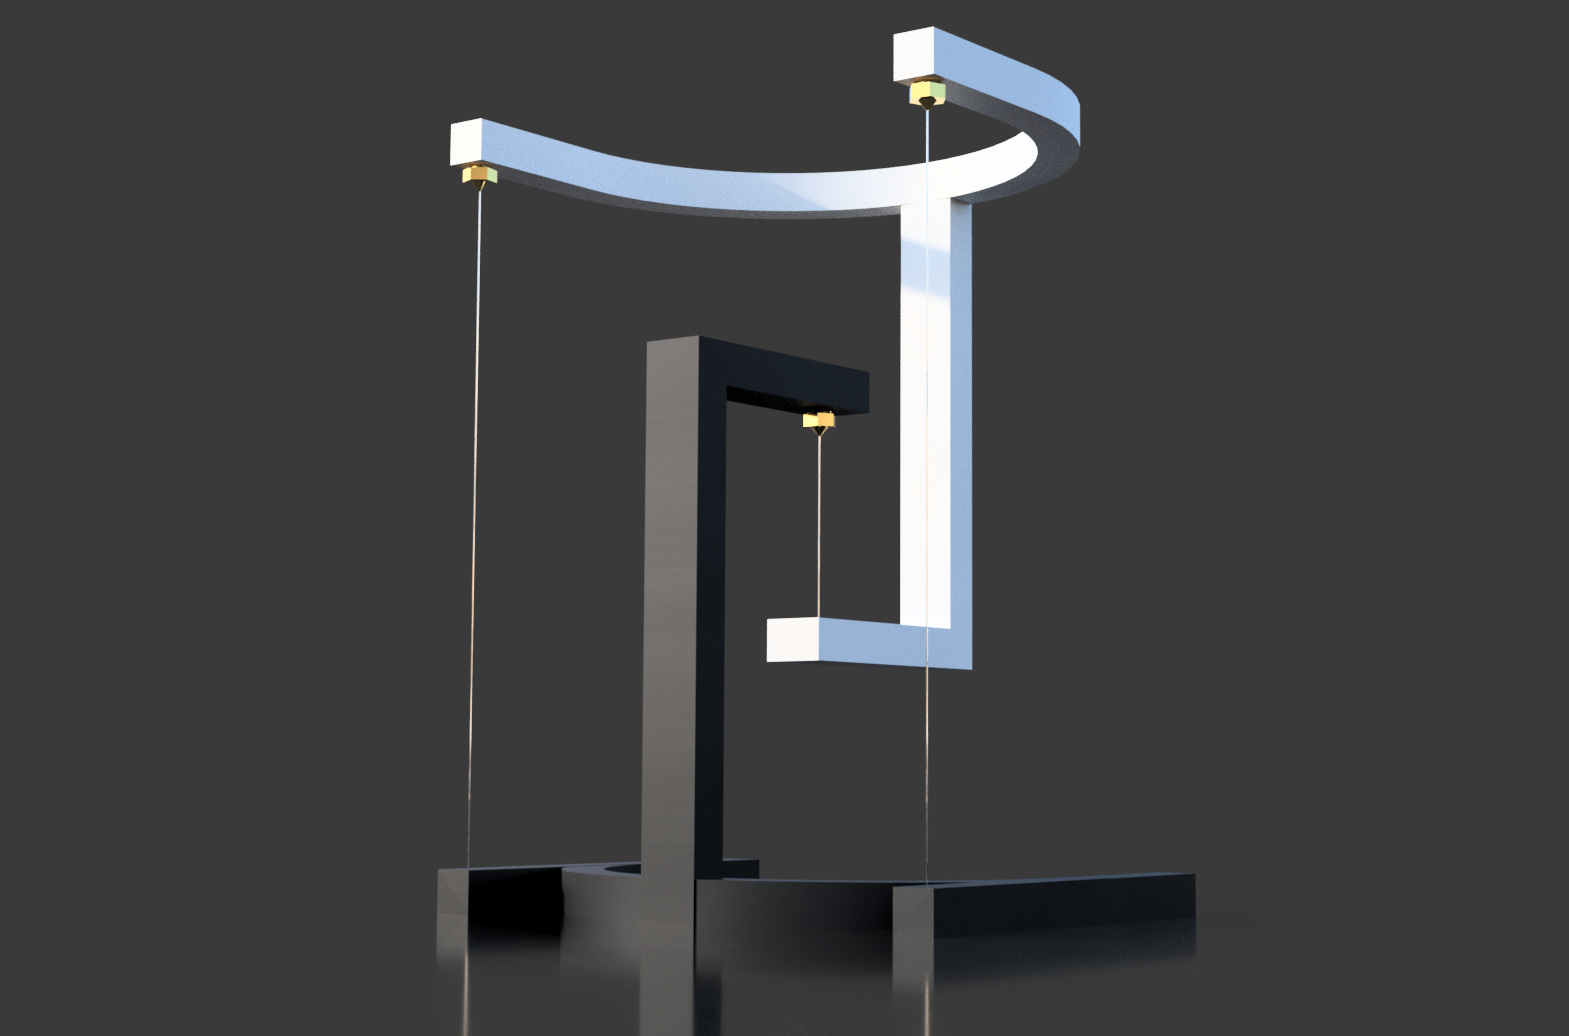
<p>"Hot End" is the name given to the nozzle on the 3D printer because it can get up to 260° hot during the printing process, depending on the type of filament. These nozzles have different outlet diameters and should be replaced from time to time due to abrasion. Therefore, one should have one or the other spare nozzle in stock.</p><p>I chose a very special place ;-) to keep my three spare nozzles for my 3D printers: the outlets for the nylon threads of the support and stabilization points for this tensegrity structure. This way, I definitely can't misplace them. However, should I need to change a nozzle on the printer at some point, the object can be assembled without nozzles.</p><p>Intended effect: It should give the impression that the nozzles are producing the nylon threads.</p><p>Tensegrity: a term from the field of architecture. A complex relationship of forces provides a relatively stable structure. </p><p>I have already designed several tensegrity objects and published them here. So far always with either 3 or 4 stabilization threads. This is the first one where the tensegrity structure is created by only 2 stabilization threads. The mode of action of the tension forces is shown in picture 6 of the introduction.</p><p>With any new tensegrity project, it is always magical how the physical conditions create a tension that makes this object a unit - a perfect unit. A bit confusing at first sight ... you have to look twice to understand the principle.</p><p> </p><p><strong>Dimensions:</strong></p><ul><li>height: about 185 mm</li><li>width: 140 mm</li><li>length: 110 mm</li></ul><p> </p><p><strong>Supplies:</strong></p><figure class="image"><img src="https://media.printables.com/media/prints/214505/rich_content/b5e2c11a-1ccf-409e-b54b-c7952ca56703/img_5414.jpg#%7B%22uuid%22%3A%22e282712c-fa53-4c04-b8ec-b1053eb12af3%22%2C%22w%22%3A4032%2C%22h%22%3A3024%7D"></figure><p><strong>Material:</strong></p><ul><li>3 Nozzles (0.4mm). Object can also be assembled without nozzles</li><li>polyamide thread: Ø 0,25mm</li><li>small pieces (about 4x4mm) from a preserving jar rubberring </li></ul><p><strong>Tools:</strong></p><ul><li>wrench 7 mm</li><li>small sewing needle</li><li>scissors</li></ul><p><strong>Print Settings</strong></p><ul><li>Printer brands: Prusa; Flashforge</li><li>Printers: MK3S; Finder</li><li>Supports: yes</li><li>Resolution: 0,2</li><li>Infill: 15%</li><li>Filament brand: Prusa; ICE</li><li>Filament color: Galaxy Black; Wintershine White</li><li>Filament material: PLA</li></ul><p>Nozzles and rubberrings you can get here:</p><ul><li>5 Stck. 3D-Drucker Düse Nozzle 0.4mm für E3D Hot Ends V5, V6 (0,4mm) https://www.amazon.de/gp/product/B0858644GN/ref=ppx_yo_dt_b_asin_title_o01_s00?ie=UTF8&th=1</li><li>https://www.amazon.de/10-Stück-Weck-Einkochringe-94x108/dp/B016BDARG6/ref=sr_1_5?crid=QLKE6EO8FV12&keywords=einmachgummis&qid=1649586757&sprefix=Einmachgummis%2Caps%2C67&sr=8-5</li></ul><p><strong>Remark:</strong> As all parts are designed to fit very precisely, it may happen that you have to rework one or the other part a bit with sandpaper and/or cutter due to different dimensional accuracy of the printers and the different behavior of the filaments.</p><p> </p><p><strong>Step 1: Printing Upper and Lower Part</strong></p><p>Required stl files:</p><ul><li>Nozzled Tensegrity_bottom.stl</li><li>Nozzled Tensegrity_top.stl</li></ul><p>The printing should be done with support!</p><p> </p><p><strong>Step 2: Inserting Nozzles</strong></p><p>The holes provided have no screw thread. Nevertheless, the nozzles can be screwed in with the help of a 7mm wrench.</p><figure class="image image-style-align-center"><img src="https://media.printables.com/media/prints/214505/rich_content/f72df999-dfbe-4bf7-a31e-9c0839b9e19b/fq55zs7l1rvcrtqjpg.webp#%7B%22uuid%22%3A%228f7afec4-b17f-4c54-904b-4e80c0c3ea11%22%2C%22w%22%3A1024%2C%22h%22%3A768%7D"></figure><figure class="image"><img src="https://media.printables.com/media/prints/214505/rich_content/e9902654-83c7-4579-8b68-b03a73bf51ef/fj62fjbl1rvcrtrjpg.webp#%7B%22uuid%22%3A%2231041aad-aaee-4b5a-9bb2-ea9ceb3c742b%22%2C%22w%22%3A1024%2C%22h%22%3A768%7D"></figure><figure class="image"><img src="https://media.printables.com/media/prints/214505/rich_content/b9e2db60-1f48-4d3b-a3a0-76d0be9eba0e/focdssgl1rvcrttjpg.webp#%7B%22uuid%22%3A%22678f3cdb-a5f2-4559-a4c6-588e624f323b%22%2C%22w%22%3A1024%2C%22h%22%3A768%7D"></figure><figure class="image"><img src="https://media.printables.com/media/prints/214505/rich_content/dba76685-8302-47d7-9466-d341d6618fbc/frc7ackl1rvcrtsjpg.webp#%7B%22uuid%22%3A%227c22d06e-84d4-4bac-bc10-fff88c444e52%22%2C%22w%22%3A1024%2C%22h%22%3A768%7D"></figure><figure class="image"><img src="https://media.printables.com/media/prints/214505/rich_content/9c57097f-bcc0-47c9-89e9-a9d33e3fb2dd/f85rnral1rvcrtujpg.webp#%7B%22uuid%22%3A%22f04f67cc-3aab-424b-973b-b5c2d6b18bda%22%2C%22w%22%3A1024%2C%22h%22%3A768%7D"></figure><p> </p><p><strong>Step 3: Inserting Support Thread</strong></p><p>The distance between the lower edge of the upper part and the upper edge of the lower part should be approx. 55 mm. A multiple knot on both sides is sufficient to prevent the thread from slipping out.</p><p> </p><p><img src="https://media.printables.com/media/prints/214505/rich_content/12f19d14-3cb5-4df9-bdfd-1eb15415a547/1.jpg#%7B%22uuid%22%3A%22cff263f7-6fba-454e-83bf-0837c3d978c7%22%2C%22w%22%3A1024%2C%22h%22%3A768%7D"></p><p><img src="https://media.printables.com/media/prints/214505/rich_content/c5b45cc2-8f51-49e0-a014-ad3a6ce42a02/2.jpg#%7B%22uuid%22%3A%22d336ade2-a4ad-4fb0-ab9e-5c352522e22a%22%2C%22w%22%3A1024%2C%22h%22%3A768%7D"></p><p><img src="https://media.printables.com/media/prints/214505/rich_content/211c68c4-26bf-4fc9-967a-3a6696262299/3.jpg#%7B%22uuid%22%3A%22188c6b47-9432-4ae0-9e47-e8759b7980b7%22%2C%22w%22%3A4032%2C%22h%22%3A3024%7D"></p><p><img src="https://media.printables.com/media/prints/214505/rich_content/18bc365c-0e45-44fd-ad7c-f960fa3871bd/4.jpg#%7B%22uuid%22%3A%22b238044f-f50d-43cd-8c66-7ae178289019%22%2C%22w%22%3A1024%2C%22h%22%3A768%7D"></p><p><img src="https://media.printables.com/media/prints/214505/rich_content/c6f9c916-adfc-42ca-b529-94718f664dc6/5.jpg#%7B%22uuid%22%3A%22a54a7eb5-5ef5-490e-8c9e-e864d3806bcf%22%2C%22w%22%3A1024%2C%22h%22%3A768%7D"><br><br><strong>Step 4: Inserting Stabilizing Threads</strong></p><p>A big problem with tensegrity projects is always the tightening of the threads. Unfortunately, simply tying a knot in the "right" place doesn't work. As I did in a previous project, I cut 3 small pieces out of a rubber ring for preserving jars. These pieces will serve as an "adjuster".</p><p>I placed the top and bottom pieces so that I could pass the 2 threads through the "upper" U from the top. I took the first thread, a sewing needle, put the thread through the eye and pierced one of the small rubber pieces from the bottom as shown in the pictures. To prevent the thread from slipping out too easily, I again pierced the needle through the rubber again from the top, not too close to the first piercing. Without worrying about alignment at that moment, I did the same with the second thread.</p><p> </p><figure class="image"><img src="https://media.printables.com/media/prints/214505/rich_content/0a9878c5-2a3c-4cf0-b79d-7487a6394b1b/fmf6amql1hva86j.jpg#%7B%22uuid%22%3A%229631c999-5afa-4382-85c1-cb95d765cf62%22%2C%22w%22%3A1024%2C%22h%22%3A768%7D"></figure><figure class="image"><img src="https://media.printables.com/media/prints/214505/rich_content/5e0e8e52-be84-4bc4-969f-283105d58dd8/fkp10kol1rvcru0jpg.webp#%7B%22uuid%22%3A%223d1dca94-d7ef-479d-bcc6-c2c4d4206e17%22%2C%22w%22%3A1024%2C%22h%22%3A768%7D"></figure><figure class="image"><img src="https://media.printables.com/media/prints/214505/rich_content/078abd2e-38f7-4013-a0c3-d4eb53be2602/f18l8cll1rvcru1-1.jpg#%7B%22uuid%22%3A%22d9af65e4-2d11-4fe9-87ba-53eb9cf73b86%22%2C%22w%22%3A1024%2C%22h%22%3A768%7D"></figure><figure class="image"><img src="https://media.printables.com/media/prints/214505/rich_content/7e70447d-1e90-4c7b-a423-0d7ac2db01a4/ftl88xfl1rvcru3.jpg#%7B%22uuid%22%3A%22b1fb16e8-3fd5-4e70-8cec-52bf190f4497%22%2C%22w%22%3A1024%2C%22h%22%3A768%7D"></figure><p> </p><figure class="image"><img src="https://media.printables.com/media/prints/214505/rich_content/f9b686a0-28b5-4a8d-a73f-55d54b39e9bd/fwq12wnl1rvcru4.jpg#%7B%22uuid%22%3A%22d49de8a6-a1fc-4142-b317-c0043abfd628%22%2C%22w%22%3A1024%2C%22h%22%3A768%7D"></figure><figure class="image"><img src="https://media.printables.com/media/prints/214505/rich_content/b171787c-77c8-4c3c-945a-40cb29af884e/fwqc3h5l1rvcru5.jpg#%7B%22uuid%22%3A%228f888a6c-5a38-4194-bdd6-5e63a919358c%22%2C%22w%22%3A1024%2C%22h%22%3A768%7D"></figure><figure class="image"><img src="https://media.printables.com/media/prints/214505/rich_content/4c55f255-cb97-47e9-8f65-2d03bf8c4d8c/fba224pl1rvcrua.jpg#%7B%22uuid%22%3A%22ef25b3cc-d36c-48e2-97ab-b9c959eff0ff%22%2C%22w%22%3A1024%2C%22h%22%3A768%7D"></figure><figure class="image"><img src="https://media.printables.com/media/prints/214505/rich_content/c96c5027-2299-4f9c-a9fd-fd82e3626b70/fdm1mt1l1rvcru8.jpg#%7B%22uuid%22%3A%22d012ddb4-5e1a-4583-a7d7-938216620587%22%2C%22w%22%3A1024%2C%22h%22%3A768%7D"></figure><p> </p><p><strong>Step 5: Setting Up Object</strong></p><figure class="image"><img src="https://media.printables.com/media/prints/214505/rich_content/2d7b17f7-2d8b-436c-9e29-306828c7d57a/f367hm0l1rvcrug.jpg#%7B%22uuid%22%3A%22908d5fbd-83df-4f3e-9132-ab45087724fe%22%2C%22w%22%3A1024%2C%22h%22%3A768%7D"></figure><p>Once the threads were prepared in this way, I began aligning them. The little rubber pieces can be moved around. I started doing this while the top and bottom were lying flat. When both threads were almost evenly tightened, I raised the object and started the "fine tuning".</p><p>It is always a fascinating experience when, after assembling the individual parts, this tension suddenly is created when setting up the object: TENSEGRITY!</p><p><strong>Video:</strong></p><figure class="media"><oembed url="https://www.youtube.com/watch?v=GgAX8I_Rc74"></oembed></figure>
With this file you will be able to print "Hot End" Tensegrity with your 3D printer. Click on the button and save the file on your computer to work, edit or customize your design. You can also find more 3D designs for printers on "Hot End" Tensegrity.