Hot plate for chocolate Dip-inator
thingiverse
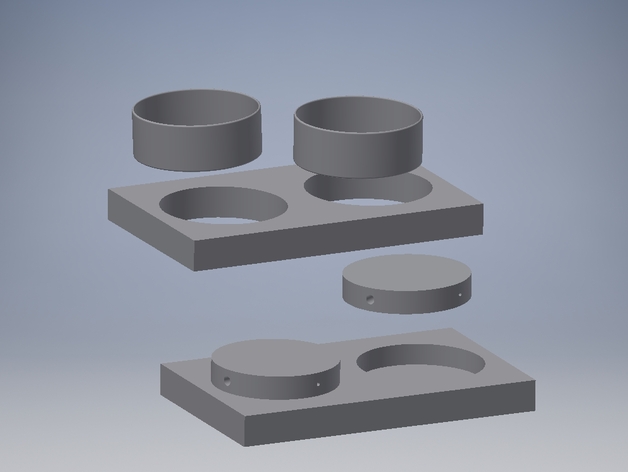
The hot plate part for the Chocolate Dip-inator built by Hinge: http://www.thingiverse.com/thing:1832773 (Or is it Dyp-inator?) A 12 V heating cartridge (the same type used in many hot-ends) is used to heat an aluminium disc (80 by 15 mm) to 50 degrees C. Since it is a low temperature application, the aluminium discs can be insulated with a slab of closed cell PE-foam packing material, but be aware, that even the modest hot end heating cartridge can easily send an insulated lump of aluminium like this well past 100 degrees C in about 10 minutes! The holes are simply cut with a scalpel. The plugs cut out from the slab are sliced into thinner slices, which are placed under the aluminium plate. An Arduino and a 100-kohm 3950 NTC temperature sensor (You guessed it: the same type used in many hot-ends) control heating. A MOSFET shield designed by Mogens Hinge provides power handling and user-friendly mounting, but any logic level MOSFET or power transistor setup will work. It is designed in eagle and previously applied in many other projects. (This is the reason why the attached files are called "Kondenser"). You should use a logic level MOSFET like the IRL540 (not BUZ21 as given) for high current applications. The power supply is a re-purposed computer supply, delivering 5V to the Arduino and 12V to the heating cartridges. Assembly: Place one or more slices of foam in each hole (determines height of the bowl). They insulate downwards and act as spacers to determine the height of the hot plate. Insert a heating cartridge and a temperature sensor in each of the hot plates, and place them in the foam slabs. Make cuts in the foam to hold the wires in place. Put the other slab of foam on top. Place your bowls in the holes. We have used cut-down 80 mm lab beakers (borosilicate glass), but any low and flat-bottomed bowl will do the job. Make the holes in the upper slab a size that supports the bowl. The entire hot plate assembly is held together with four printed clamps, but for a more permanent setup, it could be glued with contact cement. It ran flawlessly for two days during the Aarhus Mini Maker Faire in October 2016. Custom Section Arduino code: /*Double hot plate for chocolate Dip-i-Nator Peter Hald 2016 Use of Steinhart-Hart method is fromhttp://www.circuitbasics.com/arduino-thermistor-temperature-sensor-tutorial/ PID controll ("P" only was enough) is based on the Arduino PID-library by Brett Beauregard http://playground.arduino.cc/Code/PIDLibrary */ include // pins: const int ntcpin1 = A0; const int ntcpin2 = A1; const int signalpin1 = 9; const int signalpin2 = 11; // setpoints: const int setpoint1 = 50; const int setpoint2 = 50; // for storing sensor readings and calculated temperatures: double Temp1; double rawtemp1; double Temp2; double rawtemp2; //pid include //Variables for PID: double Setpoint1, Input1, Output1; double Setpoint2, Input2, Output2; //Adressing and PID parameters, just pure "P"-controll: PID myPID1(&Input1, &Output1, &Setpoint1, 180, 0, 0, DIRECT); PID myPID2(&Input2, &Output2, &Setpoint2, 180, 0, 0, DIRECT); void setup() { // setup Serial.begin(9600); pinMode(ntcpin1, INPUT); pinMode(signalpin1, OUTPUT); pinMode(ntcpin2, INPUT); pinMode(signalpin2, OUTPUT); Input1 = Temp1; Setpoint1 = setpoint1; //for PID Input2 = Temp2; Setpoint2 = setpoint2; //for PID //turn the PID on myPID1.SetMode(AUTOMATIC); myPID2.SetMode(AUTOMATIC); } void loop() { // Steinhart-Hart to give a real temperature from the NTC-reading // Then using that value as input in the PID rawtemp1 = analogRead (ntcpin1); Temp1 = log(10000.0 ((1024.0 / rawtemp1 - 1))); Temp1 = 1 / (0.001129148 + (0.000234125 + (0.0000000876741 Temp1 Temp1 )) Temp1 ); Temp1 = Temp1 - 273.15; Input1 = Temp1; myPID1.Compute(); analogWrite(signalpin1, Output1); rawtemp2 = analogRead (ntcpin2); Temp2 = log(10000.0 ((1024.0 / rawtemp2 - 1))); Temp2 = 1 / (0.001129148 + (0.000234125 + (0.0000000876741 Temp2 Temp2 )) Temp2 ); Temp2 = Temp2 - 273.15; Input2 = Temp2; myPID2.Compute(); analogWrite(signalpin2, Output2); // for de-bugging and monotoring: / Serial.print("Temperature 1 = "); Serial.println(Temp1); Serial.print(" C"); Serial.print (" Output 1 = "); Serial.print (Output1); Serial.print(" Temperature 2 = "); Serial.print(Temp2); Serial.print(" C"); Serial.print (" Output2= "); Serial.println (Output2);/ delay(1); }
With this file you will be able to print Hot plate for chocolate Dip-inator with your 3D printer. Click on the button and save the file on your computer to work, edit or customize your design. You can also find more 3D designs for printers on Hot plate for chocolate Dip-inator.