HOTAS Throttle Joystick
thingiverse
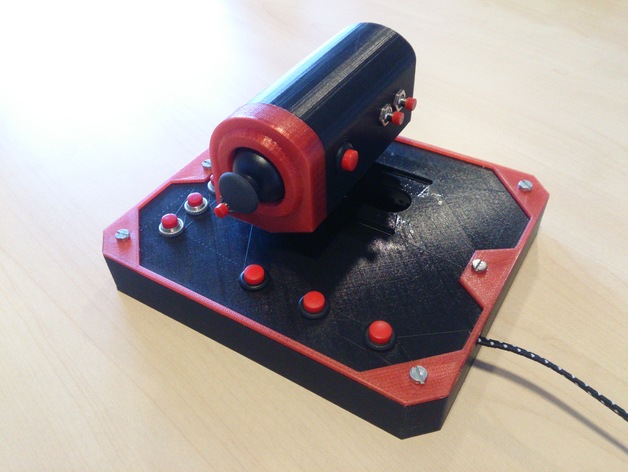
For a while I've been playing flight simulation games using a normal flight stick and my keyboard/mouse. But I got sick of this and started researching the cost of a HOTAS throttle joystick and found that these are absurdly priced. After that I started with a simple breadboard, an Arduino Micro, a PS2 thumb joystick and some buttons. Using the Adafruit Joystick library I was able to very easily make a prototype joystick with which I could control my vehicles in games. But I've got a 3D printer, so using it on a breadboard is no fun. Time to design a case for it! Included are all files needed to make the general joystick, including the specific adapter I used for my potentiometers. The total amount of inputs on this device are 14 buttons, 2 axis for the thumbstick and 1 axis for the throttle itself. Don't have a printer yourself? Contact me on my Etsy store and I'll be happy to print it for you:https://www.etsy.com/shop/XDr4g0nX3DPrinting Print Settings Printer Brand: RepRap Printer: GEEETech i3 Pro B Rafts: No Supports: Yes Resolution: 0.2mm layer height Infill: 15-25% Notes: Print the case/case-top/case-top-deco with the bottom on the bed, this to provide a smooth area. For the handle, print it on the closed side and give the holes some support to prevent warping so the buttons will fit in. The handle-endcap is a bit tricky, print it with the outer part facing up and with quite heavy support to ensure that the outer shell will be smooth. Post-Printing After printing the case and case-top, do a test fit to see if the USB cable hole is the right size. If not, file it down so that it is. As for the handle, take your time and do a test fit without hardware installed. If it's too tight you will have a hard time getting it apart or have the parts breaking all together. How I Designed This I took a shape that fit in my hand comfortably and used the size of that to shape the handle, from there I printed test parts and added holes to the handle to keep testing alignment. After about 4 versions I have the one I am uploading now, I hope that it will fit most hand sizes. Custom Section Design The device runs on a Arduino Pro Micro using the Game Controller library found here;https://github.com/MHeironimus/ArduinoJoystickLibrary This library must be installed for the code to compile and upload. I have included my Arduino code with the files of this Thing, I also included a schematic of the 4 connection types in the controller. I will not write a complete tutorial unfortunately, but with a bit of patience you should be able to work out how the other connections need to go. I will write out what each wire type is; Red = Vcc / 5V / 3,3V Blue = Gnd / 0V Green = Signal wire for throttle Orange = Signal wire for the button string, this works using a resistor ladder Purple = Signal wire for the single button Yellow = Signal wire for the button inside the PS2 thumbstick White/Cyan = Signal wires for the X and Y axis of the thumbstick For the exact connections, just check the code and wire accordingly...or don't, I'm not your mother. You can of course just change the pins in the code, to take note that except for the single buttons, the signal wires from all other components need a analog pin on the Arduino to work
With this file you will be able to print HOTAS Throttle Joystick with your 3D printer. Click on the button and save the file on your computer to work, edit or customize your design. You can also find more 3D designs for printers on HOTAS Throttle Joystick.