Hotwheels Ford Bronco R Forza Horizon 5 Theme Display Base
prusaprinters
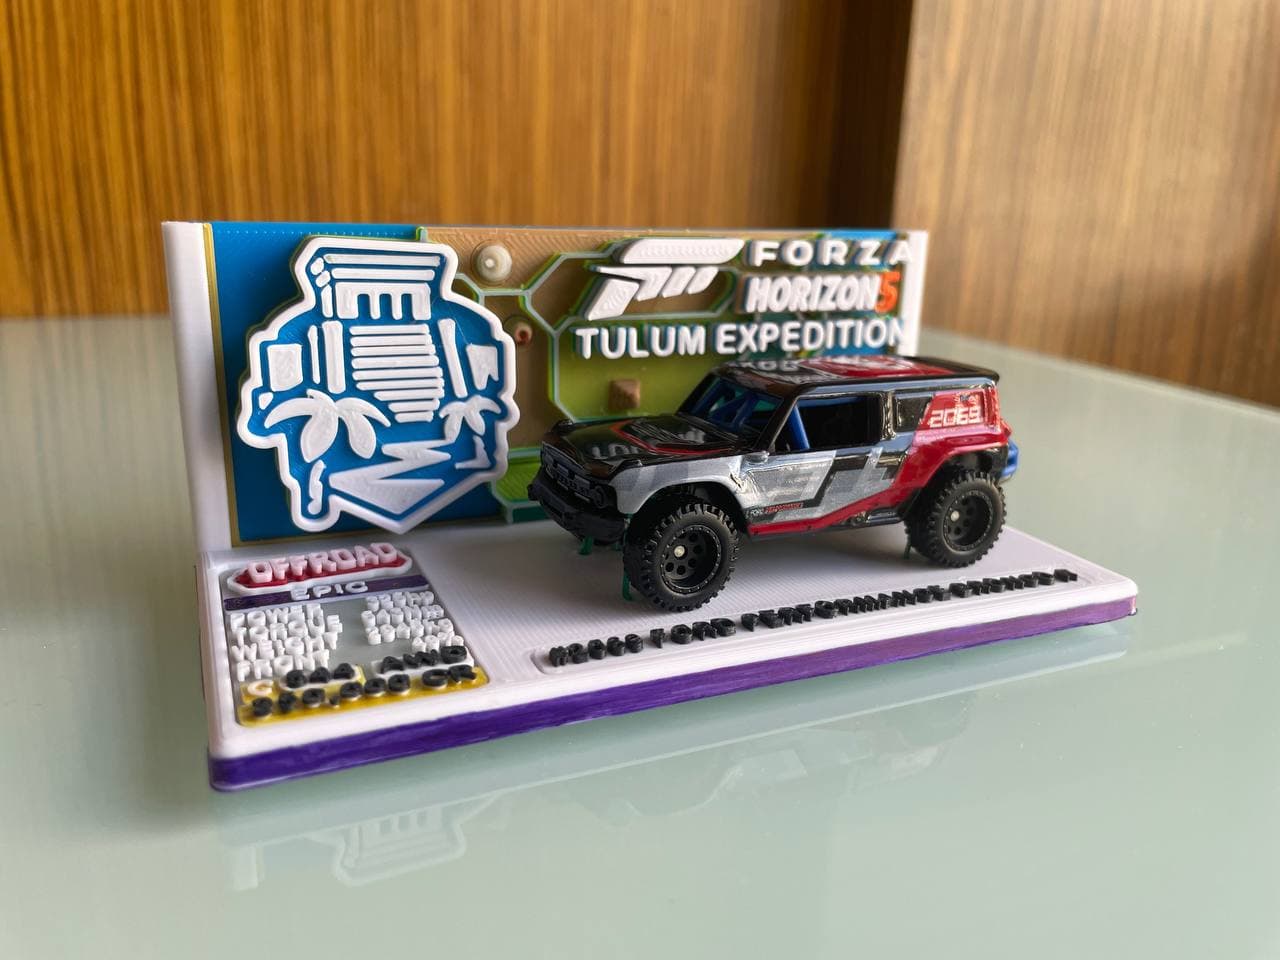
<p>The display base is design based on Forza Horizon 5 theme since the Ford Bronco R is used in the Tulum Expedition mission early in the game. The box back is based on the Horizon Adventure map, the name plate is a slightly simplified version of the in game car stats.</p><p>The display base is separated into 4 main parts for easy printing and colour swap. The parts are:</p><p>1) Name plate</p><ul><li>NamePlate.STL</li><li>NamePlate4.STL</li><li>NamePlateSimple.STL</li></ul><p>2) Base (BaseV2.STL)</p><p>3) Base back wall:</p><ul><li>BoxBackAssem1.STL</li><li>BoxBackSimple.STL</li></ul><p>4) Car Name</p><ul><li>BroncoName.STL</li><li>BroncoNameBold.STL</li></ul><p>The additional parts for BoxBackAssem1.STL:</p><ul><li>DeTuia.STL</li><li>Tulum.STL</li><li>Balam.STL</li><li>Volcano.STL</li><li>Satallite.STL</li></ul><h3>Base Back Wall and Name Plate Variant</h3><p>There are 2 base back wall and 3 name plate, the one in my pictures are "BoxBackAssem1.STL" and "NamePlate4.STL".</p><p>The difference for each base are:</p><h3>BoxBackAssem1:</h3><p>As seen in the pictures above, it has extra slots for putting the ruins, volcano and satallite on the map.</p><h3>BoxBackSimple:</h3><p>A simplify version of the map with no slots for putting the small ruins, volcano and satallite.</p><h3>NamePlate.STL:</h3><p>A high detail name plate based on the car stats in game. The colour change will need to change filament and also needed to be printed with a small 0.2mm nozzle.</p><h3>NamePlate4.STL:</h3><p>A medium detail name plate based on the car stats in game, it is the one shown in the picture above. The colour change in this version uses marker pen to colour the parts.</p><h3>NamePlateSimple.STL:</h3><p>A simplified version of the name plate with no car stats details, a large car class logo will replace majority of the space with a larger car PI stats and AWD logos on it.</p><h3>Box Back Print Settings</h3><p>Nozzle size = 0.4 mm (minimum, smaller better)<br>Layer height = 0.2 mm</p><p>Both BoxBackAssem uses the same print setting</p><p>Filament change layer for colours on both BoxBack variant:<br>1) Start (Surrounding "sea" colours, mine is in blue)<br>2) Layer 4 (General brown area of the map, mine is in brown)<br>3) Layer 9 (Center part of the map, mine is in yellow)<br>4) Layer 14 (Lower part of the map, mine is in light green)<br>5) Layer 19 (Right side of the map, mine is in dark green)<br>6) Layer 24 (Borderline of the map, mine is in grey)<br>7) Layer 30 ( Horizon and "5" colours, mine is in orange and marker pen colour "5" to red)<br>8) Layer 34 (Tulum logo background, mine is in blue like the in game logo colour)<br>9) Layer 39 (Tulum logo overall detail colours, mine is in white)<br>*10) Layer 44 (Forza logo and "Forza" lettering colours, this is optional and I skipped mine so it is in white)</p><h3>NamePlate4 Print Settings</h3><p>Nozzle size = 0.3 mm (minimum, smaller better)<br>Layer height = 0.2 mm</p><p>1) Start (Background colour of the overall piece, mine in grey)<br>2) Layer 13 (Car stats lettering colour, mine is in white)<br>3a) Layer 18 (Pause for marker pen colouring for all parts, offroad part is coloured in red, top bar is coloured in purple, lower bar and PI stats piece in yellow)<br>3b) Layer 18 (Colour of "Epic" on the top bar and "Offroad" lettering colours, mine is in white)<br>4) Layer 22 (Lettering colour of PI stats, AWD and car price)</p><h3>NamePlate Print Settings</h3><p>Nozzle size = 0.2 mm (minimum)</p><p>1) Start (Background colour of the overall piece)<br>2) Layer 5 (Offroad logo background)<br>3) Layer 9 (Lower bar colour, PI stats background colour)<br>4) Layer 14 (Upper bar for "Epic" lettering)<br>5) Layer 18 (Lettering colours for car stats and "EPIC", Offroad logo lettering, PI stats second rectangle colour)<br>6) Layer 22 (PI stats number, AWD and car price lettering)</p><h3>NamePlateSimple Print Settings</h3><p>Nozzle size = 0.4 mm (smaller better)<br>Layer height = 0.2 mm</p><p>1) Start (Background colour of the overall piece)<br>2) Layer 9 (Offroad logo background)<br>3) Layer 11 (Offroad logo lettering)<br>4) Layer 16 (PI stats background colours)<br>5) Layer 21 (PI stats inner box colours and AWD box background colour)<br>6) Layer 24 (PI stats number and AWD lettering)</p><h3>BroncoName Print Settings</h3><p>Nozzle size = 0.3 mm or smaller (For BroncoName.STL)<br>Nozzle size = 0.4 mm (For BroncoNameBold.STL)<br>Layer height = 0.2 mm</p><p>1) Start (Background colour of the overall piece, mine is in white)<br>2) Layer 10 (Bronco name lettering colours, mine is in black)</p><h3>Extras Print Settings</h3><p>Nozzle size = 0.3 mm or smaller<br>Layer height = 0.2 mm (Smaller better)</p><p>Printing for the extras listed below:</p><ul><li>DeTuia.STL</li><li>Tulum.STL</li><li>Balam.STL</li><li>Volcano.STL</li><li>Satallite.STL</li></ul><p>Can just be printed on single colour with the smallest possible nozzle for best detailed.</p><h3>Assembly</h3><p>The car is tied by wires through the hole in the base</p><p>Back plate, BroncoName and name plate should slide in nicely into the display base. If the name plate and BroncoName is loose, double sided tape will hold it nicely</p><p>The extras can just be slot into each holes, each ruins has different depths to fit in each hole. The volcano and satallite will need some double sided tape to hold it.</p><h3>Others</h3><p>I did not test the the variants base back wall, BroncoNameBold and name plate but it should works fine.</p><p>Feel free to send me any feedback on how to improve the design. Suggestion on display base designs are welcomed too.</p>
With this file you will be able to print Hotwheels Ford Bronco R Forza Horizon 5 Theme Display Base with your 3D printer. Click on the button and save the file on your computer to work, edit or customize your design. You can also find more 3D designs for printers on Hotwheels Ford Bronco R Forza Horizon 5 Theme Display Base.