How to run Customizer on your own computer
cults3d
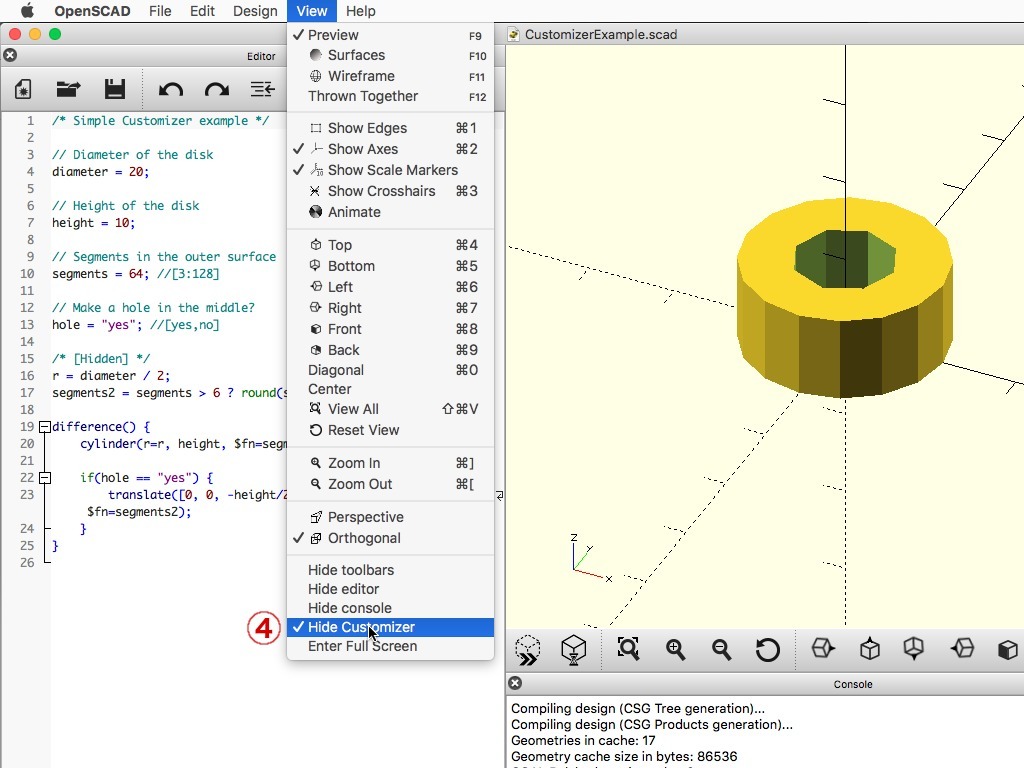
This page won't be updated anymore. The new page with more up-to-date instructions is now here. Please do not ask questions in this thing's comments about how to fix a problem with Customizer on Thingiverse. The whole purpose of these instructions, is to tell you how to run Customizer without needing the Thingiverse website at all. Old description below. This is a useless customizable thing, to demonstrate how to create a customized STL on your own computer instead of having to rely on Thingiverse's on-line Customizer app which has a history of breaking at random moments, sometimes for extended periods. For instance at the moment when I created this, attempting to run Customizer on the website resulted in this error at the side of the Thingiverse server: “/usr/local/bin/openscad/openscad: error while loading shared libraries: libCGAL.so.10: cannot open shared object file: No such file or directory” Another advantage of running Customizer locally even if the on-line one works fine, is that you do not need to wait for your turn in the processing queue. Moreover, you have a much better and faster preview of the model, which you can rotate and zoom freely. And last but not least, you have better control over the parameters. In a nutshell, the steps to run Customizer on your own computer are (see images for steps 4 to 8): 1. Download and install OpenSCAD. You need version 2019.05 or newer to be able to use the customizer feature and for the following instructions to work. You can also use the latest development snapshot if you wish (this one has a blue icon instead of the usual yellow program icon). 2. Download the .scad file of the Thing you want to customize. If it also has a .json file, you can download this as well and place it next to the .scad file, but it is not essential. Then open the .scad file in OpenSCAD. 3. (Ignore this step, it was only applicable to previous versions.) 4. Make sure ‘Hide Customizer’ is not checked in the View menu. The Customizer UI should be visible at the right. 5. Hit the Preview button (F5) to enable the customizer interface (this makes no sense but the ritual in previous versions was even worse). Click the triangle icons to expand controls for their sections. Now you should be able to edit the values as you would in the online Customizer. 6. If ‘Automatic preview’ is not enabled, hit the Preview button (F5) again to get a quick preview of your current settings. You may need to press enter after editing values in edit fields to view the effect. 7. When ready, hit the Render button (F6). This may take a while. 8. When the model has been rendered, click the STL button to export the custom STL file. 9. If you want to save your current settings, click the ‘+’ button. To update the currently selected preset, click ‘Save preset’. There are some limitations compared to the Thingiverse customizer. For instance drawing a shape (like here (https://www.thingiverse.com/thing:270289)) is not yet implemented in OpenSCAD at the time of this writing, you can only enter raw coordinates. There is also a problem with customizers that use an image as input to generate a shape, like lithophanes: if you use a PNG or JPG image, the shape will be too tall by a factor 100. You can fix this by changing the appropriate scaling factor in the source code, an example can be found in the comments. Obviously this only works for Things that have been designed to be customizable. If there is no ‘Open in Customizer’ button on the Thing page, you cannot magically make it customizable. (Only if a thing has a .scad file, it is possible to make it Customizer-friendly but this requires basic knowledge of OpenSCAD. Here is some basic documentation about converting a scad file to make it customizable.) Some customizable things rely on OpenSCAD libraries that aren't installed. In that case you will get errors like: “Can't open library '…'”. You will need to find where you can download the library (e.g. ‘write’ can be found here (https://www.thingiverse.com/thing:16193)), and place it inside the same folder as the .scad file. The same goes for other dependencies like fonts. If you try to use a font that is not on your computer, a boring default font will be used instead. If you want to use any of the fonts that were available in the Thingiverse customizer, you will have to search for them on the web and install them on your own computer. You can of course also edit the name of the font in the source code of the .scad file, and use any font you already have on your system. A bit of extra info: Customizer is based on OpenSCAD, a program that can generate 3D models out of a set of instructions. A customizer file is just a .scad file with specific formatting. You can use any version of OpenSCAD to load and edit a customizer file, but I highly recommend using version 2019.05 or newer. You can also use the latest development snapshot to get the latest bells and whistles (and bugs). The customizer inside OpenSCAD has a presets feature. Presets are saved to a .json file with the same name as the .scad file. If you want to distribute presets with your Thing, also upload the JSON file to Thingiverse. (Keep in mind that these presets only work in OpenSCAD, they are not available in the online Customizer.) OpenSCAD has two modes: a fast preview mode (F5 key), and a (usually slow) render mode which produces a model that can be saved for printing (F6 key). Tweak the customizer parameters in preview mode, and only render when satisfied with the preview, because rendering can take long depending on how complex the model is. Finally, you must export the model to an STL file which you can then print like any other file you would have downloaded. Notice to Thingiverse: please don't use this as an excuse to postpone fixing the online customizer!
With this file you will be able to print How to run Customizer on your own computer with your 3D printer. Click on the button and save the file on your computer to work, edit or customize your design. You can also find more 3D designs for printers on How to run Customizer on your own computer.