Hubsan X4 H107C to FPV Mini-Whoop
thingiverse
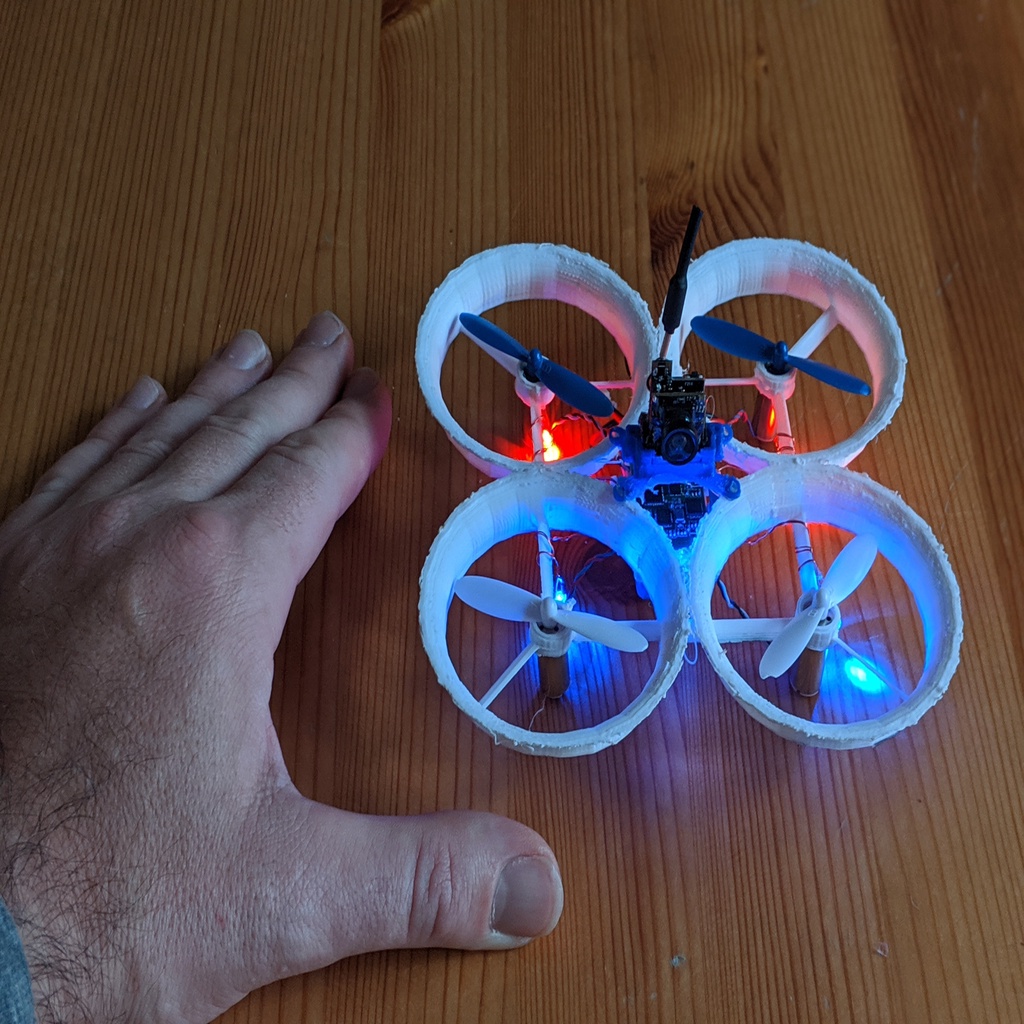
This is a frame I designed to convert a stock Hubsan X4 H107C to a "mini whoop" FPV. Basically it is a tiny whoop that is scaled up to handle the 8.5mm motor and props of the Hubsan X4 H107C. I don't have a weight measurement as of yet, but it is slightly heavier than the stock frame. I have tested it, and it flies very well, both indoors and out. First off, I'd like to point out HicWic's "Mini Whoop" https://www.thingiverse.com/thing:1715901 and osliang's "Whoopee" https://www.thingiverse.com/thing:1700311 ...both of which served as inspiration for this design, but I wanted something that was more specific to a Hubsan X4 H107C conversion. Also, this frame prints without support, and has the controller and battery low, optimal for a good vertical CG. The design goal of this project was to get a nice indoor/outdoor flying FPV with a decent amount of power and battery life, for the minimal investment. The Hubsan X4 H107C is a very interesting RTF because they are extremely cheap (Under $30 for a whole kit with transmitter and battery), and extremely fun to fly. With the addition of a cheap FPV camera and UVC receiver, your smartphone, and a cheap VR goggle box, you can be doing "serious" FPV for around $75. BOM with approximate cost: $30 Hubsan X4 H107C $17 Wolfwhoop WT05 AIO FPV camera/TX $20 Eachine ROTG01 UVC FPV Receiver (or similar) $10 VR Beatz VR Headset box Rubber Band 2 Self-tapping micro screws Because I am still improving on the ease-of-assembly, I have included the controller platform and camera mount as separate files, in case you want to glue them on. The camera mount is from HicWic's Mini Whoop. It's a glue on for now, until I can add something like it directly into the design. Heads up: You will probably find that the motor mounts are (read: too) generously sized, because I print with ABS and experience TONS of shrinkage, plus my printer is old and has lots of backlash causing circles to be more like ovals. So you'll probably need to glue those in to keep the motors from falling out. Also, my printed model needs some clean up one the outer edges of the ducts (which you can see I did not do). You may have better results with your printer. If there is enough interest in this frame, I will continue updating here with any improvements I come up with. Printing & Assembly notes: Save the 2 self-tapping case screws when you disassemble the H107C. These can be used to screw the controller down to the platform. Remove the recording camera from the H107C. You can connect the power cable for your AIO FPV camera to the same terminals (at least that was the case for my WolfWhoop WT05). I used a connector from a spare battery & charger I had. 1. You can actually print this without support. 2. Print using .1mm resolution because of some fine details. 3. Find the front of the craft. The horizontal struts are diagonally angled according to the prop spin direction, so make sure to pay attention to this. The right front prop (looking at the unit from the top) spins clockwise. You can see this in this photo (the front of the craft is toward the camera). For the below steps, you may find it easier to remove (cut out) the controller platform, attach the controller, and then glue it back on. However, it is certainly possible to do it while attached. 4. Run the motor and LED wires out the sides. Insert the motors and apply a dab of glue to shore them up, if necessary. Wrap the LED wires around each strut closest, and point the LED downward. 5. Position the controller between the tabs on the controller platform. The tab at rear of the controller is offset to accommodate the battery wires. Use the 2 self tapping screws to secure the board (they should be able to self drill right through the platform). 6. Add a rubber band to the tabs, for holding the battery. 7. Optionally, attach on your FPV camera. At this time, I have only included an example mount that can be glued on.
With this file you will be able to print Hubsan X4 H107C to FPV Mini-Whoop with your 3D printer. Click on the button and save the file on your computer to work, edit or customize your design. You can also find more 3D designs for printers on Hubsan X4 H107C to FPV Mini-Whoop.