Huge Cheap Home CNC (#hchcnc)
thingiverse
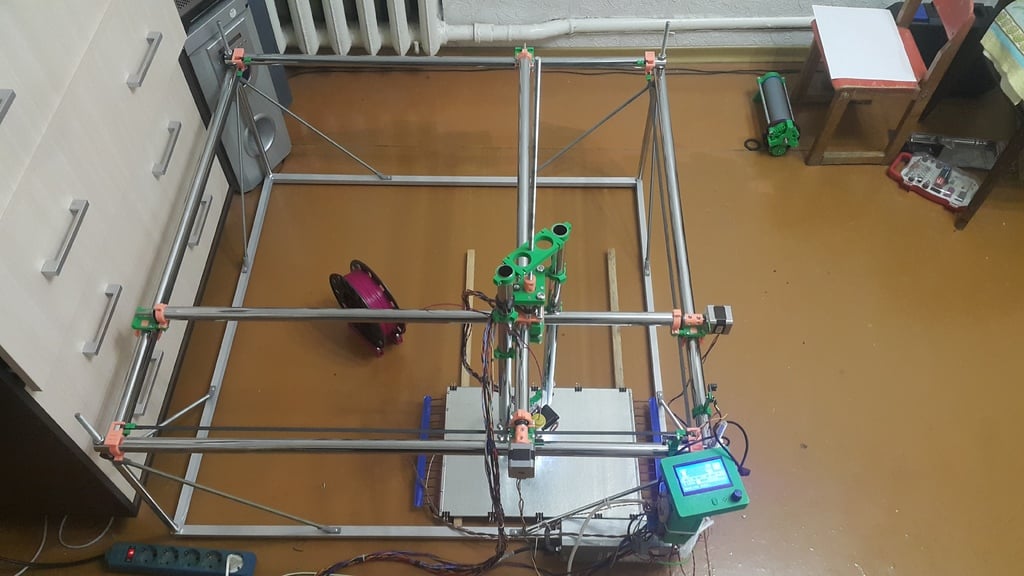
Project: Huge Cheap Home CNC (#hchcnc) ================================= (continue of my Project: https://www.thingiverse.com/thing:2781630 some files listed can be found there) The best guide for beginners: just start already ;-) ..and don't forget to **press Like** button ;-) Design advantages: --------------------------- * Only 3 Steppers for XYZ * Strong construction (almost no plastic parts for frame and legs) * Small number of parts and parts types * Really small parts size, print time, filament amount * Small and cheap bollbearings * Less screws and nuts * Balanced Head Mount * Universal Head Mount * Mobility * Self designed hotbed from scratch ... ets. Possibilities / features ------------------------------ * New: Foam cutting operation https://youtu.be/GZXX6x-DWQc Foam Cutting Head: https://www.thingiverse.com/thing:3339841 * 3D Printing: https://youtu.be/j36U9geLij4 https://youtu.be/kaJyCJsM_6M (all parts are visible here i hope ;-) * Laser Engraving https://youtu.be/N4sjGfpQQ8g * Drilling by Dremel 4300 https://youtu.be/VoB-7SFKuH0 * Wood Engraving by Dremel 4300 https://youtu.be/m8kS548m90w * Wood Milling by Dremel 4300 https://youtu.be/IL2M5LSuGdY https://youtu.be/nneKpp0wLkA The Idea: ------------- The Idea is based on C-23.5mm OD https://www.thingiverse.com/thing:724999 F-25mm OD https://www.thingiverse.com/thing:790533 Borrowed parts, solutions and Thankses ------------------------------------------------------ * Quick fit carriage system https://www.thingiverse.com/thing:1670305 Thanks to **Lukas** https://www.thingiverse.com/lukie80/about * Dasaki Ramps 1.4 Enclosure / Box / Case https://www.thingiverse.com/thing:761806 Thanks to **David Sanz Kirbis** https://www.thingiverse.com/dasaki/about * Case for the Full Graphic Smart LCD Controller https://www.thingiverse.com/thing:87250 Thanks to **Michael Christou** https://www.thingiverse.com/wersy/about * Parametric Z-axis coupler (stepper and threaded rod coupling) https://www.thingiverse.com/thing:1329750 Thanks to **Lorenzo Aspesi** https://www.thingiverse.com/aspesilorenzo/about * Printrbot Simple Metal GT2 Belt Clip https://www.thingiverse.com/thing:746423 Thanks to **Spanner Hands** https://www.thingiverse.com/SpannerHands/about * MiniDrill Mountings https://www.tinkercad.com/things/kVAEjzTXiO7#/ Thanks to **Miguel Braidot** https://www.thingiverse.com/mabraidot/about * TUSH - The Ultimate Spool Holder https://www.thingiverse.com/thing:2047554 Thanks to **Vassil Gounev** https://www.thingiverse.com/filamentry/about * UPGRADING YOUR RAMPS WITH HIGH POWER COMPONENTS http://www.instructables.com/id/Upgrading-Your-RAMPS-With-High-Power-Components/ Thanks to **AndJoeG** http://www.instructables.com/member/AndJoeG/ * INCREASING VOLTAGE SERVER SWITCHED POWER SUPPLY https://pa0fri.home.xs4all.nl/Diversen/DPS-800GB%20A%20Server%20sypply/DPS-800GB%20A%20PSU%20eng.htm Thanks to **Frits, PAØFRI** https://pa0fri.home.xs4all.nl/ The DESIGN & CONSTRUCTION ========================== **All parts design was made by myself from scratch with OpenSCAD.** Designed Parts (0x04..0x19): - ###Part 04: 3xBearing_Ring cnc_laser_04_3xBearing_Ring.scad cnc_laser_04_3xBearing_Ring.stl Quantity: 12 pcs Params/1: Supports: No Layer: 0.2 Infill 20% Time: 30 min Weight: 4.45 g Length 1.75: 1480.6mm Purpose: Main housing for MR83ZZ bearing to slide over d25 tubes Assemble guide: Push 3 x MR83ZZ bearing into the holes, fix with M3 screw and nut gently. Put 2x on every of 6x d25 1 meter tubes. ###Part 05: hole_helper (not a permanent part, used only during building) cnc_laser_05_hole_helper.scad cnc_laser_05_hole_helper.stl Quantity: 2 pcs Params/1: Supports: No Layer: 0.2 Infill 20% Time: 15 min Weight: 2.41 g Length 1.75: 802.1mm Purpose: To achieve exactly parallel holes on both ends of a tubes Assemble guide: Measure and cut d25 tube first. Fit 2 hole helpers on the both ends of the tube. The end of each tube shuld exectly match with hole helper. Put a tube an a horizontal surface. Drill first upper hole with 2mm drill. Insert a short 2mm nail in a hole (don’t remove hole helper). Drill the second upper hole on another end of a tube. Insert a short 2mm nail in a hole (don’t remove hole helper). Accuratly turn the tube upside down and drill both end bottom holes (currently they are on the top) with 2mm drill. Remove both nails. Remove both hole helpers. Drill a holes smoothly increasing drill sizes until you got ~10.5mm holes. ###Part 06: BaseGasket cnc_laser_06_BaseGasket.scad cnc_laser_06_BaseGasket.stl Quantity: 4 pcs Params/1: Supports: No Layer: 0.2 Infill 100% Time: 1 min Weight: 0.09 g Length 1.75: 31.5mm Purpose: To fill clearance between aluminum u-profiles of the base Assemble guide: Сombine a holes in an aluminum u-profiles of a base, insert gasket and then insert M10 threaded rod from top. Fix with M10 nut from bottom. ###Part 07: FixtureRing cnc_laser_07_FixtureRing.scad cnc_laser_07_FixtureRing.stl Quantity: 8 pcs Params/1: Supports: No Layer: 0.2 Infill 20% Time: 31 min Weight: 5.00 g Length 1.75: 1661.8mm Purpose: 1)To fix 2 moving tubes and 2) fix rubber belts Assemble guide: 1) Fix 4 pcs to StepperFrame_v3a (after complete assemble of GuideRoller_v3 and Stepper fixture) with M3 screws and nuts then fix to the tube with upper holes M3 screw and nut. 2) Fix to the front and back tubes near each end with upper holes M3 screw and nut. ###Part 08: StepperFrame cnc_laser_08_StepperFrame_v3a.gcode cnc_laser_08_StepperFrame_v3a.scad cnc_laser_08_StepperFrame_v3a.stl Quantity: 4 pcs Params/1: Supports: Yes, Brim: Yes (included in provided .gcode file) Layer: 0.2 Infill 20% Time: 57 min Weight: 10.12 g Length 1.75: 3366.2mm Purpose: To fix steppers and free ends of moving tubes Assemble guide: Insert assembled GuideRoller_v3 screws. Fix stepper on stepper end only. Fix FixtureRing. ###Part 09: GuideRoller cnc_laser_09_GuideRoller_v3.scad cnc_laser_09_GuideRoller_v3.stl Quantity: 8 pcs Params/1: Supports: No Layer: 0.15 Infill 100% Time: 14 min Weight: 0.37 g Length 1.75: 123.2mm Purpose: To hold and guide a belts to GT2 timing pulley Assemble guide: Fix a MR83ZZ bearing on a 32mm M3 screw with two M3 nuts. Push GuideRoller on a MR83ZZ bearing gently until stop. Insert two assembled Rollers into StepperFrame_v3a according a picture provided. ###Part 0A: FixtureFrame cnc_laser_0A_FixtureFrame.scad cnc_laser_0A_FixtureFrame.stl Quantity: 12 pcs Params/1: Supports: No Layer: 0.2 Infill 20% Time: 13 min Weight: 2.25 g Length 1.75: 746.9mm Purpose: 1)To fix a space between each pair of 3xBearing_Rings on a static tubes 2) To hold ends of front and back rubber belts. Assemble guide: 1)Attach two of FixtureFrame to the both bottom MR83ZZ bearing “ears” of the 3xBearing_Rings on a static tubes.2) Push FixtureFrame on the top of each FixtureRing on a ends of front and back static tubes. ###Part 0B: HeadPlate (middle) cnc_laser_0B_HeadPlate.scad cnc_laser_0B_HeadPlate.stl Quantity: 1 pcs Params/1: Supports: No Layer: 0.2 Infill 20% Time: 1h 9 min Weight: 11.22 g Length 1.75: 3730.5 mm Purpose: Head middle plate. Assemble guide: Insert 4 M8 threaded rods into the bottom HeadPlate. Collect all 4 3xBearing_Ring symmetrically add four HeadFixers (two 2a and two 2b). Insert M8 threaded rods of bottom plate into four HeadFixers holes from bottom. Attach middle HeadPlate and then top the top. Fix with M8 nuts from both sides. Look at the pictures provided. ###Part 0C: LaserMount cnc_laser_0C_LaserMount.scad cnc_laser_0C_LaserMount.stl Quantity: 1 pcs Params/1: Supports: No Layer: 0.2 Infill 20% Time: 1h 26 min Weight: 14.31 g Length 1.75: 4760.7 mm Purpose: Mount Laser on a Head. Assemble guide: Attach Laser with M3 screws. Attach LaserMount on two diagonal M8 threaded rods and fix with M8 nuts. ###Part 0D: OptSensorFixture cnc_laser_0D_OptSensorFixture.scad cnc_laser_0D_OptSensorFixture.stl Quantity: 2 pcs Params/1: Supports: No Layer: 0.2 Infill 20% Time: 27 min Weight: 2.87 g Length 1.75: 953.9 mm Purpose: Mount Optical Endstop Sensor to M10 threaded rod. Assemble guide: Attach Sensor with M3 screw and nut. Attach OptSensorFixture to the M10 threaded rod with two M10 nuts. According to the picture. ###Part 0E: OptSensorFlag cnc_laser_0E_OptSensorFlag.scad cnc_laser_0E_OptSensorFlag.stl Quantity: 2 pcs Params/1: Supports: No Layer: 0.2 Infill 20% Time: 7 min Weight: 0.40 g Length 1.75: 133.1 mm Purpose: Cover IR beam of Optical Endstop sensors. Assemble guide: Paint with black nail polish from both sides! Attach to Stepper with M3 screw Adjust to be in a middle of Optical Sensor in a zero position. ###Part 0F: HeadFixer cnc_laser_0F_HeadFixer_v2a.scad cnc_laser_0F_HeadFixer_v2a.stl cnc_laser_0F_HeadFixer_v2b.scad cnc_laser_0F_HeadFixer_v2b.stl Quantity: 4 pcs (2a + 2b) Params/1: Supports: No Layer: 0.2 Infill 20% Time: 35 min Weight: 5.89 g Length 1.75: 1958.3 mm Purpose: Fix .four 3xBearing_Rings together Assemble guide: Insert 4 M8 threaded rods into the bottom HeadPlate. Collect all 4 3xBearing_Ring symmetrically add four HeadFixers (two 2a and two 2b). Insert M8 threaded rods of bottom plate into four HeadFixers holes from bottom. Attach top HeadPlate on the top. Fix with M8 nuts from both sides. Look at the pictures provided. ###Part 10: StepperPlate (top) cnc_laser_10_StepperPlate1.scad cnc_laser_10_StepperPlate1.stl Quantity: 1 pcs Purpose: Fix Z-axis Stepper Params/1: Supports: No Layer: 0.2 Infill 20% Time: 1h 45 min Weight: 26.43 g Length 1.75: 8789.2 mm Assemble guide: Attach Z-axis Stepper with 4 M3 screews. Insert 4 M8 threaded rods into the bottom HeadPlate. Collect all 4 3xBearing_Ring symmetrically add four HeadFixers (two 2a and two 2b). Insert M8 threaded rods of bottom plate into four HeadFixers holes from bottom. Attach middle HeadPlate and then top the top. Fix with M8 nuts from both sides. Look at the pictures provided. ###Part 11: HeadPlate_Bottom cnc_laser_11_HeadPlate_Bottom.scad cnc_laser_11_HeadPlate_Bottom.stl Quantity: 1 pcs Params/1: Supports: No Layer: 0.2 Infill 20% Time: 2h 34 min Weight: 33.35 g Length 1.75: 11092.4 mm Assemble guide: Insert 4 M8 threaded rods into the bottom HeadPlate. Collect all 4 3xBearing_Ring symmetrically add four HeadFixers (two 2a and two 2b). Insert M8 threaded rods of bottom plate into four HeadFixers holes from bottom. Attach middle HeadPlate and then top the top. Fix with M8 nuts from both sides. Look at the pictures provided. ###Part 12: Z_Plate cnc_laser_12_Z_Plate.scad cnc_laser_12_Z_Plate.stl Quantity: 1 pcs Params/1: Supports: No Layer: 0.2 Infill 20% Time: 1h 4 min Weight: 15.70 g Length 1.75: 5220.5 mm Assemble guide: Insert M8 nut in a hole. Wind on Z-axis threaded rod. Fit tight on Z-axis d25 tubes with 4x M3 nuts and 4x M3 screws. ###Part 13: SplittedFixture (for optical X,Y endstop sensors) cnc_laser_13_SplittedFixture.scad cnc_laser_13_SplittedFixture.stl Quantity: 2 pcs Params/1: Supports: No Layer: 0.2 Infill 20% Time: 26 min Weight: 5.76 g Length 1.75: 1917.3 mm Assemble guide: Insert 2 x M3 nuts in a holes. Put parts from both sides of d25 tube near 0.0 by XY coords and fix with 2 x M3 screws. Attach optical endstop sensor. ###Part 14: EndStopZ (fixture for Z Endstop) cnc_laser_14_EndStopZ.scad cnc_laser_14_EndStopZ.stl Quantity: 1 pcs Params/1: Supports: No Layer: 0.2 Infill 20% Time: 11 min Weight: 0.81 g Length 1.75: 269.0 mm Assemble guide: use one of Z stepper screw to fix EndStopZ holder. Attach Z Endstop Optical sensor with m3 screw and nut. Use a piece of insulation tape to prevent electrical contacts. ###Part 15: SpindleFixture (**Optional:** to fix custom 12v motor spindle) cnc_laser_15_SpindleFixture.scad cnc_laser_15_SpindleFixture.stl Quantity: 2 pcs Params/1: Supports: No Layer: 0.2 Infill 20% Time: 31 min Weight: 6.79 g Length 1.75: 2258.4 mm ###Part 16: DremelFlexibleFixture (**Optional:** to fix Dremel flex shaft) cnc_laser_16_DremelFlexibleFixture.scad cnc_laser_16_DremelFlexibleFixture.stl Quantity: 2 pcs Params/1: Supports: No Layer: 0.2 Infill 20% Time: 17 min Weight: 3.43 g Length 1.75: 1141.8 mm Assemble guide: Attach to the custom plate from "Quick fit carriage system" with pair of M3 screws and nuts ###Part 17: marker (**Optional:** to fix pencil or marker) cnc_laser_17_marker.scad cnc_laser_17_marker.stl Quantity: 1 pcs (3 sizes) Params/1: Supports: No Layer: 0.2 Infill 20% Time: 9 min Weight: 1.74 g Length 1.75: 579.7 mm Assemble guide: use acetone as a glue to glue to the custom plate from "Quick fit carriage system" ###Part 18.3: coupler3 top M10 to 2x M8 threaded rod ridgepole fixtures cnc_laser_18_coupler3_ok.scad cnc_laser_18_coupler3.stl Quantity: 4 pcs Params/1: Supports: No Layer: 0.2 Infill 20% Time: 22 min Weight: 3.04 g Length 1.75: 1010.8 mm Assemble guide: cut the internal thread with a tap on M8. Screw M8 threaded rod into 18.3 on the top and 18.4 at the bottom. Drill a M3 hole in the base in place. Fix with M3 screw and nut. ###Part 18.4: coupler4 bottom M8 threaded rod ridgepole fixtures cnc_laser_18_coupler4.scad cnc_laser_18_coupler4.stl Quantity: 8 pcs Params/1: Supports: Yes Layer: 0.2 Infill 20% Time: 23 min Weight: 2.77 g Length 1.75: 922.6 mm Assemble guide: cut the internal thread with a tap on M8. Screw M8 threaded rod into 18.3 on the top and 18.4 at the bottom. Drill a M3 hole in the base in place. Fix with M3 screw and nut. ###Part 19: heated_table_connector_strip1 cnc_laser_19_heated_table_connector_strip1.scad cnc_laser_19_heated_table_connector_strip1.stl Quantity: 4 pcs Params/1: Supports: Yes Layer: 0.2 Infill 20% Time: 31 min Weight: 5.89 g Length 1.75: 1959.1 mm Assemble guide: Use a kitchen cutting board from strained glass. Remove a picture with hot air gun. (Don't remove glue). Attach to 1-1.2 mm alluminium plate. Cover alluminium with 2-3 layers of captone tape. Use nichrome wires. Look at a pictures for detailes ;-) Firmware: -- Marlin_1.1.8_Configuration.zip - My Configuration files for Marlin Firmware Laser PWM control is attached to D6 at Servos ramps 1.4 connector. Laser power is controlled by: M3 Sxxx - Laser On: xxx=0..255, 255 - max M5 - Laser Off Test code: -- PowerTestCode.zip - Code to generate Laser power test .gcode files (windows) TestGcode.zip - Test files to start with CAM Software Used: -- ###Laser GRBL 2.8.35: Vectorize mode only (without filling). Postprocess: Replace: "M5 S255" -> "M3 S0" "M3" -> "M3 S255" "M5" -> "M3 S0" Rename: .nc -> .gcode ###Av's SVG to GCODE v 1.2.6 Preprocess: check initial svg units (Marlin works in mm only): Replace 'width="4in" height="3in"' <svg xmlns="http://www.w3.org/2000/svg" xml:space="preserve" width="4in" height="3in" version="1.1" style="shape-rendering:geometricPrecision; text-rendering:geometricPrecision; image-rendering:optimizeQuality; fill-rule:evenodd; clip-rule:evenodd" viewBox="0 0 4000 3000" with 'width="4000" height="3000"' from 'viewBox="0 0 4000 3000"' <svg xmlns="http://www.w3.org/2000/svg" xml:space="preserve" width="4000" height="3000" version="1.1" style="shape-rendering:geometricPrecision; text-rendering:geometricPrecision; image-rendering:optimizeQuality; fill-rule:evenodd; clip-rule:evenodd" viewBox="0 0 4000 3000" Postprocess: Replace: " M62 P0" -> "" "M3 S1" -> "M3 S255" "M5" -> "M3 S0" Ordered Parts: -- 1x: DIY 5.5W high power 450nm Focusing Blue Laser Engraving cutting TTL 5500mW 1x10m: Hot sale 10meter GT2-6mm open timing belt width 6mm GT2 2GT Timing belt 4x: 20teeth GT2 Timing pulley 8mm 1x: 50 PCS high quality MR83ZZ(3*8*3 )MINI bearings 3*8*3 ABEC-3 MR83ZZ bearing--- free shipping $11.33 https://www.aliexpress.com/item/*/32440196802.html 1x: Free shipping !! 3D printer smart controller RAMPS 1.4 LCD 12864 LCD control panel blue screen $8.80 https://www.aliexpress.com/item/*/1952896825.html 1x: Free shipping 3PCS Nema17 Stepper Motor 42 motor Nema 17 motor 42BYGH 1.7A (17HS4401) motor 4-lead for 3D printer https://www.aliexpress.com/item/*/32665922113.html 1x: 3D Printer 1pc Mega 2560 R3 + 1pc RAMPS 1.4 control panel+ 5pcs DRV8825 Stepper Motor Drive Carrier Reprap for 3D printer kit $17.50 https://www.aliexpress.com/item/*/32599773680.html 2x: 1pcs IR Infrared Slotted Optical Speed Measuring Sensor Optocoupler Module For Motor Test For Arduino PIC AVR https://www.aliexpress.com/item/*/32802060247.html ~7m: Chrome Tube Hanging Rail d=25mm s=1mm L=3m ~$1/meter 2x: 8mm x 2000mm Stainless Steel M8 Threaded Rod 1x: 10mm x 2000mm Stainless Steel M10 Threaded Rod 4x: ALUMINIUM U-PROFILE 20mm x 15mm x 2mm x 1000mm m8 x 1.25 nut m10 x 1.25 nut m10 washer m3 nut: https://www.aliexpress.com/item/*/32729344815.html M3 screw 3 Phillips Pan Head: https://www.aliexpress.com/item/*/32776662981.html 2x: 608ZZ Bearing 8x22x7 mm ( 10 PCS ) ABEC-5 Skate Stroller Miniature 608 ZZ Ball Bearings 608Z 608 2Z Bearing https://www.aliexpress.com/item/*/549643998.html
With this file you will be able to print Huge Cheap Home CNC (#hchcnc) with your 3D printer. Click on the button and save the file on your computer to work, edit or customize your design. You can also find more 3D designs for printers on Huge Cheap Home CNC (#hchcnc).