Human brain mold (anatomically correct)
prusaprinters
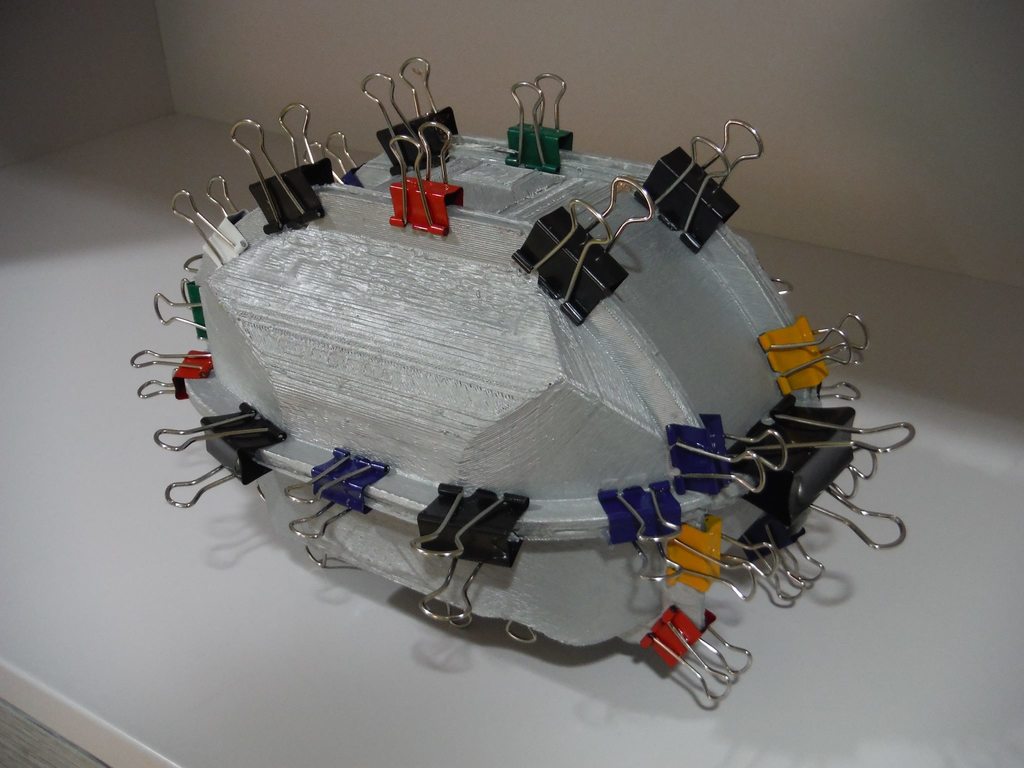
<p>A mold to make a cast in the shape of an anatomically correct human brain (made using the MiloMi's <a href="https://www.thingiverse.com/thing:371899">model</a>), including instructions for making the mold and the gelatine cast (see the Post Printing section).</p><p>An artist friend of mine needed an anatomically correct model of a human brain that could be melted and asked me to help her. I ended up using FX-grade gelatine and we melted it in a controlled manner using a 3D-printer heated bed.</p><h3>Print Settings</h3><p><strong>Printer:</strong></p><p>Heavily modded Craftbot</p><p><strong>Rafts:</strong></p><p>Yes</p><p><strong>Supports:</strong></p><p>Yes</p><p><strong>Resolution:</strong></p><p>0.3mm</p><p><strong>Infill:</strong></p><p>15%</p><p><strong>Notes:</strong></p><p>You are going to need a mid-sized 3D-printer for this one, mine is 25 x 20 x 20cm and I could print two pieces at once.</p><p>This is a large project, could come to about half a kilogram of filament alltogether. I printed it in three stages with two mold pieces each out of ABS, so it can take the ~60°C expected when pouring gelatin. You could also do it with PLA, but in that case, be careful when casting - the liquid gelatine should not exceed about 50°C.</p><p>Support is mandatory and I suggest you orient the models with the smooth side at 45° towards the print bed, this will save supports and make the side with the whorls look better.</p><p>You don't need a high resolution here, the 3D-printed structure actually adds a lovely additional texture that enhances the overall look of the cast. This will save you a LOT of time.</p><h3>Post-Printing</h3><p><strong>Make the mold non-porous</strong></p><p>When the mold pieces are printed, clean them up and then paint them with spray paint or lacquer, so they are no longer porous. This will help you separate the cast from the mold. Wait until the paint dries.</p><p><strong>Glue the mold pieces together using silicone for a watertight mold</strong></p><p>Take some non-acidic silicone and apply a thin! (you will have to cut it after casting) trace of silicone on the outer side of one of the flanges of one of the mold pieces.</p><p>Take another mold piece and press the matching flange on the flange you just pasted with silicone. Align the flanges carefully and fix them using 4-6 foldback clamps per flange join.</p><p>Apply some more silicone on one of the unglued flanges on the glued part and add the next mold piece in the same way.</p><p>I suggest you do the top three pieces first (center, left and finally right part), then bottom three pieces (center, left and right). This way you get a top and bottom part, which you can then glue together in one step.</p><figure class="image"><img src="https://media.printables.com/media/prints/214693/rich_content/28531fad-6f1d-4062-bd67-3e53700de34e/img_20171129_124846_214693.webp#%7B%22uuid%22%3A%22a03ba6cf-e3fe-43f1-bd86-6645497c7c31%22%2C%22w%22%3A1920%2C%22h%22%3A1229%7D"></figure><p><i>The top and bottom halves. Note the hole for casting on the bottom half.</i></p><p><strong>Wait for the glue to cure</strong></p><p>With non-acid silicone, you should be good to go in about 3-4 hours. You can now remove the clips.</p><p><strong>Oil the mold</strong></p><p>To later separate the cast from the mold, you need to add a separating agent on the interior surface of the mold. I used cooking oil:</p><ul><li>Pour about 50ml of cooking oil in the mold.</li><li>Move and rotate the mold in all possible directions so the oil coats the entire interior. Do this above the sink to prevent a mess.</li><li>Try to pour out the remaining oil, but don't worry too much about some of it staying inside.</li></ul><p><strong>Prepare the FX-gelatine</strong></p><p>The original size mold holds about 800ml of liquid, I suggest you make a liter of gelatine so you don't run out.</p><p>The recipe is based on <a href="http://www.learnmakeupeffects.com/making-gelatine/">this excellent article</a>. You will need:</p><ul><li>100g of gelatine (FX-grade is best, but I was able to do this with regular cooking gelatine powder)</li><li>300ml of glycerine (cheap is ok, I paid 7€ for 1 liter pharma-grade glycerine in the local farm supplies store)</li><li>500g of table sugar (preferably white)</li><li>(optional) Some red or pink food dye.</li><li>Thermometer</li></ul><p><i>Preparation</i> 1. Put the gelatine in 300ml of room-temperature water. Mix and let the gelatine bloom for 15 minutes. 2. Then add glycerine and sugar (and optionally a bit of food dye), mix and put in microwave oven for 1 minute. Mix again and check temperature. If less than 60°C, add in microwave again for 30 seconds, mix and check temperature. Continue the heat-and-mix cycle until the temperature is above 60°C. 3. Now stir the mixture for at least 20 minutes, until everything is dissolved and the mixture is mostly clear. Your FX-gelatine is ready.</p><p>Please note: As long as you keep it refrigerated, you can remelt and cast the FX-gelatine several times. Just heat it in the microwave for 30 seconds and repeat until it is mostly melted, then stir. Do not overheat, it will destroy the gelatine, and boiling will cause bubles.</p><p>REGULAR GELATINE WILL NOT WORK, IT IS TOO BRITTLE!</p><p><strong>Make the cast</strong></p><p>Turn the mold with the casting hole upwards and pour in the gelatine. Do this in a kitchen sink to avoid the mess.</p><p>When full, angle the mold a bit, so the air can escape. Add extra gelatine and angle some more.</p><p>Put the mold in a baking pan (to catch any possible leaks) and let it stand at room temperature.</p><p>After an hour or so, you will find that the gelatine contracted a bit. Heat up the leftover gelatine in a microvave and pour some more until the mold is full again.</p><p>Leave to cool.</p><figure class="image"><img src="https://media.printables.com/media/prints/214693/rich_content/cf00aec6-7a9e-45b4-8e08-95c2bc0a83ac/img_20171204_181044_214693.webp#%7B%22uuid%22%3A%22c968aef7-a90b-4ba6-bd3c-89e0d73849e3%22%2C%22w%22%3A810%2C%22h%22%3A1440%7D"></figure><p><i>The sink is your friend</i></p><p><strong>Wait</strong></p><p>The longer the gelatine sets, the firmer it gets and the better it separates from the mold. Do not be hasty, it needs to sit at least overnight, but several days are even better. After the first day, put it in a refrigerator so it doesn't spoil.</p><p><strong>Cut the mold open</strong></p><ol><li>Take a boxcutter and extend the blade for about 10mm (the width of the flange - this will prevent cutting into the gelatine).</li><li>Insert the blade between two flanges and cut down the whole length of a flange. Repeat for all flange pairs. Please be CAREFUL: the boxcutter is among the most dangerous tools you have.</li><li>Take a thin, but not sharp!, tool for prying apart the mold pieces. A table knife works well.</li><li>Starting with the lower side mold piece, insert the knife between flanges and pry the flanges apart until remaining silicone gives way.(~5mm). You will feel a clear distinction between the force of the glue and the gelatine.</li><li>When the glue gives way, GENTLY and SLOWLY rock the mold piece in all directions until the gelatine loosens from the mold. Save any detached pieces of gelatine for repair later.</li><li>Repeat steps 4 and 5 in the following sequence: lower side pieces, upper side pieces, lower center piece, upper center piece. After the first piece is removed, you can help the loosening of gelatine with your finger.</li></ol><p>Remember, patience is key here, you will need at least half an hour for this step. Or the cast will come apart in too many pieces to fix.</p><figure class="image"><img src="https://media.printables.com/media/prints/214693/rich_content/e1f35ca7-1662-4662-9417-6aaafe43a41e/img_20171205_101404_214693.webp#%7B%22uuid%22%3A%2234614f4b-63c5-42a2-81a2-6f0764fb2d05%22%2C%22w%22%3A1920%2C%22h%22%3A1378%7D"></figure><p><i>This happens to hasty people (or in my case, with regular gelatine)</i></p><p><strong>If needed: Repair</strong></p><p>Even when careful, some pieces can break away from the cast. You can glue them back on the cast using heat. You will need a hairdryer and some patience.</p><ol><li>Heat up the bottom part of the broken-off piece with the hair dryer until it starts to melt just a bit (about 10 seconds).</li><li>Stick it on the right place on the cast and hold it still for a few minutes, until it sticks (the gelatin needs to harden again).</li><li>Repeat steps 1 and 2 for all remaining pieces.</li></ol><figure class="image"><img src="https://media.printables.com/media/prints/214693/rich_content/ad4c5638-52b7-4683-898d-d56cbdb83811/img_20171208_125356_214693.webp#%7B%22uuid%22%3A%2298e84057-4f54-48b3-a289-bd69c348c76a%22%2C%22w%22%3A810%2C%22h%22%3A1440%7D"></figure><p><i>Almost done</i></p><figure class="image"><img src="https://media.printables.com/media/prints/214693/rich_content/452e8914-1ac4-4692-961f-a9fe3d0a0b22/img_20171208_134213_214693.webp#%7B%22uuid%22%3A%2271cb50ea-2486-4912-9c48-7a940477a557%22%2C%22w%22%3A1920%2C%22h%22%3A1080%7D"></figure><p><i>Congratulations</i></p><p>You now have a lovely looking cast of a human brain :)</p><p><strong>Optional: Melt the thing ;)</strong></p><p>In my case, the brain cast was destined to be melted again. I used a heated bed for a 3D-printer at 100°C, it took about an hour, see the timelapse below.</p><p>Remember, the gelatine can be recycled and recast several times.</p><p>Have fun!</p><figure class="media"><oembed url="https://youtu.be/nREd8-KuxhM"></oembed></figure><h3>How I Designed This</h3><ul><li>I used Fusion 360 to trace a rough outline of the brain as two sketches, one horizontal and one vertical.</li><li>I then extruded one sketch and cut it with the other. This gave me the solid from which the mold was made.</li><li>I cut the solid in half and hollowed it to have 25mm thick walls. This was to prevent overly deep parts projecting into the cast. I then rejoined the solid.</li><li>I cut the solid with two vertical and one horizontal plane to get the six mold pieces.</li><li>I then made sketches on the cut surfaces and extruded 10mm long and 5mm thick flanges for holding the mold together.</li><li>This is it for Fusion, since it can't do a Boolean substraction of a STL model, so I exported the pieces as STL. (I think Fusion is now updated to support this directly.)</li><li>I imported the pieces in Netfabb along with the MiloMi's brain <a href="https://www.thingiverse.com/thing:371899">model</a>. I then performed boolean substraction of the brain model from the mold pieces.</li><li>Cleaned up the pieces and saved them as STL.</li></ul>
With this file you will be able to print Human brain mold (anatomically correct) with your 3D printer. Click on the button and save the file on your computer to work, edit or customize your design. You can also find more 3D designs for printers on Human brain mold (anatomically correct).