Hummer H3 Power Station
thingiverse
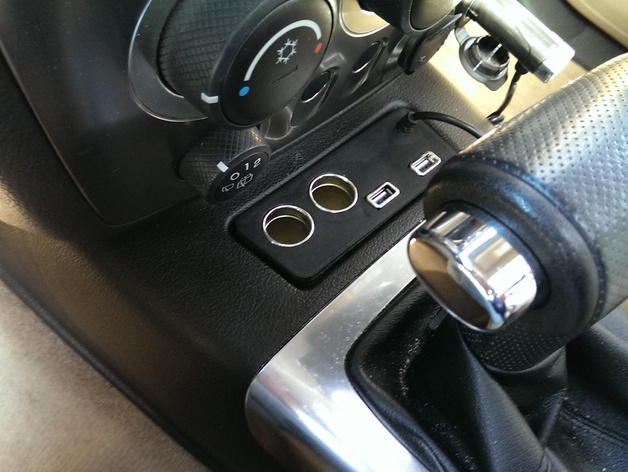
This was a custom design for a coworker who has a 2008 Hummer H3. She handed me a Bell Power Station ($14 on Amazon)... http://www.amazon.com/Bell-Automotive-22-1-39275-8-Station-Holder/dp/B008QBTV4G/ ...and asked if I could gut it and make a new case for it that would fit into an otherwise useless pocket near her dash. This turned out to be a major challenge because of the space constraints, but I managed to do it. The circuit board for the USB ports was a real estate hog and left little room for the two cigarette ports. But enough of my whining. The good news is, now that it is designed, the printing and assembly is more or less trivial (assuming you can solder and have a basic understanding of electricity). See the "Instructions" tab for details. Instructions Print one of each part. You will want to use ABS or PET. PLA will melt and shrivel in the heat of a car's interior. I'd also print them mostly solid. The bracket might need support, but the others do not. You will want to get a really nice first layer for the faceplate, as that will be the only thing that is seen. Now follow these steps: 1) Take apart the Bell Power Station - save the screws and the chrome plastic bezels. 2) Unsolder the power cord and two cigarette ports. You can leave the wires coming from the USB board. 3) Insert the two chrome rings/bezels for the cigarette ports. Mind the notch. You might have to file the holes slightly to get them to fit. You may also have to shave just a little plastic from the rim around the closest USB hole. No worries. 4) Now install the bezels for the USB Ports. Some filing may once again be needed. 5) Lay the faceplate face-down on a soft cloth. Place the two cigarette ports in place on top of the bezels. Mind the notches again. 6) Secure the cigarette ports with the bracket and four of the screws that you saved. If the bracket does not seem to hold tightly enough, snip/trim/file a little bit of height off of the four mounting posts. Do not over tighten the screws. 7) Attach the USB circuit board with two more screws. Again, there is no need to get crazy while tightening these. Snug will do. 8) Use super glue to glue the power cord in place. You will have to trim off some rubber to get it to fit into the hole. Superglue should hold wonderfully if you printed in ABS. 9) Wire everything up. The USB board and the two Cigarette ports need access to the 12V coming in from the power cord. How you accomplish this is up to you. Just remember that the outside of the power ports are negative (black) and the centers are positive (red). If that confuses you, stop now and ask for help before you set your car on fire. 10) Glue on the walls with superglue. Yes, I know. This is very lame. But the walls are not put under any stress when in place, other than compressive, so I don't feel too ashamed about this. 11) Optionally line the outside with felt or rubber for a nice fit and prevention of rattling. Although, I suppose you would probably not hear this in a Hummer. It's up to you. Also, yes, I know there is no bottom. Feel free to make one if this bothers you. I used felt. I am actually a bit ashamed of that. Just a bit. 12) Profit!
With this file you will be able to print Hummer H3 Power Station with your 3D printer. Click on the button and save the file on your computer to work, edit or customize your design. You can also find more 3D designs for printers on Hummer H3 Power Station.