Hummingbird with exposed infill
prusaprinters
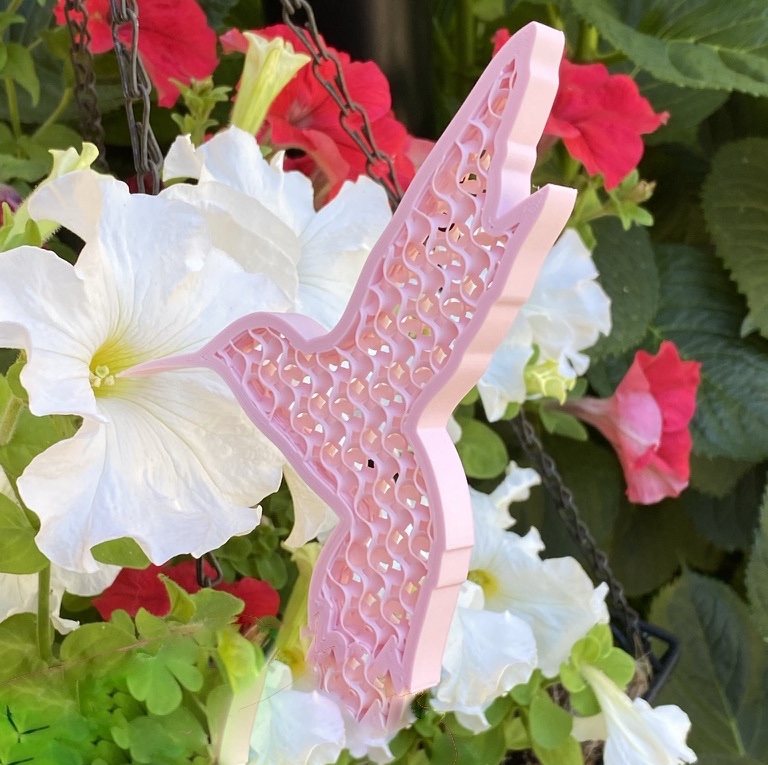
<p>This is a bit of a do-it-yourself project to print a hummingbird silhouette with interesting infill. The basic idea is to print the interior with no top or bottom layers to expose the infill. When you first import the STL, it will look solid, but it is actually composed of an exterior and an interior as shown in these images:</p><figure class="image image_resized" style="width:50%;"><img src="https://media.prusaprinters.org/media/prints/68704/rich_content/5bd24564-e542-46b3-9bb4-413f29c879bd/model.png#%7B%22uuid%22%3A%22c64ff3a3-ff6c-4136-96f3-7ec61d3cfce5%22%2C%22w%22%3A1082%2C%22h%22%3A1034%7D"></figure><figure class="image image_resized" style="width:50%;"><img src="https://media.prusaprinters.org/media/prints/68704/rich_content/ebc1150d-7d14-458f-ba06-8d6a2b29d303/model-exterior.png#%7B%22uuid%22%3A%22b14eeb05-1a02-4b19-b3ba-b7792ee33840%22%2C%22w%22%3A1125%2C%22h%22%3A1053%7D"></figure><figure class="image image_resized" style="width:50%;"><img src="https://media.prusaprinters.org/media/prints/68704/rich_content/f02e8a0f-6750-4589-9eb4-e8c042554df5/model-interior.png#%7B%22uuid%22%3A%2237ed710f-035f-4a32-b4ae-dbde99d094b5%22%2C%22w%22%3A1028%2C%22h%22%3A1055%7D"></figure><p> </p><p>First, determine how big you'd like your hummingbird to be. By default, it will be about 130mm from the tip of the wing to the tip of the tail. The photos show two different sizes. One is the standard size (pink) and the other (yellow) is scaled up to 150%.</p><p>If you were to just slice and print the STL as is, you'd get a solid object. To get the infill effect you need to first split the STL into separate objects using the “Split to objects” button in PrusaSlicer. Other slicers have similar functionality.</p><figure class="image image_resized" style="width:50%;"><img src="https://media.prusaprinters.org/media/prints/68704/rich_content/1ba0c0e0-65c8-4fb7-ac9d-add18548dd69/split-to-objects.png#%7B%22uuid%22%3A%22850483b4-f378-402a-9a4d-ddc5fdfd97ab%22%2C%22w%22%3A199%2C%22h%22%3A150%7D"></figure><p>Now you'll see two objects in the browser panel as shown in the next screenshot. Your objects will be named <i>Hummingbird.stl_1</i> and <i>Hummingbird.stl_2</i>. Toggle the visibility of the objects to determine which is the interior and which is the exterior. </p><figure class="image image_resized" style="width:50%;"><img src="https://media.prusaprinters.org/media/prints/68704/rich_content/6f3acdf6-4e55-4b8b-8903-0fe3267d516e/settings-example-1.png#%7B%22uuid%22%3A%2288118da9-6c59-4454-a0ef-adff6b592b12%22%2C%22w%22%3A422%2C%22h%22%3A868%7D"></figure><p>When you've identified the interior, use the context menu to add <i>Infill</i> options:</p><figure class="image image_resized" style="width:50%;"><img src="https://media.prusaprinters.org/media/prints/68704/rich_content/802b97ab-e7c9-4afa-8d01-58af336161ca/infill-options.png#%7B%22uuid%22%3A%2221d989b1-ab0f-4553-9212-fb747ee9b5c7%22%2C%22w%22%3A412%2C%22h%22%3A457%7D"></figure><p>Use the same menu to add options for <i>Layers and Perimeters</i> and <i>Extrusion Width > Infill</i>. This last option is available under the <i>Add settings</i> submenu.</p><p>First, set <i>Bottom</i>, <i>Perimeters</i>, and <i>Top</i> to 0 under <i>Layers and Perimeters (see the screenshot above)</i>. This will expose your infill. Next, choose an infill type. I really like the look of Gyroid, but try different options and see what you think. You'll see one picture where I used Archimedean Chords (the black one). That's pretty interesting too. Try different infill percentages and potentially different infill extrusions widths and preview the sliced model unit you get the effect you want.</p><p>If needed, you can adjust settings for the exterior using the normal <i>Print Setting</i> options. Now just slice, export, and send it to your printer. I found that for some infill types like Gyroid, I needed to slow down my first layer a bit (maybe 10%) to ensure good adhesion.</p><p><i><strong>Update [2021-06-10]</strong></i>: Based on the very cool multi-material print by user @<a href="https://www.prusaprinters.org/social/119801-johannes-e/prints"><strong>Johannes E</strong></a>, I printed the interior in one color separate from the exterior in another color. I then glued them together. See the last photo. Here are the steps:</p><ol><li>After separating the objects, delete the exterior. Slice the interior with exposed infill as before, but this time leave two perimeters.</li><li>Set the scale to 99.5% to give yourself a little extra clearance. You may find that you don't need to scale it, or you may need to adjust the amount a little.</li><li>Print the interior.</li><li>Re-import the full model and this time, after splitting it into objects, delete the interior.</li><li>Slice and print it as usual.</li><li>When you have printed both parts, press the interior into the exterior and check the fit. </li><li>Once you're happy with it, push the pieces apart, add a dab of glue, and push the interior back in.</li></ol><p>There is more than one way to achieve this result, but I was experimenting with some features of Fusion 360 and it lead me down this path. BTW, the F360 file is included.</p>
With this file you will be able to print Hummingbird with exposed infill with your 3D printer. Click on the button and save the file on your computer to work, edit or customize your design. You can also find more 3D designs for printers on Hummingbird with exposed infill.