Hylian Shield
thingiverse
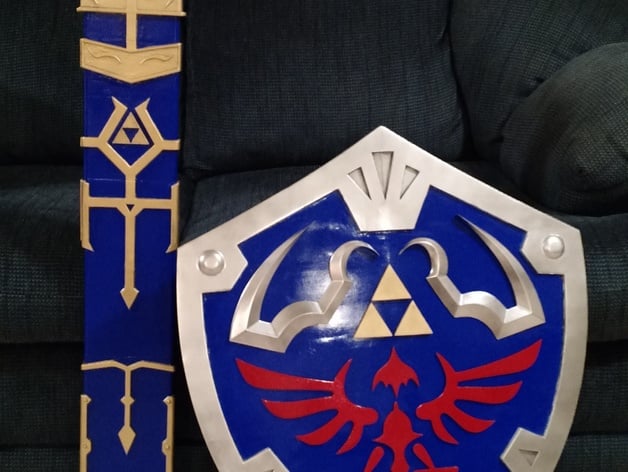
This is a full-sized Hylian Shield I crafted for my Link cosplay. The body consists of 18 distinct parts carefully pieced together to ensure accuracy and detail. Each front piece is designed as a separate entity, allowing for individual painting before being securely attached with glue. This thoughtful design enables users to paint the pieces without worrying about messy glue seepage. The handles on the back are interchangeable, making it possible to use this shield either with your left or right hand. The holder, which complements the scabbard perfectly, allows you to hang the shield at an angle on your back just like in the game. This feature is achieved through the use of magnets, providing a secure yet removable connection. When printing the holder, be aware that it may get trapped between the two strap loops on the back of the scabbard. To avoid this issue, ensure you print the holder with caution. Master Sword Scabbard [Edit 1/20/2019] Following user requests, I have added a "Hylian Shield Single Piece.123dx" file, which contains the entire shield before it's cut into its individual pieces. This version still includes the pegs necessary for placing other parts on the face. Print Settings: Printer Brand: SeeMeCNC Printer: Rostock MAX Rafts: No Supports: Yes Post-Printing: The 18 body pieces were glued together using Gorilla Glue, ensuring a strong and durable bond. To prevent glue from seeping through the seams on the front, I applied blue painters tape along all edges. After gluing, I cleaned any excess glue from the sides and back. Next, I smoothed out the print to prepare it for painting. You can try using XTC-3D, wood filler, spackle, or whatever works best for you. Alternatively, you can use filler primer to achieve a smooth finish. Once primed, sand the surface smooth, prime again, and then paint. For the chrome pieces, start by painting them gloss black. Then apply Spaz Stix Mirror Chrome to achieve a sleek, mirror-like finish. Be sure to follow these steps carefully to achieve professional-looking results. All front pieces were smoothed and painted before being glued into place for the final step. I left off the bottom wing pieces and filled the holes with spackle, but you can use them if desired. The handle pieces were glued in place using Gorilla Glue, creating a secure connection between the shield and the handle. The design features nuts trapped inside the shield pieces, which are then secured with screws to hold the handle firmly in place. Unfortunately, I've misplaced the nuts and bolts used, so I'll leave that detail for you to figure out. I chose brown nylon webbing for my forearm on the left side. For the handle, you have two options: if you won't be mounting the shield to your back, use the "handle.stl" piece; otherwise, print "handle_with_magnets.stl". I used N50 1/2 x 1/8 inch Neodymium Disc Magnets, eight on each of the handle and mount. Ensure that all magnets are glued in correctly. If you print the holder, use small hinges to connect the two pieces. I obtained these hinges from Lowes, but unfortunately, I've forgotten the exact type they were. How I Designed This: I designed this Hylian Shield using 123D Design software.
With this file you will be able to print Hylian Shield with your 3D printer. Click on the button and save the file on your computer to work, edit or customize your design. You can also find more 3D designs for printers on Hylian Shield.