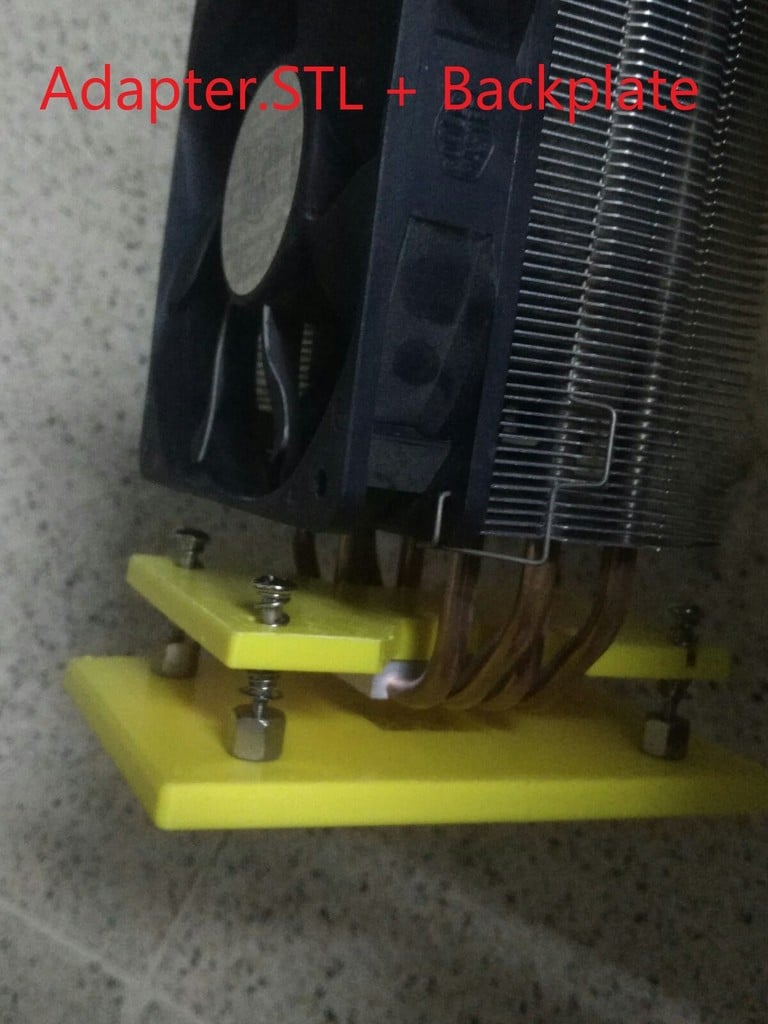
Hyper 212 AM4 bracket/mount/ backplate
thingiverse
I TAKE NO RESPONSIBLITY FOR ANY DAMAGE CAUSED BY THIS! damages include but not limited to: Fire, broken pc parts especially Graphics card so USE AT YOUR OWN RISK!! UPDATE! Backplate Version: 10/1/2021: Old one worked fine but was abit too long and was sitting above some soldered part of motherboard causing it to be uneven which I did not like so I shortened length from 130mm to 120mm, also the width by 5 or 10mm I can't remember. Adapter version: V2 Beta: 2 part print, in testing Phase, so far the temperature are very good with 100% multicore load 10min test at 82c at 60% fan speed, I recommend to use this version. V0.4 Alpha: 1 Part print, Only print this if you want something that just works, My motherboard arrived and tested, it works but I will have to design another one probably consist of 2 parts because current version only allows the heatsink fan to be installed facing top of case or GPU which can cause suffocation and not desired airflow, my ryzen 3600 reach to about 86c 100% multicore load 10minute test with Cinebench 23 with cpu fans 100% . I suggest using ABS or other high glass transition temperature filaments. DON'T use PLA Be careful when using ABS of Warping(causing dimensional inaccuracy) & layer separation(causing fragile prints) so inspect thoroughly post print. What is this? this is an adapter & backplate for old coolermaster hyper 212 that didn't support AM4 out of the box, should be compatible with any version that has the small metal notch and hole in the mount area, not compatible with Hyper 212 V2. Does it work? Yes, make sure your printer is calibrated for hole size (you can use hole horizontal expansion in cura and do some hole calibrations tests before printing these), I'm beginner in designing things and don't know how sturdy it is however I tried my best with dimensions and to make it tough hope it works, any feedback appreciated. What do I need beside the print? original screws, springs, washer, standoffs and nuts Installation: 1. put the nuts in backplate and align the backplate holes to the motherboard, install the standoffs in backplate nuts by rotating the standoffs. 2. Adapter.stl: diagonally put the thin side of adapter into the cooler while aligning the hole and notch. AdapterV2: put insert the heatpipes into AdapterV2P1 , install adapterV2P2 aligning the hole and notch, then drop P1 notched area into the wings of P2. 3. Install screws and springs 4. put paste on cpu 5. align the cooler with the adapter installed to the cooler and screw diagonally alittle bit at first, when all 4 scrwes are in standoffs then tighten the screws make sure cooler sits on cpu but don't exert alot of force or may damage cpu. Tip: You can print with larger size nozzles to save time, I printed mine on 1mm nozzle which saved me hours.
With this file you will be able to print Hyper 212 AM4 bracket/mount/ backplate with your 3D printer. Click on the button and save the file on your computer to work, edit or customize your design. You can also find more 3D designs for printers on Hyper 212 AM4 bracket/mount/ backplate.