Hypercube Evolution Insulated Enclosure
thingiverse
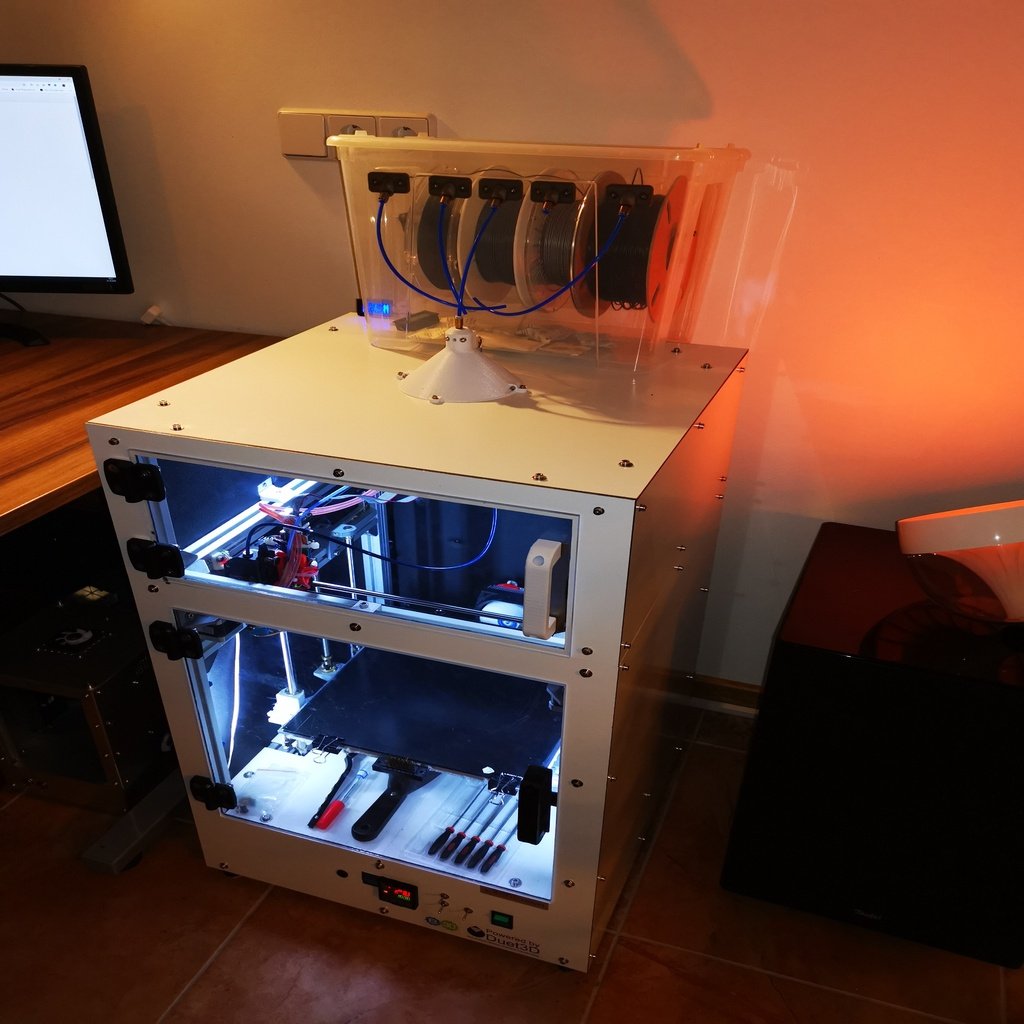
My design of a insulated enclosure for a standard Hypercube Evolution 3D Printer with an build volume of 300x300x300mm. In my Hypercube i've included an extra space for the electronics in the bottom with 100mm extra heigth (Stand extrusion length 600mm). 3D Printed parts: 32 x Distance 10mm (for left and right enclosure plates) 13 x Distance 25mm (for rear enclosure plate) 4 x Distance hinge (for mounting the hinges to the front plate) 2 x Door handle 2 x Magnet holder Parts what you need: - 4 x Multi hinge for 30x30mm extrusion (https://www.ebay.de/itm/Scharnier-Kombischarnier-Kunststoff-30-30-nicht-aushangbar-48-x-59-mm-schwarz/251637007543?hash=item3a96bc04b7:g:HxkAAOSwVFlUCOz7) - 4 x Magnet 12x8x2mm - Insulating mat 10mm thickness (https://www.amazon.de/D%C3%A4mmschaummatte-selbstklebend-verschiedenen-Gr%C3%B6%C3%9Fen-1000x500x10mm/dp/B011L30X6K/ref=sr_1_17?ie=UTF8&qid=1531299576&sr=8-17&keywords=d%C3%A4mmschaummatte) - M4 Screws - M6 Screws - M4 Nuts for 30x30 extrusion - M6 Nuts for 30x30 extrusion Enclosure plates: I've used 3mm Alu DiBond plates with a white surface, the front door is made of 4mm Plexiglas. I've integrated a power switch (Terminal mounting diameter of 28,5x21,5mm) and two switches (Bore diameter 6mm) for switch on/off the lighting and some fans. Dimensional drawings can be found in the file area in the "Enclosure_cut.pdf", for milling I've also uploaded all frame parts as a .dxf file. Chamber heater: Goal of this project was to get a heated chamber for my HEVO to print ABS, ASA, etc. without any warping. Maximum chamber temperature goal was 70°C. To heat up the chamber I've integrated 2 ptc heater in the bottom plate of the enclosure: https://www.amazon.de/gp/product/B07BK1VQTP/ref=ppx_yo_dt_b_asin_title_o03_s00?ie=UTF8&psc=1 The ptc heater are controlled in a combination of a seperated temperature controller and a heater output of the Duet mainboard. The seperated temperature controller is used to limit the PTC heater temperature to 100°C and the heater output of the Duet is used to control the chamber temperature. Both controller outputs have MosFet's connected to switch the heater power: https://www.amazon.de/gp/product/B07L5577CD/ref=ppx_yo_dt_b_asin_title_o02_s00?ie=UTF8&psc=1 To temperature sensors are required, one which is integrated in one of the ptc heaters and is connected to the seperated heater controller and one to measure the chamber temperature (placed in height of the print head) which is connected to the Duet. My experience has shown that the standard air cooling for the E3D V6 is not working so I've upgraded my E3D V6 with a water cooled cold end (Selfmade). Updates: 2018-07-11 - Updated distances that they will fit into the 3030 extrusion together with the nuts. - Uploaded a new magnet holder type for easier fixing the magnets inside, just put the magnets together with a usable glue for your printed material into the printed magnet holder. - Uploaded .DXF files for the enclosure panels made of 3mm Alu DiBond - Uploaded .DXF files for front door and magnetic steel plate mounted at the front door - Uploaded .PDF dimension files 2018-07-19 -Added additional cutout in front panel with 45x45mm for Omron temperature controller for build volume heating 2019-10-27 Updated design with a top cover which is also made of 3mm Alu Dibond with an integrated filament sensor and exhaust fans in the back. For the top cover 5 aditional 25mm and 10 aditional 10mm distances are needed! For the front door you also need 2 aditional hinge distances and 2 aditional hinges! Also a aditional door sheet and a door handle is needed! The filament sensor on the top of the cover is made to integrate the Duet laser filament monitor. To route in the filament you need 2 M5 4mm fittings for example from SMC. For the exhaust fans there can be used fans with mounting hole diameters of 82,5x82,5mm. The aditional 12mm hole in the cover backpanel is used for a mounting fitting (SMC KQE04-00) to route in the air pressure for the component cooling (Berd Air). If you are using a water cooling you may also need 2 more 12mm holes to integrate the same fittings which are used for the component cooling, one for water IN and one for water OUT. Design for a integrated HEPA filter actually outstanding!
With this file you will be able to print Hypercube Evolution Insulated Enclosure with your 3D printer. Click on the button and save the file on your computer to work, edit or customize your design. You can also find more 3D designs for printers on Hypercube Evolution Insulated Enclosure.