Hypercube Linear Rail X Axis
prusaprinters
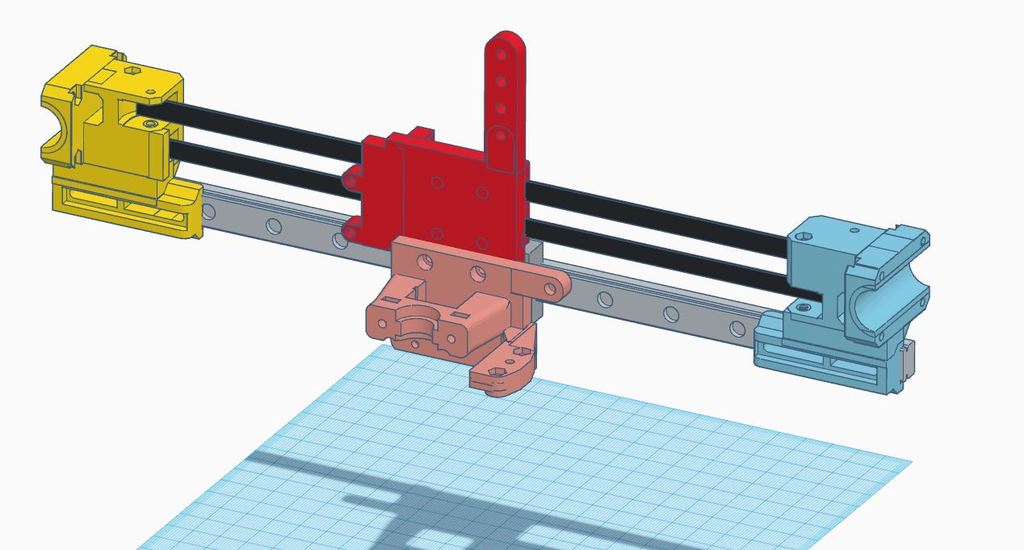
<p><em>I'm still considering this a work in progress as I continue to test the design and get feedback. I'll add pictures in the future as well.</em></p> <p><strong>Ongoing Edits and Changes</strong><br/> <em>EDIT: Apr. 23 2019 - Added an untested mount for the NF 2 in 1 out dual color hot end.</em><br/> <em>https://amzn.to/3e7FE2R</em></p> <p><em>EDIT: Dec. 9 2018 - An error was noticed on the Xmin carriage parts where the rail sits, I removed the error and re-uploaded the Xmin parts.</em></p> <p><em>EDIT: Nov. 16 2018 - I've now tested the 8mm Y rod parts and confirm they perform as expected.</em></p> <p><em>EDIT: Nov. 13 2018 - Added hot end and fan duct mount for the XCR 2in1 dual extrusion hot end (<a href="https://www.aliexpress.com/item/3DSWAY-3D-Printer-Part-XCR-2IN1-V2-Color-Switching-Hotend-Two-Color-NV6-Heated-0-4/32911051621.html">https://www.aliexpress.com/item/3DSWAY-3D-Printer-Part-XCR-2IN1-V2-Color-Switching-Hotend-Two-Color-NV6-Heated-0-4/32911051621.html</a>), other fan ducts may work but may need to be shortened, use my uploaded one for approximate sizing.</em></p> <p><em>EDIT: Nov. 12 2018 - Had to make a quick addition to the X min joiners, the switches weren't engaging before the housings were touching so I added a bit of an offset to help engage the switch earlier.</em></p> <p><em>EDIT: Nov. 2 2018 - Made quick adjustment to the carriage, it had trouble printing and slicing due to thin walls around the holds for the m3 bolts that hold the belt tensioning bracket. Also added (untested) mounts for an E3D Titan and BL-Touch</em></p> <p><strong>Summary</strong><br/> These are parts for a Hypercube conversion to using MGN12H linear rails for the X axis linear movement rather than the standard steel/aluminum/carbon-fiber rods. The goal was to keep the parts simple and printable without supports. The outcome is a motion system that involves less parts and seems more rigid than the stock design. Demo: <a href="https://youtu.be/igHfxheWQmU">https://youtu.be/igHfxheWQmU</a></p> <p>There are parts available whether your running 8mm or 10mm Y linear rods. Also the joiners utilize 20t idlers. Also I've made the mounting for the MGN12 onto the joiner fairly compliant so sizing should be more forgiving. You'll want to have at least two bolts for each side to prevent any pivoting.<em>I still need to figure out the best size bolt and nut for this, I used some random I had in my shop at the time, I'll provide those specs and other possibilities in the future.</em></p> <p>Note that the carriage and hot end mount directly to the MGN12H carriage, so the spacing of the mounting points is not standard Hypercube. Also a quirk is that the fixed and adjustable belt mounting to the carriage is reversed from standard Hypercube, though it shouldn't matter. Finally this carriage also has the integrated belt tensioner system from Anukwolf</p> <p>Additional Printed Parts Needed:<br/> Joiner Clamps - 10mm - <a href="https://www.thingiverse.com/thing:2012264">https://www.thingiverse.com/thing:2012264</a><br/> Joiner Clamps - 8mm - <a href="https://www.thingiverse.com/thing:1752766">https://www.thingiverse.com/thing:1752766</a><br/> Belt Tensioner Components - <a href="https://www.thingiverse.com/thing:2758419">https://www.thingiverse.com/thing:2758419</a></p> <p>Components Used:<br/> 400mm MGN12 Rail and Bearing Block - https://amzn.to/3fntvHc<br/> 8mm Linear Rod - https://amzn.to/2Y5Mpwk<br/> 10mm Linear Rod - https://amzn.to/2Y5vfPm<br/> LM8LUU - https://amzn.to/2Y4NwMK<br/> LM10LUU - https://amzn.to/3e8WApn</p> <p>E3D V6 24v - https://amzn.to/37CSGCI<br/> V6 Clone 24v - https://amzn.to/3hysqOt<br/> E3D Titan - https://amzn.to/3e9YQN8<br/> Titan Clone - https://amzn.to/3ed9mDu<br/> Pancake Stepper for Titan - https://amzn.to/2Y5XRIf<br/> Part Fans - https://amzn.to/3hJzhVE<br/> Hotend Fan - https://amzn.to/37BHbf9</p> <p>20t 3mm Bore Idler - https://amzn.to/3ef7tX6<br/> Smooth 3mm Bore Idler - https://amzn.to/2N6fL7s<br/> GT2 Belt - https://amzn.to/2zIc1pS</p> <p><strong>Additional Attribution</strong><br/> <em>This design was done in Tinkercad, where I utilized small components from a number of existing parts, all of which have been changed quite heavily. Here is a list of some of those designs, thanks for your contributions:</em></p> <p><em><a href="https://www.thingiverse.com/thing:2288561">https://www.thingiverse.com/thing:2288561</a></em><br/> <em><a href="https://www.thingiverse.com/thing:2848466">https://www.thingiverse.com/thing:2848466</a></em><br/> <em><a href="https://www.thingiverse.com/thing:2422839">https://www.thingiverse.com/thing:2422839</a></em><br/> <em><a href="https://www.thingiverse.com/thing:2758419">https://www.thingiverse.com/thing:2758419</a></em><br/> <em><a href="https://www.thingiverse.com/thing:2012264">https://www.thingiverse.com/thing:2012264</a></em><br/> <em><a href="https://www.thingiverse.com/thing:2514648">https://www.thingiverse.com/thing:2514648</a></em><br/> <em><a href="https://www.thingiverse.com/thing:2538448">https://www.thingiverse.com/thing:2538448</a></em></p> <h3> Print Settings</h3> <p><strong>Printer:</strong></p> <p>Hypercube</p> <p><strong>Rafts:</strong></p> <p>No</p> <p><strong>Supports:</strong></p> <p>Doesn't Matter</p> <p><strong>Infill:</strong></p> <p>30-40%</p> <p><strong>Notes:</strong></p> <p>Parts need to be stiff.</p> Category: 3D Printer Parts
With this file you will be able to print Hypercube Linear Rail X Axis with your 3D printer. Click on the button and save the file on your computer to work, edit or customize your design. You can also find more 3D designs for printers on Hypercube Linear Rail X Axis.