Hyperpixel 4" Touchscreen + LCD + Raspberry Pi4 for Octoprint and OctoDash Prusa for MK3s+
prusaprinters
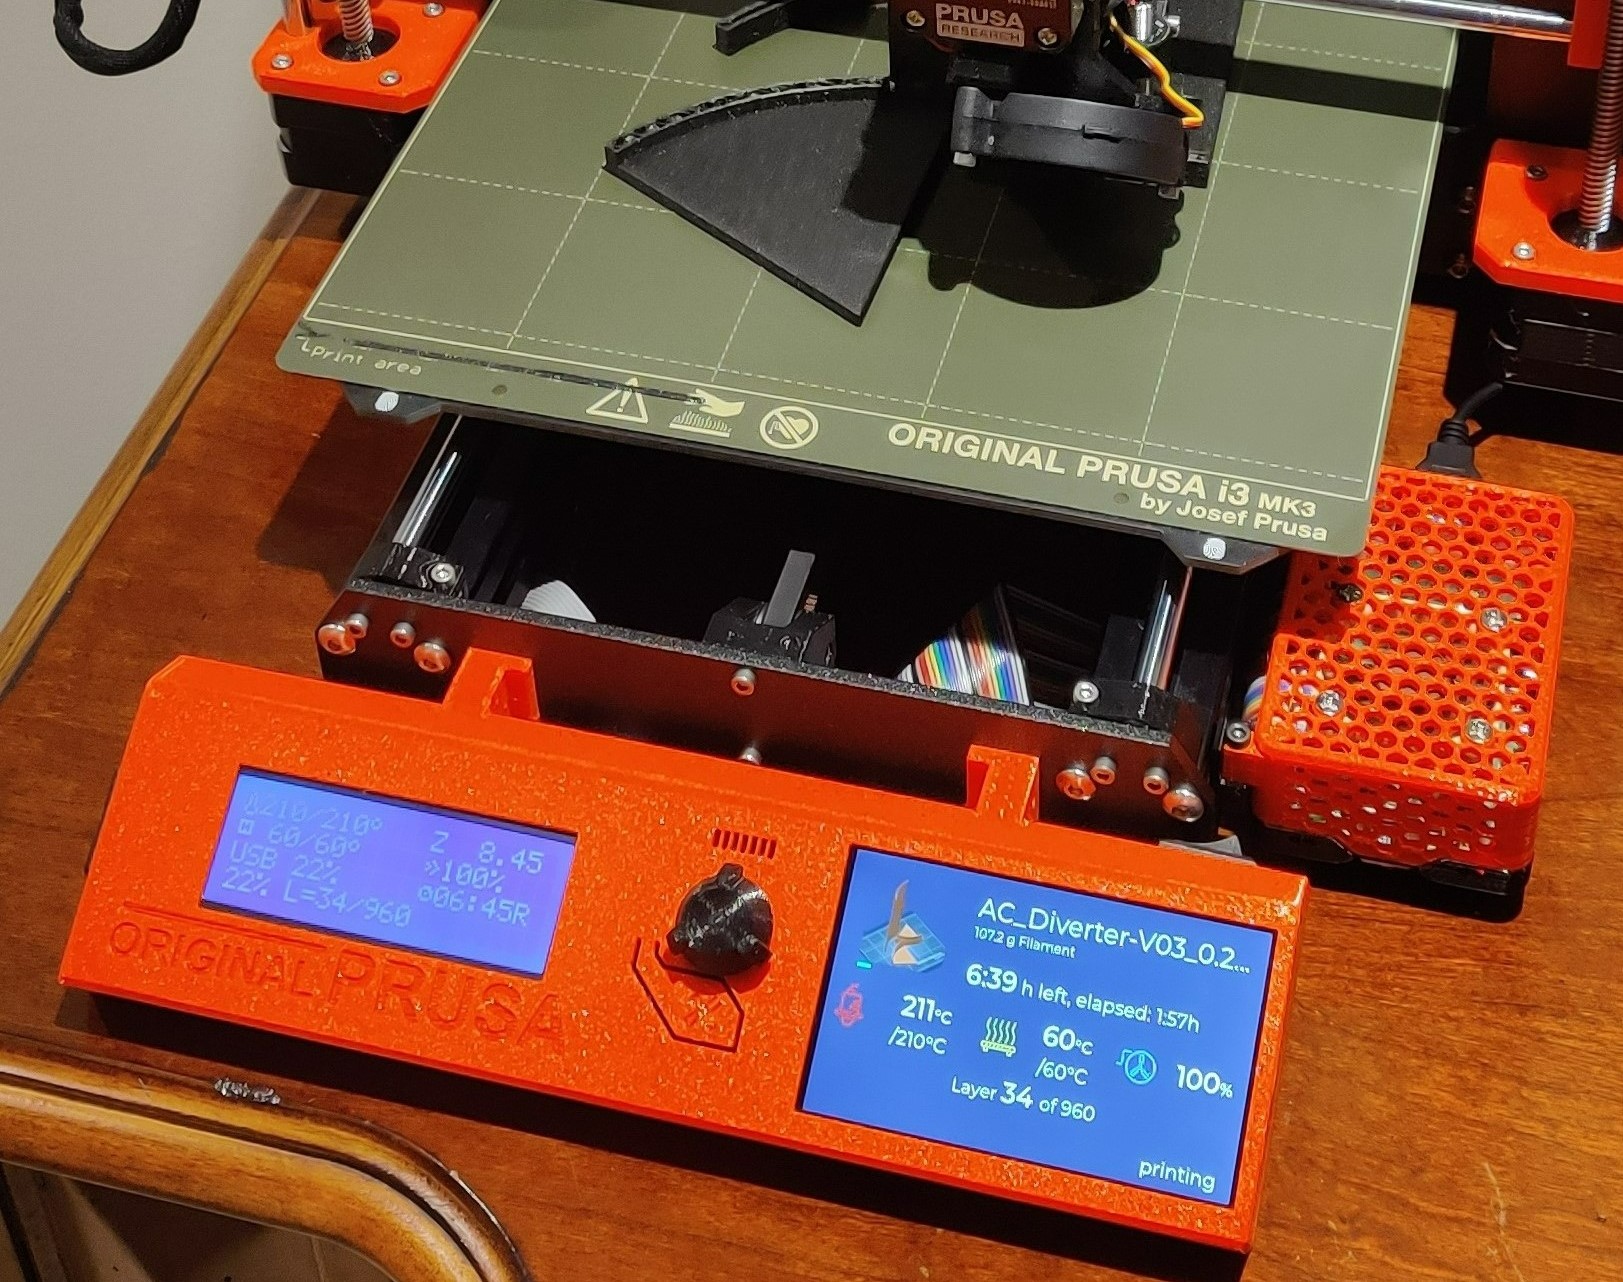
<p><strong>LCD panel that works with the awesome Hyperpixel 4" touchscreen with Raspberry Pi4.</strong></p><p>This is for: MK3/MK3S/MK3S+ and Pi4</p><p>Yet another remix of the 4” HyperPixel cover for the Prusa MK3S+ for the Pi4 to be used with Octoprint and Octodash. The goal of this remix and why it is different than the previous iterations: </p><ol><li>No USB cables sticking out of the side of the control panel</li><li>Utilize a standard USB-C power supply for the Pi4 and hyperpixel (instead of a buck transformer)</li><li>No power USB-C Cable sticking out of the side of the panel or Pi4</li><li>No soldering on the Pi4 or Hyperpixel screen</li><li>Easy installation of the Hyperpixel screen without cracking it</li><li>Utilize a 40mm Noctua 5v fan at 3.3v for total silence</li><li>A dedicated power switch for the Pi4/Hyperpixel</li><li>Everything physically connected to the Prusa printer so there are no dangling wires or parts</li><li>One USB-C power connection at the back of the printer next to the power supply for easy hookup</li><li>Must look cool and not increase the depth of the overall printer significantly</li><li>Must run Octoprint and Octodash flawlessly</li></ol><p>Parts utilized:</p><figure class="table" style="width:400px;"><table><tbody><tr><td style="height:15.0pt;width:161pt;">Pimoroni HyperPixel - 4.0" Touchscreen</td><td style="height:15.0pt;width:200px;"><p><a href="https://amzn.to/3wOFF50">https://amzn.to/3wOFF50</a></p><p>-or-</p><p><a href="https://tinyurl.com/42zw6wax">https://tinyurl.com/42zw6wax </a></p></td></tr><tr><td style="height:15.0pt;">40 Pin 8" Female to Male Ribbon Cable</td><td style="height:15.0pt;width:200px;"><a href="https://amzn.to/2TSIfse">https://amzn.to/2TSIfse</a></td></tr><tr><td style="height:15.0pt;">GPIO 1 to 2 Expansion Board</td><td style="height:15.0pt;width:200px;"><a href="https://amzn.to/2UwFsW1">https://amzn.to/2UwFsW1</a></td></tr><tr><td style="height:15.0pt;">SparkFun USB-C Breakout Board</td><td style="height:15.0pt;width:200px;"><a href="https://amzn.to/3qpmhcn">https://amzn.to/3qpmhcn</a></td></tr><tr><td style="height:15.0pt;">Noctua NF-A4x10 5V Fan (40x10mm)</td><td style="height:15.0pt;width:200px;"><a href="https://amzn.to/2SU37Pz">https://amzn.to/2SU37Pz</a></td></tr><tr><td style="height:15.0pt;">Raspberry Pi 4 4GB</td><td style="height:15.0pt;width:200px;"><a href="https://amzn.to/3qjVik3">https://amzn.to/3qjVik3 </a></td></tr><tr><td style="height:15.0pt;">CanaKit 3.5A Raspberry Pi 4 Power Supply (USB-C)</td><td style="height:15.0pt;width:200px;"><a href="https://amzn.to/3xLzDC3">https://amzn.to/3xLzDC3</a></td></tr><tr><td style="height:15.0pt;">Samsung PRO Endurance 32GB MicroSD</td><td style="height:15.0pt;"><a href="https://amzn.to/3gLpIa4">https://amzn.to/3gLpIa4</a></td></tr><tr><td style="height:15.0pt;">Heat Shrink Tubing</td><td style="height:15.0pt;"><a href="https://amzn.to/3gLwRqN">https://amzn.to/3gLwRqN</a></td></tr><tr><td style="height:15.0pt;">USB-C Extension Cord</td><td style="height:15.0pt;"><a href="https://amzn.to/3gSjCUl">https://amzn.to/3gSjCUl</a></td></tr><tr><td style="height:15.0pt;">On/Off Rocker Switch</td><td style="height:15.0pt;"><a href="https://amzn.to/35IXh6n">https://amzn.to/35IXh6n</a></td></tr><tr><td style="height:15.0pt;">Jumper Wires</td><td style="height:15.0pt;"><a href="https://amzn.to/3xFpXZW">https://amzn.to/3xFpXZW</a></td></tr><tr><td style="height:15.0pt;">Miscellaneous Screw Kit</td><td style="height:15.0pt;"><a href="https://amzn.to/3xFpFCk">https://amzn.to/3xFpFCk</a></td></tr><tr><td style="height:15.0pt;">Female Spade Wire Crimp Terminals</td><td style="height:15.0pt;"><a href="https://amzn.to/3qi0nru">https://amzn.to/3qi0nru</a></td></tr></tbody></table></figure><p>All STL files are included. How to assemble summary:</p><ol><li>You need some moderate to advanced knowledge of how to connect power and how to get power from the GPIO pins of the Pi4. If you mess up anything doing this you will fry your Pi4 for sure. So don’t do this unless you are prepared to fry your Pi4</li><li>Print the panel</li><li>Print the bracket you need to hold the hyperpixel (4 different thickness brackets are included so you can use whatever length screws you might have laying around)</li><li>Print the Pi4 Case</li><li>Print the Pi4 Case Brackets</li><li>Install the Hyperpixel into the panel with the GPIO connector at the top, use one of the brackets to hold it in place (2 M2 or M3 short screws needed). Make sure not to put any pressure on the screen when installing because you might crack or somehow damage the screen. If necessary, flex the panel to get the hyperpixel to drop in smoothly</li><li>Install the power rocker switch in the panel - it needs to go in with the spade connectors on the far right side of the panel (when looking at the panel from the front). If installed incorrectly the spade connectors will hit the hyperpixel screen and you won't be able to connect the power wires to the switch</li><li>Solder a female breakout wire to ground to the SparkFun USB-C Breakout Board</li><li>Solder a wire from the SparkFun USB-C Breakout Board V+ to a wire and female spade connector</li><li>Connect that V+ connected spade connector to the power rocker switch</li><li>Connect a female spade connector to a female breakout wire</li><li>Connect that spade connector to the power rocker switch</li><li>With 2 M2 or M3 short screws, screw the SparkFun USB-C Breakout Board to the inside-side of the right hand panel mounting bracket (2 holes are there for this)</li><li>Connect the GPIO 1 to 2 Expansion Board to the hyperpixel</li><li>Solder female breakout connectors to the (+) and (-) leads of the Noctua fan</li><li>Connect the Noctua fan female breakout connector leads to a 3.3v pin on the GPIO 1 to 2 Expansion Board (connected to the back of the hyperpixel)</li><li>Connect the ground female breakout connector lead from the SparkFun USB-C Breakout Board to a ground pin on the GPIO 1 to 2 Expansion Board (connected to the back of the hyperpixel)</li><li>Connect the 5v female breakout connector lead from the power rocker switch to the GPIO 1 to 2 Expansion Board (connected to the back of the hyperpixel)</li><li>Connect the 40 Pin 8” Female to Male Ribbon Cable (male end) to the GPIO 1 to 2 Expansion Board (connected to the back of the hyperpixel)</li><li>Install the Prusa LCD - make sure it is allignd square before tightening</li><li>Install 4 square nuts on the panel brackets</li><li>Plug the male end of the USB-C Extension Cord into the SparkFun USB-C Breakout Board</li><li>Use the 4 hex bolts to attach the panel to the printer metal forward bracket</li><li>Place the Pi4 in the Pi4 case bottom</li><li>Screw the Noctua fan into the Pi4 case top with the 4 screws that come with the fan</li><li>Thread the 40 Pin 8” Female to Male Ribbon Cable through the side cutout of the Pi4 case top, install the female end of the cable into the Pi4 GPIO header, and snap close the Pi4 case</li><li>On the right side of the Prusa, twist fit the Pi4 Case Brackets</li><li>Screw the Pi4 case from the top down into the Pi4 Case Brackets</li><li>Cable manage the USB-C Extension Cord to get it from the panel to the back of the printer, and use cable ties to tie it to the printer frame where appropriate</li></ol><p>To setup the hyperpixel, follow the instructions here: <a href="https://github.com/pimoroni/hyperpixel4/tree/pi4">https://github.com/pimoroni/hyperpixel4/tree/pi4</a></p><p>After following the github installation instructions for installation of the hyperpixel drivers, to properly rotate the screen orientation of the hyperpixel (which survives reboot), you need to text edit the </boot/config.txt> file and comment out this by adding a # sign in front of this line:</p><pre><code class="language-c"> # dtoverlay=vc4-fkms-v3d</code></pre><p>And insert this new line:</p><pre><code class="language-c"> dtoverlay=hyperpixel4,touchscreen-inverted-3,touchscreen-inverted-3 display_lcd_rotate=3</code></pre><p><strong>Caution:</strong> If doing this be very careful because when using the GPIO 1 to 2 Expansion Board to provide power to the Pi4/Hyperpixel and provide power to the 40mm fan you can easily fry things on the Pi4 and Hyperpixel screen. Check everything once, twice, three times before powering anything on!</p><p>Original projects this was remixed from: </p><ol><li>Hyperpixel Panel: <a href="https://www.prusaprinters.org/prints/47153-lcd-hyperpixel-4-touchscreen-cover">https://www.prusaprinters.org/prints/47153-lcd-hyperpixel-4-touchscreen-cover</a></li><li>Malolo's snap fit case pi4 Case: <a href="https://www.thingiverse.com/thing:3723561">https://www.thingiverse.com/thing:3723561</a></li></ol><p>Here is a great looking remix of this panel without the power switch cutout: <a href="https://www.prusaprinters.org/prints/70062-hyperpixel-4-touchscreen-lcd-raspberry-pi4-without">https://www.prusaprinters.org/prints/70062-hyperpixel-4-touchscreen-lcd-raspberry-pi4-without</a></p><p>Warning: I received a series of private messages from a user who has attempted to replicate this build, but experienced “low voltage” error messages from OctoPrint that they have been unable to resolve, despite valiant effort. I have not experienced low voltage errors, but this appears to be a risk in this build. </p><p>NOTES and DISCLOSURE: This post contains affiliate link(s). An affiliate link means I may earn advertising or referral fees if you make a purchase through my link.</p>
With this file you will be able to print Hyperpixel 4" Touchscreen + LCD + Raspberry Pi4 for Octoprint and OctoDash Prusa for MK3s+ with your 3D printer. Click on the button and save the file on your computer to work, edit or customize your design. You can also find more 3D designs for printers on Hyperpixel 4" Touchscreen + LCD + Raspberry Pi4 for Octoprint and OctoDash Prusa for MK3s+.