Hyperrail Evolution
thingiverse
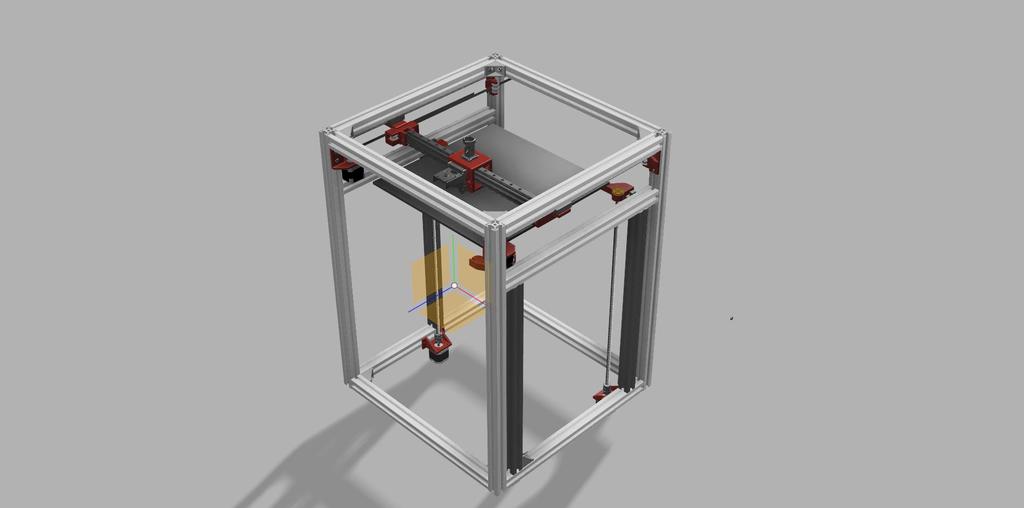
First of all I'd like to credit Scott and Tech2c for their innovative design of the Hypercube and Hypercube Evolution. Secondly, I'd like to thank Tony and Steve for designing the amazing Railcore II. As I was having a lot of trouble trying to get the whole XY gantry alligned and well working, I still noticed a lot of "flex" in my aluminum rods. So I decided to throw the whole thing overboard and design a new gantry using 2x MGN15H for the Y-axis, mounted to the bottom of the top extrusion and 2x MGN12H mounted top and bottom of a single 2020 extrusion for the X-axis. For simplicity, I used the existing Hypercube Evolution stepper mounts The belt tensioners and the idlers are used as in the Hypercube Evolution. The Z-axis uses 3 3030 profiles, 3 MGN12(H) Linear rails and 3 stepper motors with a leadscrew and spider coupler. This design is made as a fully customisable work, the X-carriage is made out of 2 parts, which can easily be switched for other hotends or Z-probes. The original is designed for an E3D V6 and Precision Piezo Orion. On the second (back)side a fan, or a probe or even a second hotend can be mounted. Next to the hypercube Evolution, you'll need: My frame was bought for a 350x350x500 mm HEVO build and I can actually print about 300x300 mm. So Adjust to your needings! - 2x MGN12 rail with MGN12H carriage for the X carriage. (390 mm) - a 2020 profile (425 mm) - 2x MGN15 with MGN15H carriage for the Y-carriage. (440 mm) - A duetwifi + Duex5 (or some other hacked solution like Klipper + 2 ramps) for the triple individual Z leveling - 3 additional 3030 profiles for each Z-motor (510 mm) - 3 8x2 ACME Leadscrews + POM nuts (I bought them at 600 mm length and cut them to size) - 3 Spider couplers - 3 MGN12 rails with MGN12H carriages for the Z-axis. (540 mm) - A lot of patience - A Z probe of your choice (I made a mount for the Precision Piezo Orion) How to assemble: The frame is assembled exactly like the original hypercube evolution, except that the lower profiles are completely flat (making it an actual cube). You'll need to print some feet, because the Z-stepper motors will be sitting lower than these profiles to have maximum Z capacity. Motor mounts and Idler mounts are mounted just as the hypercube evolution by the combination of M5 bolts (one M6 for each hidden corner bolt) to the frame and M3 bolts to hold the motors and idlers in place. For the XY-joiner: You'll need to melt in a threaded insert on each side, and use a long M3 bolt to hold the idlers in place, (I cut out a small diameter so that the head can sit nicely flush inside the XY joiner) You'll need to mount the 2020 profile with an M5 (10 or 12mm) bolt and a 2020 M5 T-nut. For the X-axis and carriage: You'll need to mount the two MGN12 rails for the X axis on top and underneath (or only one of either) on that same 2020 profile. You'll need to melt threaded inserts into the X-carriage (there is now also a version with captive M3 nuts!) In every hole except for the 4 on opposing to eachother. These are meant for mounting the X-carriage to the MGN12H carriages. Attach the belt to one of each X-carriage (this works easier). so for example Top belt to the front X-carriage, Bottom belt to the back. Next, attach the X-carriage to the MGN12H carriages and route the belt around. Use a small flathead screwdriver to have the belt come around so that you can lock in place with the clamp and tighten it. It's VERY fiddly with the tiny belt-tensioner block but it's surely doable. 1/ Screw in a bolt barely. 2/ Grab the belt, push in the belt-tensioner block, 3/ wrap the belt around, 4/ give it a small tug and clamp it down firmly. If you have any questions or need more pictures. Please do NOT hesitate to ask! FUTURE PLANS: - Adjust the parts to be able to use Gates 6mm idlers and a gates belt. I'm still working out a way to be able to fix some 5 mm shoulder screws in there. - Mill the Z-carriages out of aluminum (perhaps make an XY-joiner as well) so they could never soften under the heat of the bed. - Make an XY-joiner, and perhaps replace the 2020 profile with an aluminum crossbar, remove one MGN12 rail from the X-axis assembly, so that a possible conversion to a Toolchanger is possible.
With this file you will be able to print Hyperrail Evolution with your 3D printer. Click on the button and save the file on your computer to work, edit or customize your design. You can also find more 3D designs for printers on Hyperrail Evolution.