I.Q.B.
thingiverse
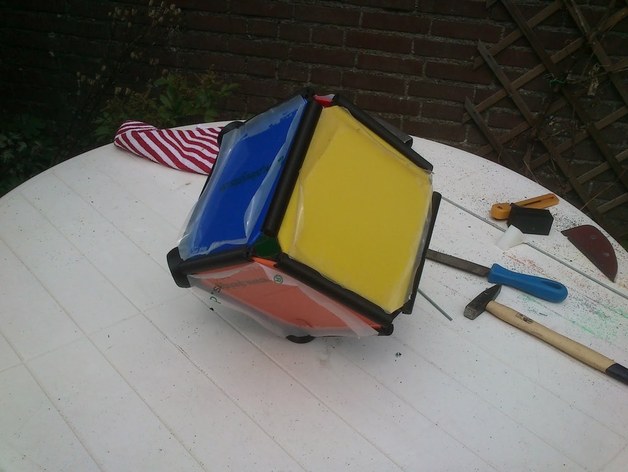
I.Q.B. (I-cube) The ultimate toddler toy! After shopping around for toys for our son, I was quite disappointed with the price/longevity/challenge of most toys. There is some cool stuff out there, but most are utterly simplistic and quickly boring and way too expensive. So I set out to create the coolest toddler toy ever ;-) The basic idea is to create a fancy looking enclosure, add lots of buttons, dials, some LED's, a mic and speaker. Hook them up to a micro-controller and voila a reprogrammable toy. I have been working on multiple aspects at the same time, but I thought it time to start sharing the first part: The enclosure, a cube made from printed parts and Plexiglas. While this is not the cheapest option, it will be quite modular during construction and finalizing. And I expect the end-result to be quite sturdy and up to toddler abuse. For me this also an excercise of working with Plexiglas again and I was ordering some anyway ;-) I'll update the project as I move along. Follow instructions at your own risk! As always, if you don't know what you are doing, don't do it! Instructions Needed parts- (6) Six square pieces of 3mm plexiglas measuring 16 x 16 cm. - (12) Twelve pieces of M3 rod measuring 157mm. - (24) Plenty of M3 nuts or lock-nuts. - (12) Twelve prints of the "Cube rib 130mm" file. - (8) Eight prints of the "Cube Corner Ball" file. - (1) One print of "Corner Cutter" file. Notes - See image for the used UP! printer settings I used. Unsolid model checked. Quality on fine. - For the Plexiglas, preferably choose the bright colors :-) I used Yellow, Orange, Red, Green, Blue and Black. - I always leave the protection foil on the Plexiglas as long as possible and only remove parts of it where needed. - As it turns out 3mm Plexiglas means anything from 2.9 to 3.1 depending on the color. So some ribs might need a little sanding/filing for the plates to slide in. - For aesthetics sake, print the ribs preferably vertically oriented, the M3 threads will pass through it for stability and to prevent delamination. - I will model and add the final caps for the corner balls later, but for initial construction they are not needed yet. - Sizes were chosen based on max print height of my Up! printer, but you can scale the rods, ribs and plates to your liking. As long as the Ribs are 3cm shorter than the plate edge. And the Rods 3mm shorter than the plate edge length. - In a later stage I will probably use some glue to add extra strength, but since we still need to cut holes for the knobs and dials I like to keep thing loosely fitted. Cut some corners I used the corner cutter block to assist in removing the corners on all Plexiglas plates consistently using an iron saw. - Press a corner of a Plexiglas plate firmly in the wide slot. - Slide saw in the thin slot. I made the block so my saw sinks in completely, so you can safely place your hand over this. - Apply pressure with your hand on this assembly and gently saw of the plate corner. - Rinse and repeat. (see photos) Assembly- Take one rib and put a ball on each end, let's call it an Endrib. - Do this once more. - Take one Plexiglas plate and slip two new ribs on opposite edges. - Slide the Endribs onto the remaining edges. - Let's call this an Endplate (see photos) - Put a piece of 157mm threaded rod through each of the ribs on this constructed piece. (So four rods in total used here.) - Repeat the above process with one other plexiglas plate, so you will have two fully assembled Endplates. - Next, put four Cube ribs in one of the previously constructed Endplates. - Now slide in another four plexiglas plates into this assembly. (see photos) - Put on the other Endplate. - Add the final four M3 threaded rods through the last ribs and tighten them with nuts. Next Determine what you will do with the box :-) I will lay out my plans here as I continue! But it will contain; adding the electronics, drilling holes for all buttons, dials, lights etc. and of course the final assembly, which will probably have some more printed parts.
With this file you will be able to print I.Q.B. with your 3D printer. Click on the button and save the file on your computer to work, edit or customize your design. You can also find more 3D designs for printers on I.Q.B..