I3 MEGA CRAZY UPGRADES BLTOUCH BONDTECH NOZZLE X MK3
thingiverse
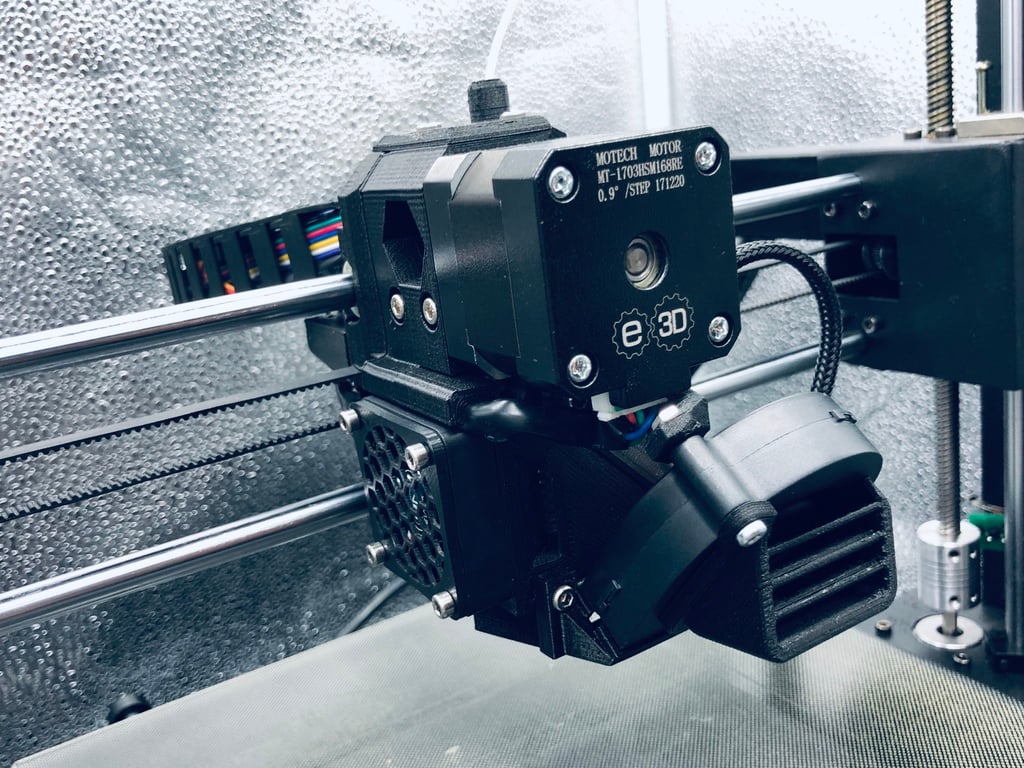
EDIT 29/03/2019 : New PID tuning profile for 50W cartridge. Added compiled unreversed. Please set your Z offset to -1.35 after flashing the new firmware for better BLTouch results. EDIT 25/03/2019 : Added fullscreen octoprint launch on raspberry Pi with 7inch screen EDIT 24/03/2019 : Firmware updated. Thermal runaway tested. PID tuning. Hi all I3 mega users ! Here is what I consider as an upgrade of my previous thingiverse hotend upgrade for the I3 mega (E3D Titan). https://www.thingiverse.com/thing:3268382 For this new setup the firmware used is a custom TMC2208 Marlin 1.1.9 firmware with BLtouch. This firmware is based upon Davidramiro's and DerDominik's work with some more modifications. The firmware is given in the files in .hex and uncompiled version to fit all your reversed/unreversed cable setups. There is a tutorial to show how to reverse your axes in the firmware if needed. Print quality with the E3D titan was really good but the slimline stepper driver was too weak to pull filament from long bowden tube with remote filament enclosures and extruder had randomly filament extrusion issues with a low pushing force. Also it has been proven that titan extruder grinds the filament and needs more cleaning : youtube.com/watch?v=FgqYS1t0PNo So i decided to upgrade even more... :-) I wanted to give the I3 mega the print quality and reliability of the Prusa MK3, the quality of E3D parts but for less than the price of a E3D V6 hotend. Here the bondtech mount is affordable as it is 3D printed. Hotend in this tutorial is better than an E3D V6 gold https://e3d-online.com/v6-gold-hotend As some may know, the steps/revolution on the stock I3 mega with stock motor is set at 92.6 steps/rev. That means that for one turn of the motor you get around 96 positions. With this setup you get around 290 steps/revolution. So an extrusion resolution is multiplied by 3 with better cooling, better overhangs, faster heating. Ii have upgraded the poor stock thermistance for a cartridge one and hotend cartridge for a 50W 12V cartridge instead of the stock 40W for faster heating. The printer can manage temperature with this setup up to 300°C enableing printing with difficult materials as polycarbonate, this setup is also enabling the use of flexible filaments and carbon fiber filaments. Firmware has ben set to a safe max temp of 295°C. Note that silicone socks are not intended for use at temperatures exceeding 300°C. If you plan to use the printer at higher temps and remove the silicon socks you may have the printer's layer fan blowing directly on the heat block leading to activate the firmware safety called "Thermal runaway" that shuts down the print. The print will fail because the fan is cooling the hotend and the printer sees that it needs to heat too much and thinks that a component is defective and go to safety mode. So use the silicone sock if you want stable temps and no thermal runaway issue. As E3D hotend gold may be expensive for some people, i used some parts from them and some chinease pieces that can be fitted to give better results resulting to an E3D V6 "gold" with nozzle X for half the price of a E3D gold (70€ versus 130€). https://www.youtube.com/watch?v=MbAcmaikCps I only use chinease parts for the heat block and radiator. The heatbreak and the nozzle must be bought from E3D. I had issues at retraction with chinease "ALL METAL" heat breaks that stuck at retraction due to a bad internal diameter. The filament melt than get stuck at retraction in the teflon white tube. I recommend to use a PTFE lining heat break if chinease or all metal from E3D. Why to use BLTouch? Many people thinks that a good hand leveling or manual mesh leveling is enough. The problem is that the bed may be flat when it's new, but with use and tensions on the springs it begins to bend. People have even bed that separates with time from the bed holder plate. Keep in mind that your bed in never perfectly flat. I even recommend to release tension on the 4 springs that levels the bed and use the X carriage leveling screws to adjust your nozzle home position with less tension on the springs in my detailed par of this tutorial. That will prevent the bed warping. So what about manual bed leveling? According to the differents bed temperatures that you may use between different prints, the dilatation of the bed with heat will change your leveling. Also when you try to remove your part from the bed with the scrapper you may damage your leveling. So BLTouch makes an automated fresh leveling with the bed heating before every print to be sure that the first layer will be perfect and that the print will stick correctly. Here is what we want : reliability. I have set the firmware for a 5X5 points mesh with a 200mm/s travel speed between points to reduce the leveling time and have a 25 points leveling accuracy. Note that if you do not modify your start GCODE in your slicer to enable BLtouch it won't work. Also I made a specific GCODE for leveling to preheat the bed a 60°C with simultaneous heating of the hotend under melting point of the filament. That gives a faster booting sequence and keeps the bed clean of any filament drops from the nozzle during leveling. See that Start GCODE at the end of this page. (In bonus, end GCODE) 3D printed parts must be printed in heat resistant filaments like PETG. I do not recommend PLA that can bend with heat. 35% infill is needed. --------------------------------- PARTS LIST --------------------------------- >>>>COPPER HOTEND WITH NOZZLE X Total cost about 70€ Copper Thermistance up to 300°C : https://www.aliexpress.com/item/1PCS-trianglelab-ATC-Semitec-104GT-2-104NT-4-R025H42G-Thermistor-Cartridge-for-E3D-V6-Volcano-Sensor/32843785247.html?spm=a2g0w.10010108.1000001.12.69ca69aeEdOfqv Copper heat block hotend / select "1 set PTFE lining" : https://www.aliexpress.com/item/HQ-gold-heatsink-v6-copper-heater-block-hotend-J-head-heater-block-heat-break-NOZZLE-for/32899194610.html?spm=a2g0s.9042311.0.0.37556c37A6f1PK 50W heater / select 12V : https://www.aliexpress.com/item/Trianglelab-3D-Printer-6-20MM-12V-24V-50W-Heater-Cartridge-With-100CM-cable-For-3D-Printer/32960167491.html?spm=a2g0s.9042311.0.0.37556c37A6f1PK E3D Nozzle X / select 0.4mm : https://e3d-online.com/nozzlex-v6 E3D Heat break / only if you plan to use filaments that need temperature above 265°C because the PTFE lining of the chinease hotend's heat break will start melting at this temp : https://e3d-online.com/v6-heat-break HOW TO ASSEMBLE HOTEND: https://e3d-online.dozuki.com/Guide/V6+Assembly/6?lang=en --------------------------------- >>>>PRUSA MK3 EXTRUDER E3D Motor : https://e3d-online.com/motors-compact-but-powerful-motor Layer fan Sunon 5015 : https://www.aliexpress.com/item/Original-Sunon-EF50151B1-C02C-A99-5015-12V-1-92W-50-50-15mm-Ultra-Quiet-Humidifier-Turbo/32820917468.html? Bondtech gears and screws : https://www.aliexpress.com/item/Prusa-i3-mk2-mk2-5-mk3-3D-Printer-Extruder-Driving-Gears-Btech-Dual-Gears-With-2pcs/32949862965.html?spm=a2g0s.9042311.0.0.27424c4dipoa8s Silent hotend Fan /select XM-2 40x40x10mm : https://www.amazon.fr/noiseblocker-XM1-Noiseblocker-BlackSilentFan-40mm/dp/B0083A0BY4?th=1 Screw set (i used the screw set of the MMU2 build and some M3 screws from my stock, you have all screws description in the HOW TO) : https://fr.aliexpress.com/item/L-ensemble-du-Kit-PRUAS-I3-MK3-MMU2-Vis-crou-Mat-riel-Pi-ces-Machine-Pi/32955693847.html?spm=a2g0s.9042311.0.0.37556c37A6f1PK Bearings, you need 3 pieces for the extruder, 3 pieces for the bed can only be purchased (i used polymer bearing for silence but you can buy metal one if you prefer) SO THIS: https://www.aliexpress.com/item/trianglelab-High-precision-EASE-BEARING-LM8UU-Long-Rod-Shaft-8X15X24MM-3d-printer-linear-bearing-For-Reprap/32980152613.html? OR THIS: https://www.aliexpress.com/item/trianglelab-Genuine-igus-RJ4JP01-Non-counterfeit-LM8UU-3d-printer-linear-bearing-For-Reprap-Anet-A8-Prusa/32948095595.html? Belt tensioners : https://www.aliexpress.com/item/10Pcs-lot-3D-Printer-Belt-Locking-Torsion-Spring-Tension-Belt-Pressure-With-Strong-Spring-For-6mm/32713433708.html?spm=a2g0s.9042311.0.0.27424c4dAFirQE New X belt 6mm (better quality and because when you remove the old one it is too short) : https://www.aliexpress.com/item/High-quality-3D-printer-GATES-LL-2GT-gear-synchronous-belt-GT2-Width-6MM-9MM-10MM-timing/32952396111.html? (optional) E3D Flexible couplers to avoid Z wobble : https://e3d-online.com/flexible-motor-coupling-5mm-to-8mm HOW TO ASSEMBLE EXTRUDER : https://manual.prusa3d.com/Guide/5.+E-axis+assembly+(textile+sleeve)/822?lang=en --------------------------------- ------------------- BLTOUCH PARTS : https://www.aliexpress.com/item/Trianglelab-3D-Printer-TOUCH-Free-Shipping-Auto-Leveling-Sensor-Auto-Leveling-3D-Printer-TOUCH-reprap-mk8/32832887426.html?spm=a2g0s.9042311.0.0.27424c4dipoa8s https://www.aliexpress.com/item/Trianglelab-NEW-3D-Printer-TOUCH-1PCS-80CM-Extension-wires-TL-touch-auto-bed-leveling-sensor-Extension/32842916585.html?spm=a2g0s.9042311.0.0.27424c4dipoa8s I made a wiring diagram in the files to download based upon robert phan's work. To interact with the probe you can send this commands to the printer connected over USB to a program like pronterface or simplify 3D: M280 P0 S10 ; pushes the pin down M280 P0 S90 ; pulls the pin up M280 P0 S120 ; Self test – keeps going until you do pin up/down or release alarm M280 P0 S160 ; Release alarm The firmware is made to handle the probe automatically so no need to interact with the probe unless you want to do some tests. THINGS TO DO BEFORE PRINTING --------------------------------- You must level you X axis and Z axis (Z offset) as described in the tutorial in the files to download under leveling/calibraiton folder. You must do a PID tuning to adapt the way the electronics of the printer heats the new hotend by sending commands to the printer as written on the picture 'PID tuning" You must calibrate your E-steps if you use a different motor than the E3D that i use. DOWNLOAD PRUSA ORIGINAL MK3 CURA PROFILES : --------------- https://manual.prusa3d.com/Guide/How+to+import+profiles+to+Cura+(Windows+&+macOS)/703 -------------- MODIFY THE GCODES FOR BLTOUCH ---------------- START GCODE TO PUT IN OCTOPRINT "BEFORE PRINT JOB STARTS " SCRIPT : G90 ; Absolute positioning M82 ; Set extruder to absolute mode M107 ; Start with the fan off M140 S60 ; Set bed temp to 60 degrees for leveling and do not wait - preheat M190 S60 ; Wait for bed temp to stabilize M104 S160 T0 ; Hotend at 160 degrees - below melting point preheat G28 X0 Y0 ; Move X/Y to min endstops G28 Z0 ; Move Z to min endstops G29 ; Enable Auto Bed Levelling (ABL) M500 ; Save mesh G28 X0 Y0 ; Return X/Y to min endstops until hotend reach new temp M420 S1; Enable BLTouch leveling mesh PART TO PUT IN YOUR SLICER START GCODE : G1 Z15.0 F{speed_travel} ;move the platform down 15mm G92 E0 ;zero the extruded length G1 F200 E4 ;extrude 4mm of feed stock G92 E0 ;zero the extruded length again M117 Printing... G5 End GCODE M104 S0 ; turn off extruder M140 S0 ; turn off bed M84 ; disable motors M107 G91 ;relative positioning G1 E-1 F300 ;retract the filament a bit before lifting the nozzle to release some of the pressure G1 Z+0.5 E-5 ;X-20 Y-20 F{speed_travel} ;move Z up a bit and retract filament even more G28 X0 ;Y0 ;move X/Y to min endstops so the head is out of the way G1 Y180 F2000 M84 ;steppers off G90 M300 P300 S4000 ----------------- Raspberry Pi with Octoprint fullscreen touchscreen : --------------------------------- Buy a Raspberry Pi 3B+ without power supply. The power supply must be set a 5.5V for 2amps with a module : Buy a Raspberry Pi 7inch official touchscreen : https://www.kubii.fr/ecrans-afficheurs/1131-ecran-tactile-officiel-7-800x480-kubii-640522710829.html? Raspberry pi case with 7inch screen : https://www.thingiverse.com/thing:2756684 Download the latest Octoprint, and copy the image to a micro SD card. To launch Raspbian with Octoprint fullscreen on chrome on a 7 inch Original Raspberry Display send this commands : sudo apt-get update sudo apt-get upgrade sudo reboot sudo apt-get install xorg sudo apt-get install raspberrypi-ui-mods sudo apt-get install chromium-browser x11-xserver-utils unclutter sudo nano /etc/xdg/lxsession/LXDE-pi/autostart add this line modified with the octoprint IP adress : @chromium-browser --start-fullscreen --start-maximized http://youroctoprintIP save with control+X sudo raspi-config Go to the following menu : Boot options>Desktop CLI> choose desktop auto login Raspbian will boot at reboot. Launch Chrome and input your IP adress for ocotprint. Save the password. Go to chrome preference and reduce the size to 80%. ---------
With this file you will be able to print I3 MEGA CRAZY UPGRADES BLTOUCH BONDTECH NOZZLE X MK3 with your 3D printer. Click on the button and save the file on your computer to work, edit or customize your design. You can also find more 3D designs for printers on I3 MEGA CRAZY UPGRADES BLTOUCH BONDTECH NOZZLE X MK3.