Icarus 2 - QIDI X-Max / X-Plus / I-Mate Carriage (Orbiter, Sherpa Mini, LGX Lite)
prusaprinters
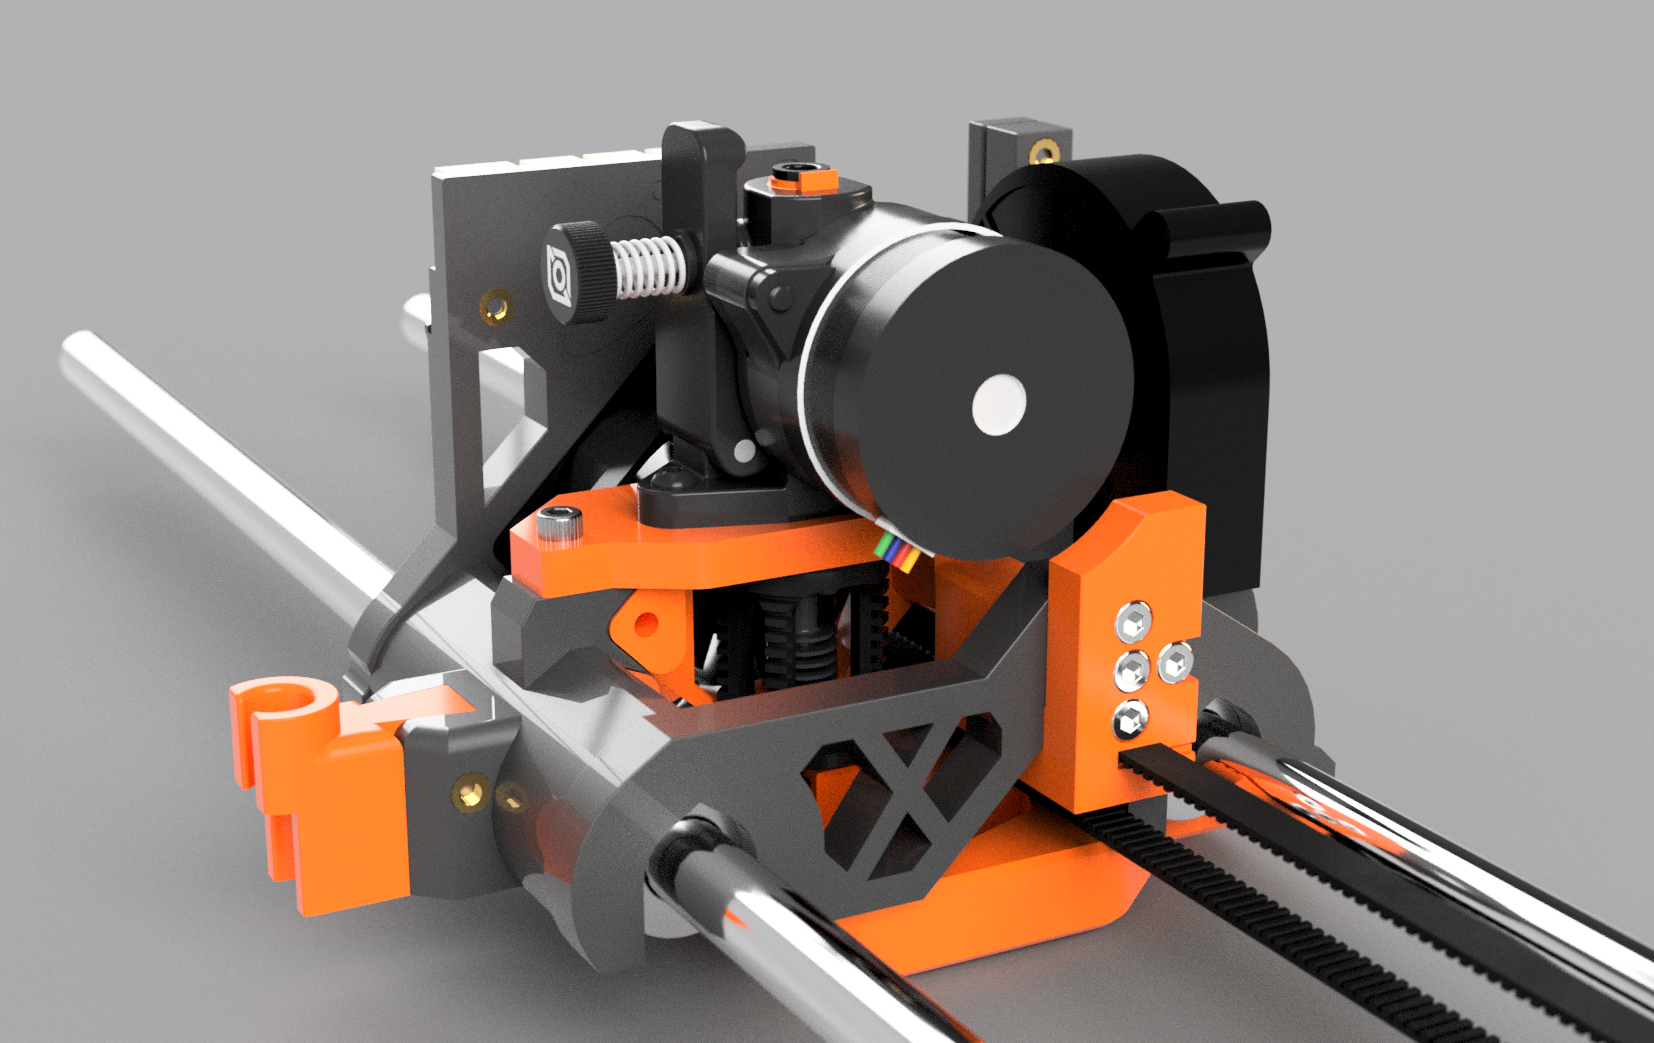
<p><i><strong>Icarus 2</strong></i> is a strong, lightweight and dimensionally accurate one-piece carriage for the QIDI X-Max, X-Plus and I-Mate (and I-Mate S) that was designed focusing on strength and ease of maintenance while keeping it very lightweight.</p><p>Icarus 2 is based on my popular Icarus 1.x mod but with a number of key improvements:</p><ul><li>A <strong>universal carriage</strong> for all supported printers, regardless of extruder and hotend. Instead, you print a mount for your chosen extruder and hotend that install with just four screws meaning you can quickly swap to another extruder and hotend while still using the same carriage, improved maintenance.</li><li>Hotend fan upgraded from 4010 to 4020 - improved cooling performance and lower noise level (4010 fan is still supported with optional printed distances).</li><li>The belt teeth are now on the belt peg and tensioner instead of the actual carriage.</li><li>Proper belt tensioner for both open and closed (stock) belts. For the stock belt the tensioner is optional but recommended, you can attach the belt peg alone if you like.</li><li>Support for the new wider Qidi PCB supplied with some printers.</li><li>Increased blower fan stability.</li></ul><p>The whole carriage is very light and only around 70 g depending on infill and filament type used and the extruder and hotend are easily accessible without removing any other parts. Once the carriage is installed, there is no play between the bearings and the carriage.</p><p>Using one of the supported Orbiter or Sherpa Mini extruders makes the Icarus printhead very capable and lightweight. This allows for higher print speeds as there is less mass to move around when printing and it will also print flexible filament with ease. </p><p>This means the Icarus printhead is about <i><strong>250g lighter than stock</strong></i>.</p><p><strong>Supported Extruders</strong></p><ul><li>Orbiter 1.5</li><li>Orbiter 2.0</li><li>Sherpa Mini R1</li><li>LGX Lite</li></ul><p><strong>Support Hotends</strong></p><ul><li>Dragon</li><li>Dragonfly (both BMO and BMS)</li><li>Mosquito (and clones)</li></ul><p>You can use any combination of the above, just print the appropriate mount.</p><p><strong>Why?</strong></p><p>I have earlier developed the Hercules mod. While print quality with Hercules is just as good as this, the BMG extruder and the V6 groove mount are not ideal for flexible filaments. This design uses a rigid mount and has a much shorter filament path from the extruder to the hotend.</p><p>I also wanted to offer a truly lightweight option which this is.</p><p><strong>What to print:</strong></p><p>Print these files:</p><p>icarus-2.0-normal.stl<br>icarus-dial-holder-2.0.stl<br>icarus-belt-peg-2.0.1.stl<br>icarus-belt-tensioner-2.0.1.stl<br>icarus-fan-duct-2.1.stl</p><p>Also, print the mount for the extruder and hotend you have chosen as well as its corresponding PTFE cutting jig. For example:</p><p>mount-sherpa-mini-r1-dragon-2.0.stl<br>ptfe-cutting-jig-orbiter-2.0-dragon-and-mosquito-2.0.stl</p><p><i>The PTFE cutting jig is for a short piece of PTFE tube used between the extruder and the hotend in the cold zone where it does not deform from heat, it's required to lead the filament to the top of the hotend. Dragon and Mosquito use the same length of PTFE tube which is why they share jig.</i></p><p><strong>BOM - Bill of Materials</strong></p><p>I buy most of my 3D printer parts from quality stores on AliExpress and Banggood. Shipping takes a while from China but quality is excellent and the prices are good. I will link to a couple of different stores for each product as sometimes one is out of stock, you obviously only need one from each row. I will also link to Banggood, sometimes you can find they're cheaper. I might add more stores to the BOM later but it's a lot of work keeping it updated and current so I will try to keep it short.</p><p><strong>Extruder</strong></p><p>All of the supported extruders below are low weight with dual gears and are excellent for flexible filament out of the box. </p><p>Use whichever you like and fit your budget.</p><figure class="table" style="height:35.7812px;width:714px;"><table style="background-color:rgba(64, 200, 232, 0.094);border:1px double rgb(179, 179, 179);"><tbody><tr><td style="border:1px solid rgb(191, 191, 191);padding:0.4em;vertical-align:top;"><strong>Orbiter 1.5 Extruder (genuine)</strong></td><td style="border:1px solid rgb(191, 191, 191);padding:0.4em;text-align:center;vertical-align:top;"><a href="https://s.click.aliexpress.com/e/_AkxC4A"><strong>AliExpress</strong></a></td><td style="border:1px solid rgb(191, 191, 191);height:3.5px;padding:0.4em;text-align:center;vertical-align:top;"><a href="https://s.click.aliexpress.com/e/_AkKUOK"><strong>AliExpress</strong></a></td><td style="border:1px solid rgb(191, 191, 191);height:3.5px;padding:0.4em;text-align:center;vertical-align:top;"><a href="https://www.banggood.com/custlink/mGKY0acA6A"><strong>Banggood</strong></a></td></tr></tbody></table></figure><figure class="table" style="height:35.7812px;width:714px;"><table style="background-color:rgba(64, 200, 232, 0.094);border:1px double rgb(179, 179, 179);"><tbody><tr><td style="border:1px solid rgb(191, 191, 191);padding:0px 0px 0px 1rem;vertical-align:top;"><strong>Orbiter 2.0 Extruder (genuine)</strong></td><td style="border:1px solid rgb(191, 191, 191);padding:0.4em;text-align:center;vertical-align:top;"><a href="https://s.click.aliexpress.com/e/_AKvZWO"><strong>AliExpress</strong></a></td><td style="border:1px solid rgb(191, 191, 191);padding:0.4em;text-align:center;vertical-align:top;"><a href="https://s.click.aliexpress.com/e/_A1WUOK"><strong>AliExpress</strong></a></td><td style="border:1px solid rgb(191, 191, 191);padding:0.4em;text-align:center;vertical-align:top;"><a href="https://s.click.aliexpress.com/e/_AgdSy2"><strong>AliExpress</strong></a></td></tr></tbody></table></figure><figure class="table" style="height:35.7812px;width:714px;"><table style="background-color:rgba(64, 200, 232, 0.094);border:1px double rgb(179, 179, 179);"><tbody><tr><td style="border:1px solid rgb(191, 191, 191);padding:0px 0px 0px 1rem;vertical-align:top;"><strong>Sherpa Mini R1 Extruder (genuine)</strong></td><td style="border:1px solid rgb(191, 191, 191);padding:0.4em;text-align:center;vertical-align:top;"><a href="https://s.click.aliexpress.com/e/_9IvYK6"><strong>AliExpress</strong></a></td><td style="border:1px solid rgb(191, 191, 191);padding:0.4em;text-align:center;vertical-align:top;"><a href="https://s.click.aliexpress.com/e/_AYdQqi"><strong>AliExpress</strong></a></td><td style="border:1px solid rgb(191, 191, 191);padding:0.4em;text-align:center;vertical-align:top;"><a href="https://www.banggood.com/custlink/K33y6oC7kh"><strong>Banggood</strong></a></td></tr></tbody></table></figure><p><strong>Hotend</strong></p><p>You can go with either Standard Flow or High Flow Dragon, I have both and they're both great although the Standard Flow is a bit easier to print with. Dragonfly is also very good.</p><p>Other hotend options are Mosquito and clones (NF-Crazy for example) but they're not linked from here.</p><figure class="table" style="height:88.7812px;width:714px;"><table style="background-color:rgba(64, 200, 232, 0.094);border:1px double rgb(179, 179, 179);"><tbody><tr><td style="border:1px solid rgb(191, 191, 191);padding:0.4em;vertical-align:top;"><p><strong>Dragon Hotend</strong></p><p><i>I recommend Standard Flow.</i></p></td><td style="border:1px solid rgb(191, 191, 191);padding:0.4em;text-align:center;vertical-align:top;"><a href="https://s.click.aliexpress.com/e/_AsBA3y"><strong>AliExpress</strong></a></td><td style="border:1px solid rgb(191, 191, 191);height:3.5px;padding:0.4em;text-align:center;vertical-align:top;"><a href="https://www.banggood.com/custlink/vvGYBGShCN"><strong>Banggood</strong></a></td></tr></tbody></table></figure><figure class="table" style="height:35.7812px;width:714px;"><table style="background-color:rgba(64, 200, 232, 0.094);border:1px double rgb(179, 179, 179);"><tbody><tr><td style="border:1px solid rgb(191, 191, 191);padding:0.4em;vertical-align:top;"><strong>Dragonfly Hotend</strong></td><td style="border:1px solid rgb(191, 191, 191);padding:0.4em;text-align:center;vertical-align:top;"><a href="https://s.click.aliexpress.com/e/_ANkCCt"><strong>AliExpress</strong></a></td><td style="border:1px solid rgb(191, 191, 191);height:3.5px;padding:0.4em;text-align:center;vertical-align:top;"><a href="https://s.click.aliexpress.com/e/_AYi54h"><strong>AliExpress</strong></a></td></tr></tbody></table></figure><p><strong>Thermocouple / Heater cartridge</strong></p><p><i>The budget thermocouple is fine, I've used a bunch without issues. Buy a spare. The sensor only is needed.</i></p><p><i>For heater I recommend a 24V 60W heater cartridge, a 50W will also work well.</i></p><figure class="table" style="width:100%;"><table style="background-color:#40C8E818;border-style:ridge;"><tbody><tr><td style="border-bottom-color:rgb(242, 242, 242);border-bottom-width:1px;padding:0px 0px 0px 1rem;"><strong>T-K500 Thermocouple (3 x 15 mm)</strong></td><td style="text-align:center;"><a href="https://s.click.aliexpress.com/e/_ATAF4i"><strong>AliExpress</strong></a></td><td style="text-align:center;"><a href="https://s.click.aliexpress.com/e/_AbR5bD"><strong>AliExpress</strong></a></td></tr></tbody></table></figure><figure class="table" style="height:3.5px;width:100%;"><table style="background-color:#40C8E818;border-style:ridge;"><tbody><tr><td><strong>6x20MM 24V 60W Heater Cartridge</strong></td><td><a href="https://s.click.aliexpress.com/e/_9u9Nbo"><strong>AliExpress</strong></a></td><td style="height:3.5px;text-align:center;"><a href="https://s.click.aliexpress.com/e/_AYJnkW"><strong>AliExpress</strong></a></td><td style="height:3.5px;text-align:center;"><a href="https://www.banggood.com/custlink/mDKd6aJvqm"><strong>Banggood</strong></a></td></tr></tbody></table></figure><p><strong>Hotend fan</strong></p><p>I like to use Sunon Maglev fans, good quality and not too noisy. If you plan on printing > 350 C a lot you may want to go for the second option (2VX) as it pushes considerably more air, it's not very silent though. Otherwise, the first option is sufficient for prints up to 300 C. </p><p>You can use a different 24 V 4020 fan if you like or a 24 V 4010 fan with printed distances.</p><figure class="table" style="height:76px;width:714px;"><table style="background-color:rgba(64, 200, 232, 0.094);border:1px double rgb(179, 179, 179);"><tbody><tr><td style="border:1px solid rgb(191, 191, 191);padding:0px 0px 0px 1rem;vertical-align:top;"><p><strong>Sunon Maglev MF40202V2-1000U-A99</strong></p><p><i>I use this Sunon Maglev fan, it's rated at just 21 dB(A). 7.7 CFM.</i></p></td><td style="border:1px solid rgb(191, 191, 191);padding:0.4em;text-align:center;vertical-align:top;"><a href="https://s.click.aliexpress.com/e/_AL1ukh"><strong>AliExpress</strong></a></td></tr></tbody></table></figure><figure class="table" style="height:76px;width:714px;"><table style="background-color:rgba(64, 200, 232, 0.094);border:1px double rgb(179, 179, 179);"><tbody><tr><td style="border:1px solid rgb(191, 191, 191);padding:0px 0px 0px 1rem;vertical-align:top;"><p><strong>Sunon Maglev MB40202VX-000C-A99</strong></p><p><i>Another option, 27.5 dB(A), 10.8 CFM.</i></p></td><td style="border:1px solid rgb(191, 191, 191);padding:0.4em;text-align:center;vertical-align:top;"><a href="https://s.click.aliexpress.com/e/_9ysVY9"><strong>AliExpress</strong></a></td></tr></tbody></table></figure><p><strong>Fasteners</strong></p><p>You need some M3 hex bolts (socket head) at various lengths. It's best to grab the kit below, it will have everything you need for this build and many more.</p><p>Heated M3 inserts are required too, for example for attaching the fan duct to the carriage, you will find out more about this later in the build.</p><figure class="table" style="height:35.7812px;width:714px;"><table style="background-color:rgba(64, 200, 232, 0.094);border:1px double rgb(179, 179, 179);"><tbody><tr><td style="border:1px solid rgb(191, 191, 191);padding:0px 0px 0px 1rem;vertical-align:top;"><strong>440 pcs M3 Hex Socket Head Cap Kit</strong></td><td style="border:1px solid rgb(191, 191, 191);padding:0.4em;text-align:center;vertical-align:top;"><a href="https://s.click.aliexpress.com/e/_AD1eFU"><strong>AliExpress</strong></a></td></tr></tbody></table></figure><figure class="table" style="height:35.7812px;width:714px;"><table style="background-color:rgba(64, 200, 232, 0.094);border:1px double rgb(179, 179, 179);"><tbody><tr><td style="border:1px solid rgb(191, 191, 191);padding:0px 0px 0px 1rem;vertical-align:top;"><strong>M3 Heated Inserts</strong></td><td style="border:1px solid rgb(191, 191, 191);padding:0.4em;text-align:center;vertical-align:top;"><a href="https://s.click.aliexpress.com/e/_Aodtxu"><strong>AliExpress</strong></a></td></tr></tbody></table></figure><p><strong>Tools</strong></p><p>You also need a JST crimping tool and some JST-XH terminals and connectors. I'm using this IWISS crimping tool which is inexpensive and is doing a good job. A digital dial indicator is optional but it's recommended so you can level the bed perfectly. A soldering iron is needed too for the heated inserts.</p><figure class="table" style="height:76px;width:714px;"><table style="background-color:rgba(64, 200, 232, 0.094);border:1px double rgb(179, 179, 179);"><tbody><tr><td style="border:1px solid rgb(191, 191, 191);padding:0px 0px 0px 1rem;vertical-align:top;"><p><strong>IWS-2820M Crimping Tool + Terminals & Connectors</strong></p><p><i>Select the option (IWS-2820 2.54 XH-F).</i></p></td><td style="border:1px solid rgb(191, 191, 191);padding:0.4em;text-align:center;vertical-align:top;"><a href="https://s.click.aliexpress.com/e/_AbCcUN"><strong>AliExpress</strong></a></td></tr></tbody></table></figure><figure class="table" style="height:35.7812px;width:714px;"><table style="background-color:rgba(64, 200, 232, 0.094);border:1px double rgb(179, 179, 179);"><tbody><tr><td style="border:1px solid rgb(191, 191, 191);padding:0px 0px 0px 1rem;vertical-align:top;"><strong>Digital Dial Indicator</strong></td><td style="border:1px solid rgb(191, 191, 191);padding:0.4em;text-align:center;vertical-align:top;"><a href="https://s.click.aliexpress.com/e/_Alycwi"><strong>AliExpress</strong></a></td></tr></tbody></table></figure><figure class="table" style="height:35.7812px;width:714px;"><table style="background-color:rgba(64, 200, 232, 0.094);border:1px double rgb(179, 179, 179);"><tbody><tr><td style="border:1px solid rgb(191, 191, 191);padding:0px 0px 0px 1rem;vertical-align:top;"><strong>Soldering Iron</strong></td><td style="border:1px solid rgb(191, 191, 191);padding:0.4em;text-align:center;vertical-align:top;"><a href="https://s.click.aliexpress.com/e/_Abph8Q"><strong>AliExpress</strong></a></td><td style="border:1px solid rgb(191, 191, 191);padding:0.4em;text-align:center;vertical-align:top;"><a href="https://www.banggood.com/custlink/DmGd4jCbG9"><strong>Banggood</strong></a></td></tr></tbody></table></figure><p><strong>Optional Parts</strong></p><p>These parts are optional. You can use the extruder PCB and blower fan from one of your old Qidi printheads to keep costs down. The other parts are spares that are good to have on hand.</p><figure class="table" style="height:35.7812px;width:714px;"><table style="background-color:rgba(64, 200, 232, 0.094);border:1px double rgb(179, 179, 179);"><tbody><tr><td style="border:1px solid rgb(191, 191, 191);padding:0px 0px 0px 1rem;vertical-align:top;"><strong>24V 5015 blower fan</strong></td><td style="border:1px solid rgb(191, 191, 191);padding:0.4em;text-align:center;vertical-align:top;"><a href="https://s.click.aliexpress.com/e/_99QPKq"><strong>AliExpress</strong></a></td><td style="border:1px solid rgb(191, 191, 191);padding:0.4em;text-align:center;vertical-align:top;"><a href="https://s.click.aliexpress.com/e/_AmqYyq"><strong>AliExpress</strong></a></td></tr></tbody></table></figure><figure class="table" style="height:35.7812px;width:714px;"><table style="background-color:rgba(64, 200, 232, 0.094);border:1px double rgb(179, 179, 179);"><tbody><tr><td style="border:1px solid rgb(191, 191, 191);padding:0.4em;vertical-align:top;"><strong>Plated Copper T-V6 Nozzle</strong></td><td style="border:1px solid rgb(191, 191, 191);padding:0.4em;text-align:center;vertical-align:top;"><a href="https://s.click.aliexpress.com/e/_9HDlsS"><strong>AliExpress</strong></a></td><td style="border:1px solid rgb(191, 191, 191);height:3.5px;padding:0.4em;text-align:center;vertical-align:top;"><a href="https://s.click.aliexpress.com/e/_9JHgGI"><strong>AliExpress</strong></a></td><td style="border:1px solid rgb(191, 191, 191);height:3.5px;padding:0.4em;text-align:center;vertical-align:top;"><a href="https://www.banggood.com/custlink/33vR6OWC1k"><strong>Banggood</strong></a></td></tr></tbody></table></figure><figure class="table" style="height:35.7812px;width:714px;"><table style="background-color:rgba(64, 200, 232, 0.094);border:1px double rgb(179, 179, 179);"><tbody><tr><td style="border:1px solid rgb(191, 191, 191);padding:0.4em;vertical-align:top;"><strong>Hardened Steel T-V6 Nozzle</strong></td><td style="border:1px solid rgb(191, 191, 191);padding:0.4em;text-align:center;vertical-align:top;"><a href="https://s.click.aliexpress.com/e/_AL6Qby"><strong>AliExpress</strong></a></td><td style="border:1px solid rgb(191, 191, 191);height:3.5px;padding:0.4em;text-align:center;vertical-align:top;"><a href="https://s.click.aliexpress.com/e/_A1pN7o"><strong>AliExpress</strong></a></td><td style="border:1px solid rgb(191, 191, 191);height:3.5px;padding:0.4em;text-align:center;vertical-align:top;"><a href="https://www.banggood.com/custlink/mmGhelpcf1"><strong>Banggood</strong></a></td></tr></tbody></table></figure><figure class="table" style="height:35.7812px;width:714px;"><table style="background-color:rgba(64, 200, 232, 0.094);border:1px double rgb(179, 179, 179);"><tbody><tr><td style="border:1px solid rgb(191, 191, 191);padding:0px 0px 0px 1rem;vertical-align:top;"><strong>Qidi extruder PCB</strong></td><td style="border:1px solid rgb(191, 191, 191);padding:0.4em;text-align:center;vertical-align:top;"><a href="https://s.click.aliexpress.com/e/_AfVtkw"><strong>AliExpress</strong></a></td></tr></tbody></table></figure><p><strong>How do I use the Dial Indicator Holder?</strong></p><p>You can achieve perfect bed level in about a minute without removing any parts / carriage.</p><p>As the dial holder is in front of the carriage it doesn't measure on top of the bed leveling screws but it doesn't matter for accuracy, we still achieve perfect bed level. The script checks the bed level on three different spots on the bed in a triangular pattern. Adjust the bed leveling screw closest to where it measures and by the time the script has looped three times the bed will be perfectly level.</p><p><i>Notice: You may need to remove the dial holder while printing else it could hit the frame of the printer. On the X-Max you can have it installed all the time but I'm unsure of the other supported printer models.</i></p><p><strong>Print Settings</strong></p><p>Print the carriage in high temp resistant filament. I recommend using Polycarbonate (PC), a PC blend such as PC-FR (flame retardant PC), PC-CF (PC with Carbon Fibre) or PA-CF (Nylon with Carbon Fibre). I like using the Prusament PC Blends with the PC-CF being top choice but it is often out of stock.</p><p>This PA-CF should be a great option:</p><p><a href="https://s.click.aliexpress.com/e/_9JGjQK">eSUN Carbon Fiber Filled Nylon Filament 1.75mm 1KG</a></p><p>To summarize, print the parts in PC if you can to be on the safe side.</p><p>Print all parts in 0.2 mm layer height using a 0.4 mm nozzle. I recommend using 5 top, bottom and perimeter layers with an infill of 25% or higher.</p><p>The whole carriage prints in one piece, supports are not needed.</p><p>The fan duct for parts cooling, the belt peg and the dragon mount all print without supports. The optional dial holder needs some supports but is easy to print.</p><p><i>Notice: If for some reason you find the carriage sits too tight or too loose you can print one of the other carriages with narrower or wider clearance for the bearings (named narrow and wide). It also depends on slicer settings so make sure you dial in flow before you start.</i></p><p><strong>Precaution!</strong></p><p>Before you start, please ensure you use the parts in the BOM only. It's very important to use a high quality thermocouple that is rated for 500 C for example, the stock Qidi thermocouple is only rated at 300 C.</p><p>If you want to increase the print temp beyond 300 C (stock) you can enable it in firmware, I have commented it there.</p><p><i>Do the mod at your own risk. Never leave your printer unattended, stock or not.</i></p><p><strong>Assembly Instructions</strong></p><p><i>Notice: The assembly instructions below are from Icarus 1.2 but it's very similar so just follow that guide until I have updated the assembly pictures. For example, it mentions a 4010 fan but we use a 4020 with Icarus 2 (a 4010 is supported too, with optional fan distances) and the extruder/hotend mount look a little different.</i></p><p>Just below is a picture of the assembled unit. This carriage was printed using another Icarus 1.2 carriage with Orbiter 1.5 and Trianglelab Dragon Standard Flow at the recommended print settings.</p><figure class="image image_resized" style="width:535.5px;"><img src="https://media.prusaprinters.org/media/prints/81744/rich_content/a280ce6d-e634-4b52-a0f6-4f9ef66402fa/thumbs/cover/800x450/jpg/01.webp"></figure><p>But we start the guide from scratch. </p><p><i>Notice: If your Dragon hotend has a V6 groove mount installed, remove it now, it is secured with two screws from below the top of the heatsink. We do not use the groove mount with the Icarus build.</i></p><p>Insert 4 brass insert using a soldering tool to the bottom of the carriage. Press it slowly then once it's almost fully in, turn the carriage around so it's standing up and then press down the whole carriage for 10 seconds on a flat high temp resistant surface. The backside of the QIDI bed plate is perfect for example.</p><p>Do the same for the dragon mount, the blower fan mount, the dial holder and the ribbon cable bracket, for these inserts you can use the Qidi metal scraper to ensure they are flat against the surface.</p><p>In total 12 brass inserts will be installed in the carriage and 2-4 in the mount (depending on mount).</p><figure class="image image_resized" style="width:535.5px;"><img src="https://media.prusaprinters.org/media/prints/81744/rich_content/0701dc5b-5efa-4dda-b997-9c1c292d511f/thumbs/cover/800x450/jpg/15.webp"></figure><figure class="image image_resized" style="width:535.5px;"><img src="https://media.prusaprinters.org/media/prints/81744/rich_content/ced0dbdc-ac8f-4340-9615-43efbde53c27/thumbs/cover/800x450/jpg/16.webp"></figure><figure class="image image_resized" style="width:535.5px;"><img src="https://media.prusaprinters.org/media/prints/81744/rich_content/433c7b3b-cece-4e6d-811e-149db04f2236/thumbs/cover/800x450/jpg/17.webp"></figure><figure class="image image_resized" style="width:535.5px;"><img src="https://media.prusaprinters.org/media/prints/81744/rich_content/f36beef8-b45f-40ea-a225-caf1ce7c9466/thumbs/cover/800x450/jpg/18.webp"></figure><figure class="image image_resized" style="width:535.5px;"><img src="https://media.prusaprinters.org/media/prints/81744/rich_content/3a4baea2-a07a-4058-9d35-061cffa2bff3/thumbs/cover/800x450/jpg/19.webp"></figure><figure class="image image_resized" style="width:535.5px;"><img src="https://media.prusaprinters.org/media/prints/81744/rich_content/4382d354-2a94-44c2-84e3-2021f65b109f/thumbs/cover/800x450/jpg/20.webp"></figure><figure class="image image_resized" style="width:535.5px;"><img src="https://media.prusaprinters.org/media/prints/81744/rich_content/8991c6dd-15f0-49f9-b61a-56deea1212b0/thumbs/cover/800x450/jpg/21.webp"></figure><figure class="image image_resized" style="width:535.5px;"><img src="https://media.prusaprinters.org/media/prints/81744/rich_content/954c0b16-f799-4e92-8528-5befedb139bb/thumbs/cover/800x450/jpg/22.webp"></figure><figure class="image image_resized" style="width:535.5px;"><img src="https://media.prusaprinters.org/media/prints/81744/rich_content/6d1ce7b3-e390-4224-beba-306a08f215c2/thumbs/cover/800x450/jpg/23.webp"></figure><figure class="image image_resized" style="width:535.5px;"><img src="https://media.prusaprinters.org/media/prints/81744/rich_content/0c969006-9e7b-480d-9ef2-fcca2e0d133e/thumbs/cover/800x450/jpg/24.webp"></figure><p>Cut the heater cartridge cable to about 16 cm. Leave a few mm unshielded and screw it to the heat block.</p><figure class="image image_resized" style="width:535.5px;"><img src="https://media.prusaprinters.org/media/prints/81744/rich_content/b5d6d4eb-b6b8-4b40-a494-551083037adb/thumbs/cover/800x450/jpg/1.webp"></figure><figure class="image image_resized" style="width:535.5px;"><img src="https://media.prusaprinters.org/media/prints/81744/rich_content/1d132749-ec88-4c08-b7dc-d7d81a9f46f7/thumbs/cover/800x450/jpg/2.webp"></figure><p>Time to fix the blower and hotend fans. Cut and crimp as described below. If you don't know how to crimp with a two step JST crimper we use in the BOM, there's a quick quide just below the pictures, it's easy so don't worry.</p><figure class="image image_resized" style="width:535.5px;"><img src="https://media.prusaprinters.org/media/prints/81744/rich_content/989ca543-ba65-4b16-8794-bf80dfeac343/thumbs/cover/800x450/jpg/3.webp"></figure><figure class="image image_resized" style="width:535.5px;"><img src="https://media.prusaprinters.org/media/prints/81744/rich_content/f979edb5-9aa8-4a4f-8ad5-0e966cf03132/thumbs/cover/800x450/jpg/4.webp"></figure><figure class="image image_resized" style="width:535.5px;"><img src="https://media.prusaprinters.org/media/prints/81744/rich_content/75d36cd3-50d0-452e-ade1-2d42e267fa26/thumbs/cover/800x450/jpg/5.webp"></figure><figure class="image image_resized" style="width:535.5px;"><img src="https://media.prusaprinters.org/media/prints/81744/rich_content/c2e8d68c-f3d5-4f4c-9e3c-7350788a8583/thumbs/cover/800x450/jpg/6.webp"></figure><figure class="image image_resized" style="width:535.5px;"><img src="https://media.prusaprinters.org/media/prints/81744/rich_content/fca73d9d-4341-4176-9154-2f243353933e/thumbs/cover/800x450/jpg/7.webp"></figure><figure class="image image_resized" style="width:535.5px;"><img src="https://media.prusaprinters.org/media/prints/81744/rich_content/a77c77cc-c6da-44d0-b415-ab252689f713/thumbs/cover/800x450/jpg/8.webp"></figure><p><br> <strong>Crimping guide (video)</strong></p><p> </p><p>Next, cut the thermocouple cable to about 15 cm. </p><p>Crimp on a JST-XH connector on the thermocouple. I used heat shrink tube on both thermocouple and heater cartridge but it's optional, it can be easier to get the pin header to grip by doing so. The thermocouple can be a bit difficult to work with so take it slow. </p><p><i><strong>Notice!</strong></i><strong> </strong>If you get a temp drop when you start heating the printer for the first time you have probably reversed the thermocouple cables. If so just unpin the connector and switch over.</p><figure class="image image_resized" style="width:535.5px;"><img src="https://media.prusaprinters.org/media/prints/81744/rich_content/7b3512e3-e7e0-45ab-8176-4a9581f38aeb/thumbs/cover/800x450/jpg/9.webp"></figure><p><i><strong>Notice!</strong> Before you start with the motor wiring, take notice of the plug direction in the pictures, it is inserted upside down on the PCB!</i></p><figure class="image image_resized" style="width:535.5px;"><img src="https://media.prusaprinters.org/media/prints/81744/rich_content/dbed99e0-78c4-44aa-a69e-9a22f60d00ef/thumbs/cover/800x586/png/qidiextrudermotorwiring-1.webp"></figure><p><i>Graphics: Gerald Abao Yuvallos</i></p><p><strong>Orbiter 1.5 and 2.0 wire order</strong></p><p>Cut the Orbiter motor cable to around 15 cm and crimp on a 4-pin JST-XH connector. The correct cable orientation for the LDO motor is as pictured: Green, red, yellow, blue.</p><p><i>If you're using a motor by Mellow, this is the correct wire order: Green, black, red, blue.</i></p><p><i>If you're using a motor by Moons, this is the correct wire order: Orange, black, red, blue.</i></p><figure class="image image_resized" style="width:535.5px;"><img src="https://media.prusaprinters.org/media/prints/81744/rich_content/1f11b50e-0396-43f7-a8f8-579c9e647466/thumbs/cover/800x450/png/12.webp"></figure><p><strong>Sherpa Mini R1 wire order</strong></p><p>Cut the Sherpa Mini motor cable to around 15 cm and crimp on a 4-pin JST-XH connector. The correct cable orientation for the LDO motor is as pictured: Blue, yellow, red, green.</p><p><i>If you're using a motor by Mellow, this is the correct wire order: Blue, red, black, green.</i></p><p><i>If you're using a motor by Moons, this is the correct wire order: Blue, red, black, orange.</i></p><figure class="image image-style-align-center image_resized" style="width:535.5px;"><img src="https://media.prusaprinters.org/media/prints/81321/rich_content/f7cce731-5539-4fa4-875b-d32aa20b2d77/thumbs/cover/800x450/png/13.webp"></figure><p><strong>LGX Lite wire order</strong></p><p>Cut the LGX Lite motor cable to around 15 cm and crimp on a 4-pin JST-XH connector. The correct cable orientation for this is as pictured: Blue, yellow, green, red.</p><figure class="image image_resized" style="width:75%;"><img src="https://media.prusaprinters.org/media/prints/130789/rich_content/dff4efd1-f7d3-4bb7-ba35-cdcb298ef88e/dsc_9555.jpg#%7B%22uuid%22%3A%22772cc075-10be-45b0-80cf-a07cdc377974%22%2C%22w%22%3A2268%2C%22h%22%3A4032%7D"></figure><p><strong>Crimping done!</strong></p><figure class="image image_resized" style="width:535.5px;"><img src="https://media.prusaprinters.org/media/prints/81744/rich_content/693ee496-d437-40ef-9ddb-e2830c5c9b6e/thumbs/cover/800x450/jpg/14.webp"></figure><p>Mount the two small hotend screws to the the hotend mount and tighten it with the hotend sitting behind it. Look at the picture for the correct orientation. In my experience 2 screws are enough but the design allows for four screws to be used.</p><p>Make sure the heatblock of the hotend is facing the correct direction for the parts cooling fan duct to be effective as it's aimed at the nozzle tip. The heater cartridge should be the closest to the front of the carriage and the thermocouple towards the blower fan.</p><p>Then cut a 12.75 mm long PTFE tube using the printed jig, the PTFE should have an inner diameter of 2 mm and outer diameter of 4 mm which is the standard for 1.75 mm filament. Insert it into the hotend mount.</p><figure class="image image_resized" style="width:535.5px;"><img src="https://media.prusaprinters.org/media/prints/81744/rich_content/1edce0d3-c393-47c2-977a-000da710ac1f/thumbs/cover/800x450/jpg/25.webp"></figure><figure class="image image_resized" style="width:535.5px;"><img src="https://media.prusaprinters.org/media/prints/81744/rich_content/e4ed34d6-2fd6-45e6-99b1-3cce52b289da/thumbs/cover/800x450/jpg/26.webp"></figure><p>Next, mount the extruder over the hotend mount so that the PTFE tube sticks up into the extruder. Secure it with 2 x 12 mm M3 bolts.</p><p><i>Caution! </i>Tighten it but do not overtighten it as we don't want the brass inserts to come loose from the carriage. The same applies everywhere in this guide.</p><figure class="image image_resized" style="width:535.5px;"><img src="https://media.prusaprinters.org/media/prints/81744/rich_content/1c0f9870-bce3-41f6-878e-1f64b0b2ebe8/thumbs/cover/800x450/jpg/27.webp"></figure><p>Insert the 4010 fan between the carriage and the hotend mount. The sticker on the fan should be facing the hotend. Then line up the screw holes before fastening it with two 25 mm M3 bolts, I find it easier to do if you use a thin pin or a thinner allen key for example to line it up before tightening.</p><p>I designed the carriage and hotend mount this way for stability as the bolts secure the hotend mount as well, preventing hotend roll.</p><figure class="image image_resized" style="width:535.5px;"><img src="https://media.prusaprinters.org/media/prints/81744/rich_content/f82e6cca-7286-422c-b439-0d72ce821257/thumbs/cover/800x450/jpg/28.webp"></figure><p>Fasten the cables from the heater cartridge to the PCB (from your spare extruder) then carefully press down the PCB into the slot, no screws are needed.</p><figure class="image image_resized" style="width:535.5px;"><img src="https://media.prusaprinters.org/media/prints/81744/rich_content/f0d59719-e19d-4f4d-b19a-444246606d48/thumbs/cover/800x450/jpg/30.webp"></figure><figure class="image image_resized" style="width:535.5px;"><img src="https://media.prusaprinters.org/media/prints/81744/rich_content/44f8d5b4-d37d-4636-b762-489e41708eee/thumbs/cover/800x450/jpg/31.webp"></figure><figure class="image image_resized" style="width:535.5px;"><img src="https://media.prusaprinters.org/media/prints/81744/rich_content/e0c48685-0f48-4062-b51e-62c24f423207/thumbs/cover/800x450/jpg/32.webp"></figure><figure class="image image_resized" style="width:535.5px;"><img src="https://media.prusaprinters.org/media/prints/81744/rich_content/153c3ca8-3832-4555-a086-a8e2e6e89eed/thumbs/cover/800x450/jpg/33.webp"></figure><figure class="image image_resized" style="width:535.5px;"><img src="https://media.prusaprinters.org/media/prints/81744/rich_content/8e0e2fe0-2e99-4407-b2ef-7e1ba5df18bf/thumbs/cover/800x450/jpg/34.webp"></figure><figure class="image image_resized" style="width:535.5px;"><img src="https://media.prusaprinters.org/media/prints/81744/rich_content/b8e4293a-9463-469a-bb7e-dd15ede6fba4/thumbs/cover/800x450/jpg/35.webp"></figure><p>Insert the blower fan and secure it with a 20 mm bolt. Do the same for the dial indicator holder if you wish to use it.</p><p><strong>The carriage is now assembled and can be installed in your printer.</strong></p><figure class="image image_resized" style="width:535.5px;"><img src="https://media.prusaprinters.org/media/prints/81744/rich_content/00071af2-3e6b-4c7a-8294-474bfaf0c4ec/thumbs/cover/800x450/jpg/29.webp"></figure><figure class="image image_resized" style="width:535.5px;"><img src="https://media.prusaprinters.org/media/prints/81744/rich_content/61c38e5b-e49a-4c9a-aea9-26d1841b8a68/thumbs/cover/800x450/jpg/36.webp"></figure><figure class="image image_resized" style="width:535.5px;"><img src="https://media.prusaprinters.org/media/prints/81744/rich_content/a6004b3d-ac6c-4a0f-9981-1c3ffdd05272/thumbs/cover/800x450/jpg/37.webp"></figure><figure class="image image_resized" style="width:535.5px;"><img src="https://media.prusaprinters.org/media/prints/81744/rich_content/b0dfcdc0-61fd-4029-9a67-448439e7f2f8/thumbs/cover/800x450/jpg/38.webp"></figure><figure class="image image_resized" style="width:535.5px;"><img src="https://media.prusaprinters.org/media/prints/81744/rich_content/de049f5a-c0c2-4273-bb44-cd3e34bbcde0/thumbs/cover/800x450/jpg/39.webp"></figure><figure class="image image_resized" style="width:535.5px;"><img src="https://media.prusaprinters.org/media/prints/81744/rich_content/f8cb9f80-c5e8-4ad1-9c4a-2af1b79c9aeb/thumbs/cover/800x450/jpg/40.webp"></figure><p>Next, remove the original QIDI extruder and carriage. It is not fully pictured but to do so remove the screw from the top cover, remove the cover, unplug the ribbon cable, unscrew the extruder from below with the two screws (and possibly fan duct if you have one), lift out the extruder, remove two screws holding the belt plate, lift over belt then pull off the whole carriage carefully but firmly, it can sit <i>very </i>tight on.</p><figure class="image image_resized" style="width:535.5px;"><img src="https://media.prusaprinters.org/media/prints/81744/rich_content/7ad0ff81-973a-480e-8070-920104a18557/thumbs/cover/800x1051/png/2020-07-05_12h08_56.webp"></figure><p><i>Picture: Olaf Krause</i></p><p>At this point it's time to install the Icarus carriage into your printer. Line up the bearings below the carriage until you feel the location is correct then press down, use both hands if needed, it is a good idea to hold the rods as well so they don't bend down. It will sit firmly and will snap over the bearings. Once installed there should be no play in the carriage against the bearings.</p><p>Install the fan duct from below using 4 x 8 mm M3 bolts.</p><p>Move over the belt over the belt holder. Insert the printed belt peg, it acts both to secure the belt but also as a limit switch plate. Place the ribbon cable over the ribbon cable bracket and then insert it into the PCB, not the other way around. Do this with the printer shut off.</p><p>The main objective of the bracket is to keep the weight from the ribbon cable from stressing the connector. It will also help preventing the ribbon cable from dipping down too much.</p><p>Fasten the ribbon cable with an 8 mm M3 bolt.</p><p><strong>Now you're done with the physical installation.</strong></p><figure class="image image_resized" style="width:535.5px;"><img src="https://media.prusaprinters.org/media/prints/81744/rich_content/9214895f-0a7a-4cbc-8128-4f6dfd19a113/thumbs/cover/800x450/jpg/41.webp"></figure><figure class="image image_resized" style="width:535.5px;"><img src="https://media.prusaprinters.org/media/prints/81744/rich_content/406b5f5f-53db-4fa9-ad3f-9715d874481b/thumbs/cover/800x450/jpg/42.webp"></figure><figure class="image image_resized" style="width:535.5px;"><img src="https://media.prusaprinters.org/media/prints/81744/rich_content/ab82f6af-9baf-41ef-a008-47d8bff9102b/thumbs/cover/800x450/jpg/43.webp"></figure><figure class="image image_resized" style="width:535.5px;"><img src="https://media.prusaprinters.org/media/prints/81744/rich_content/1df5e568-d4ba-48ec-9946-ccc074aba7a1/thumbs/cover/800x450/jpg/44.webp"></figure><figure class="image image_resized" style="width:535.5px;"><img src="https://media.prusaprinters.org/media/prints/81744/rich_content/5c252fb7-2477-44d0-9e0f-e8eff0380047/thumbs/cover/800x450/jpg/45.webp"></figure><figure class="image image_resized" style="width:535.5px;"><img src="https://media.prusaprinters.org/media/prints/81744/rich_content/20e00b43-3ff2-4e5a-8c2a-756f6a323054/thumbs/cover/800x450/jpg/46.webp"></figure><figure class="image image_resized" style="width:535.5px;"><img src="https://media.prusaprinters.org/media/prints/81744/rich_content/37b182d0-6a8d-4efd-b506-0e55eeeea1f9/thumbs/cover/800x450/jpg/48.webp"></figure><figure class="image image_resized" style="width:535.5px;"><img src="https://media.prusaprinters.org/media/prints/81744/rich_content/d8c06922-e56d-4e23-a2c9-21349b5a9cf4/thumbs/cover/800x450/jpg/51.webp"></figure><p>Time to print some files for firmware adjustments! Download the gcode files from here, extract the files and place them on your USB stick:</p><p><a href="https://www.minux.se/humebeam/icarus-2-firmwares-and-gcodes.zip"><strong>icarus-2-firmwares-and-gcodes.zip</strong></a></p><p>Now with the files you downloaded on your USB stick, if you want to you can save the current configuration to the USB stick before you start. It's optional (you can always revert to stock firmware by printing files received by Qidi support). Print this file:</p><p><i>output-configuration.gcode</i></p><p>Next, there are two files to print. First the firmware, then the PID tune. So go ahead and print the firmware appropriate for your extruder, for example:</p><p><i>icarus-2-orbiter-2.0-firmware.gcode</i></p><p><strong>Notice! </strong>All compatible printers use the same firmware file, only the extruders use different e-step values.</p><p>Just print it like you would print a normal model. It will make adjustments to the motor directions, X and Y distances, E-step adjustments and finally save it all. It will save immediately, no need for a reboot.</p><p><strong>PID tune</strong></p><p><strong>Caution! If your Qidi firmware is recent (4.2.14.x or later) skip the PID tuning step completely, the printer will work fine with the stock PID values. A bug in the recent Qidi firmwares results in PID tunes not working properly.</strong></p><p>I've made an auto PID tune gcode that you just need to print, you no longer need to connect Octoprint and send the commands to the printer and watch the output and apply yourself. Print the file, it will heat up to 230 degrees in eight cycles then use the output result and apply to the printer immediately, no need for a reboot.</p><p><i>pid-autotune.gcode</i></p><p>It will take a few minutes to run so be patient until it finishes.</p><p><strong>Notice: If for some reason the PID tune is not improving the print temp stability you can revert it to stock PID values by printing this:</strong></p><p><i>qidi-back-to-stock-pid.gcode</i></p><p>My firmware adjustments does not change the max print temp which is set to 300 C but it is commented in the firmware if you want to increase it (at your own risk).</p><figure class="image image_resized" style="width:535.5px;"><img src="https://media.prusaprinters.org/media/prints/81744/rich_content/f18c2c70-7bc6-4488-b1b9-b70a2017d32d/thumbs/cover/800x600/jpg/48b.webp"></figure><figure class="image image_resized" style="width:535.5px;"><img src="https://media.prusaprinters.org/media/prints/81744/rich_content/f67a25cf-f9a6-48a9-902d-ac1b86e28233/thumbs/cover/800x450/jpg/49.webp"></figure><figure class="image image_resized" style="width:535.5px;"><img src="https://media.prusaprinters.org/media/prints/81744/rich_content/dc91f8e0-0882-4d0e-ba78-7f16a22da5dc/thumbs/cover/800x450/jpg/50.webp"></figure><p>Now it's time to check the functionality. First, do a manual X, Y and Z adjustment and see how the carriage moves. If everything looks normal heat up the extruder to printing temps and feed in the filament using the load menu. If everything goes well it will now extrude from the nozzle.</p><p>Level the bed and you're done.</p><p><strong>Important!</strong> Screw down the bed leveling screws quite a bit first because the carriage sits a bit lower than stock so you must lower the bed a few mm. If you don't, the nozzle may crash against the bed! Also, remove the bed sticker on the first attempt so you don't accidently run into it.</p><figure class="image image_resized" style="width:535.5px;"><img src="https://media.prusaprinters.org/media/prints/81744/rich_content/d8e3e21a-02a1-4c51-82be-81d6e8a619ce/thumbs/cover/800x450/jpeg/dsc_7676.webp"></figure><figure class="image image_resized" style="width:535.5px;"><img src="https://media.prusaprinters.org/media/prints/81744/rich_content/ce1b115e-5dac-4503-9d5e-cc9b64451b3a/thumbs/cover/800x450/jpeg/dsc_7681.webp"></figure><figure class="image image_resized" style="width:535.5px;"><img src="https://media.prusaprinters.org/media/prints/81744/rich_content/45f225e4-53a4-4d42-9be4-b1fe1dadd706/thumbs/cover/800x450/jpg/51.webp"></figure><p>If you have a dial indicator now is a good time to perfectly level the bed. Screw in the bed leveling screws quite a bit so the springs/silicone are firm, insert the dial indicator and start the bed leveling script.</p><p>The script checks the bed level on three different spots on the bed in a triangular pattern. Adjust the bed leveling screw closest to where it measures and by the time the script has looped three times the bed will be perfectly level.</p><p>Just print it like you would a normal model:</p><p><i>qidi-xmax-icarus-dial-bed-leveling-script.gcode</i></p><p>If you use an X-Plus or I-Mate this is the script to print:</p><p><i>qidi-xplus-imate-icarus-dial-bed-leveling-script.gcode</i></p><p>All done. Enjoy!</p><p><i>Notice: You may need to remove the dial holder while printing else it could hit the frame of the printer. On the X-Max you can have it installed all the time but I'm unsure of the other supported printer models.</i></p><p><strong>Just a few tips on settings.</strong> The Dragon hotend does not need as much retraction as stock Qidi. I find around 0.8-1.0 mm is good with a retraction speed of 25 mm/s, depending on filament. If you get blobs on layer changes, disable "travel prime" in your slicer.</p><p>Also, print a few flow calibration cubes and temp towers for your filaments to dial in your printer, I have everything you need, check my other designs.</p><p>If you have a dial indicator you can now insert it to the holder and run the bed leveling script.</p><p>Icarus full weight including Orbiter extruder and motor, Dragon hotend, blower fan, PCB, bolts, 3010 fan, fan duct with bolts, dial holder with bolt and belt peg is 343g on my scale. It is 173g lighter than Hercules with pancake stepper and <i>more than 250g lighter than stock</i>.</p><figure class="image image_resized" style="width:714px;"><img src="https://media.prusaprinters.org/media/prints/81744/rich_content/df262147-fcbe-4111-b5af-8a61d11c19dd/thumbs/cover/800x450/jpeg/dsc_7717.webp"></figure><p><strong>Back to stock firmware?</strong></p><p>If you ever wish to go back to stock firmware, if you're selling the printer and want to keep the fancy extruder and hotend for example, you can reinstall the stock printhead and print this gcode:</p><p><i>qidi-back-to-stock-firmware.gcode</i></p><p><strong>Some test videos</strong></p><p>First video is the Voron test cube at 100 mm/s, eSUN ABS+.</p><p>Second video is the same Voron test cube at 60 mm/s, eSUN TPU 95A.</p><p>Third video is a completed print of a 30 mm test cube at "normal" print speeds (40 mm/s), eSUN ABS+</p><figure class="media"><oembed url="https://youtube.com/watch?v=1dxapTvOYkg"></oembed></figure><figure class="media"><oembed url="https://www.youtube.com/watch?v=2oMcZjvkidw"></oembed></figure><figure class="media"><oembed url="https://www.youtube.com/watch?v=BD8vViwPeYg"></oembed></figure><p><strong>Time for some still images.</strong></p><p>I have not quite dialed in TPU yet but here's Fred the frog in eSUN TPU 95A. First pic shows the effect on the first layer when using the textured side of the ENERGETIC PEI plate, I quite like it. I usually use the smooth side though.</p><p>Below it we have a flow calibration cube in the same filament.</p><figure class="image image_resized" style="width:535.5px;"><img src="https://media.prusaprinters.org/media/prints/81744/rich_content/75b88ffd-6fea-4bcb-8614-289ff4357982/thumbs/cover/800x450/jpeg/dsc_7697.webp"></figure><figure class="image image_resized" style="width:535.5px;"><img src="https://media.prusaprinters.org/media/prints/81744/rich_content/42075475-6742-4525-a126-adc9e1ea085d/thumbs/cover/800x450/jpeg/dsc_7722.webp"></figure><figure class="image image_resized" style="width:535.5px;"><img src="https://media.prusaprinters.org/media/prints/81744/rich_content/00db1514-5ddb-4a42-9eda-90300729405d/thumbs/cover/800x450/jpeg/dsc_7723.webp"></figure><figure class="image image_resized" style="width:535.5px;"><img src="https://media.prusaprinters.org/media/prints/81744/rich_content/d483e39c-1e34-4dd4-9d4f-fe90d1e0e172/thumbs/cover/800x450/jpeg/dsc_7707.webp"></figure><p>Next we have a couple of practical prints. They're a custom design wheel for a robotic lawn mower I made. Printed in black ABS filament with a large 0.8 mm nozzle and 0.6 mm layer height.</p><p>Below it we have an early version of the Icarus fan duct printed in the same filament.</p><figure class="image image_resized" style="width:535.5px;"><img src="https://media.prusaprinters.org/media/prints/81744/rich_content/aa58ea7b-0514-4d05-ab36-bd2bb6dfc157/thumbs/cover/800x450/jpeg/dsc_7702.webp"></figure><p> </p><figure class="image image_resized" style="width:535.5px;"><img src="https://media.prusaprinters.org/media/prints/81744/rich_content/431868f3-72a7-4711-9a6c-bc132c881d14/thumbs/cover/800x450/jpeg/dsc_7743.webp"></figure><figure class="image image_resized" style="width:535.5px;"><img src="https://media.prusaprinters.org/media/prints/81744/rich_content/900e4e16-b08e-462d-8f41-26921c16430b/thumbs/cover/800x450/jpeg/dsc_7720.webp"></figure><p>Some speed tests of the Voron test cube.</p><ul><li>Bottom is printed at 80 mm/s, eSUN ABS+</li><li>Middle is printed at 100 mm/s, eSUN ABS+ (it's the cube from the video above)</li><li>Top is printed at 60 mm/s, eSUN TPU 95A (also from the video above)</li></ul><figure class="image image_resized" style="width:535.5px;"><img src="https://media.prusaprinters.org/media/prints/81744/rich_content/c72f7f89-2871-44fe-a51a-a90f0ebeca00/thumbs/cover/800x450/jpeg/dsc_7768.webp"></figure><p>Here is a 30 mm test cube, it's printed in eSUN ABS+ at "normal" speed of 40 mm/s.</p><p>0.40 mm nozzle and 0.20 mm layer height.</p><p>On the Y side we see the Z seam on the edge.</p><figure class="image image_resized" style="width:535.5px;"><img src="https://media.prusaprinters.org/media/prints/81744/rich_content/c1b9f476-c913-49b2-b2bc-a9cc680207cc/thumbs/cover/800x450/jpeg/dsc_7771.webp"></figure><figure class="image image_resized" style="width:535.5px;"><img src="https://media.prusaprinters.org/media/prints/81744/rich_content/29ff5a75-fba1-4b19-81f0-2fcaf16945f7/thumbs/cover/800x450/jpeg/dsc_7776.webp"></figure><figure class="image image_resized" style="width:535.5px;"><img src="https://media.prusaprinters.org/media/prints/81744/rich_content/bc98071b-6eb6-4df2-9d9e-0041b2c58444/thumbs/cover/800x450/jpeg/dsc_7777.webp"></figure><figure class="image image_resized" style="width:535.5px;"><img src="https://media.prusaprinters.org/media/prints/81744/rich_content/326a11be-b38b-40f3-96b5-b33627f66a59/thumbs/cover/800x450/jpeg/dsc_7778.webp"></figure><p>Some Silica Gel boxes printed at 70 mm/s using Icarus and Dragon Standard Flow. Layer height 0.2 mm. Trianglelab T-V6 Plated Copper Nozzle 0.40 mm.</p><p>The design is available here:</p><figure class="image image_resized" style="width:535.5px;"><img src="https://media.prusaprinters.org/media/prints/81744/rich_content/b5f1c4ed-6a82-496d-ad7e-4ac425eebe17/thumbs/cover/800x450/jpeg/dsc_7946.webp"></figure><figure class="image image_resized" style="width:535.5px;"><img src="https://media.prusaprinters.org/media/prints/81744/rich_content/14538121-2ddb-45ee-8592-b1d012cfd67d/thumbs/cover/800x450/jpeg/dsc_7947.webp"></figure><figure class="image image_resized" style="width:535.5px;"><img src="https://media.prusaprinters.org/media/prints/81744/rich_content/ac2709cb-d9e5-4c34-a605-f7d8a3286909/thumbs/cover/800x450/jpeg/dsc_7948.webp"></figure><figure class="image image_resized" style="width:535.5px;"><img src="https://media.prusaprinters.org/media/prints/81744/rich_content/5dc2c157-b503-4680-85cc-7d7f3d23605f/thumbs/cover/800x450/jpeg/dsc_7950.webp"></figure>
With this file you will be able to print Icarus 2 - QIDI X-Max / X-Plus / I-Mate Carriage (Orbiter, Sherpa Mini, LGX Lite) with your 3D printer. Click on the button and save the file on your computer to work, edit or customize your design. You can also find more 3D designs for printers on Icarus 2 - QIDI X-Max / X-Plus / I-Mate Carriage (Orbiter, Sherpa Mini, LGX Lite).