ICE for OS-Railway - fully 3D-printable railway system!
thingiverse
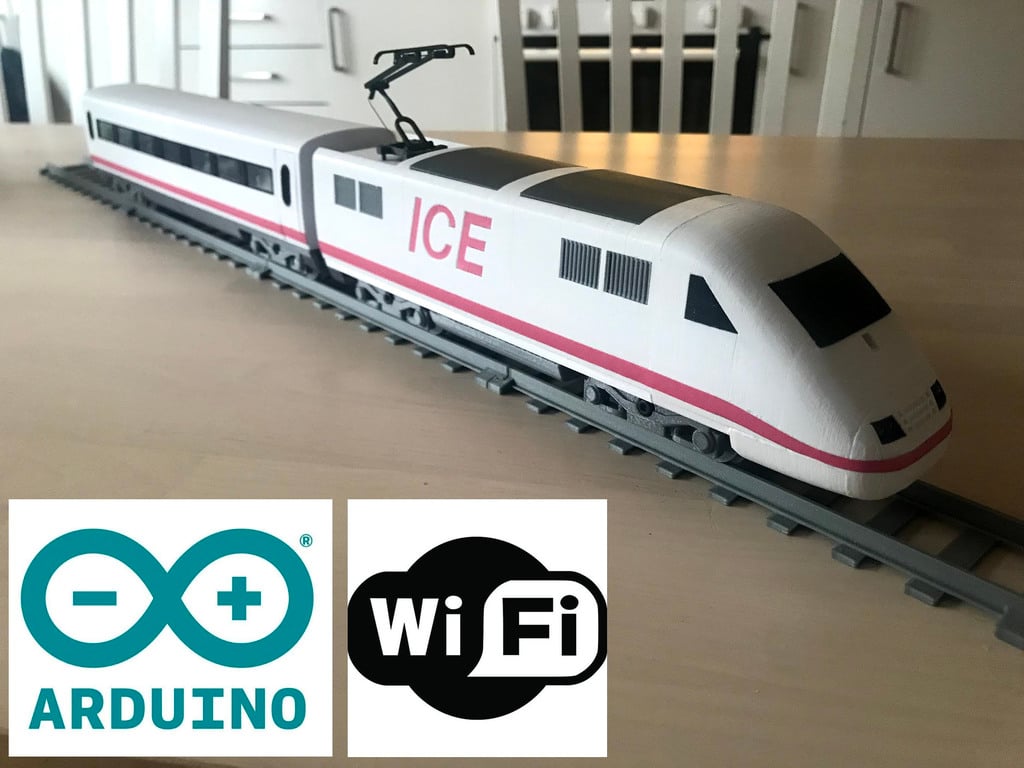
Human: IcE - A Model Of The Intercontinental Express (Version 1 For Train Enthusiasts). Some May Wonder Why I Didn't Create A Model Of The Latest Version Of The ICE. The Answer Is Simple, I Don't Like Its Looks. The Model Is Part Of My Larger Project Called "OS-Railway," With The Aim Of Creating A Completely 3D-Printable Toy/Model Railway System Where As Much As Possible Is 3D-Printable And The Rest Is Relatively Easy To Get. No Specialized Commercial Train Hardware Is Needed. <h2>Electronics</h2> This Model Uses The Same System And Concept As The Hectorrail 141. Please Check That Page For The Electronics: Https://Www.Thingiverse.com/Thing:2575667 Main Controller: NodeMCU (ESP8266 Evaluation Board, Programmed With Arduino IDE). Motor Controller: Dual TB6612FNG From Sparkfun. A Battery Box Is Included In The Design, But You Can Put The Batteries Inside Instead. I'm Using NiMH Cells In The Battery Pack And Intend To Make A Charging Station For The Pack. Don't Recommend Using Lithium Cells Because They Are Very Sensitive To Over-Charging And Undervoltage. This Design Doesn't Have Any Low-Voltage-Cutoff, So If You Use Lithium Cells And Leave It On, It Will Probably Be Enough With One Single Time And The Cells Are Damaged. However, There Is An Available Analog Input On The NodeMCU That Can Be Used To Measure The Battery Voltage Through A Voltage Divider. <h2>The Bogies</h2> The Bogies Are Slightly Modified Versions Of My Separately Published Bogle: Https://Www.Thingiverse.com/Thing:2644082. Check That Page For More Pictures And Hardware List. <h2>Layout</h2> There Are A Couple Of Combination Possibilities, You Can Either Print Two Locomotive Bodies And "Cockpits" If You Want Identical Ends To Your Train Set. Also, If You Intend To Make More Than One Car, I Recommend Using Two Motorized Locomotives Because A Small 16mm Motor With Low Gear Reduction Will Not Be Able To Cope Alone With Several Cars. A Suitable Setup For A Single Motor Is Locomotive + Middle Car + End Car With "Cockpit." See Picture With STL-Map For The End Car. <h2>Connection Between Cars</h2> This Model Differs From The Rest Of The OS-Railway System By Utilizing Magnets For Connection Between Locomotive And Cars. It Uses A 5mm Diameter Round Magnet. Glue It In With A Drop Of CA-Glue. <h2>Printing</h2> The Main Body Parts Of The Train Are Drawn To Be Printed Vertically. I Recommend Playing Around With Different Settings In Your Slicer Software And Look At The Previews To Find A Way That You Are Comfortable With. Note! This Is A DIY Project, So A Lot Of Things Are Not Given By The Design. Things Like Where You Put The Electronics, How You Run The Cables Etc. I Include Parts Called "Light Rack" That Are Meant To Be Used As Cable Holders And LED Holders. <h2>Other Compatible Things (Including Track And Bridges):</h2> Https://Www.Thingiverse.com/Groups/os-Railway/things <h2>Change Log</h2> <b>2019-01-28</b> Added Files For Power Source Rig
With this file you will be able to print ICE for OS-Railway - fully 3D-printable railway system! with your 3D printer. Click on the button and save the file on your computer to work, edit or customize your design. You can also find more 3D designs for printers on ICE for OS-Railway - fully 3D-printable railway system!.