iFix Roller Shade Gear and Mounting Hardware
thingiverse
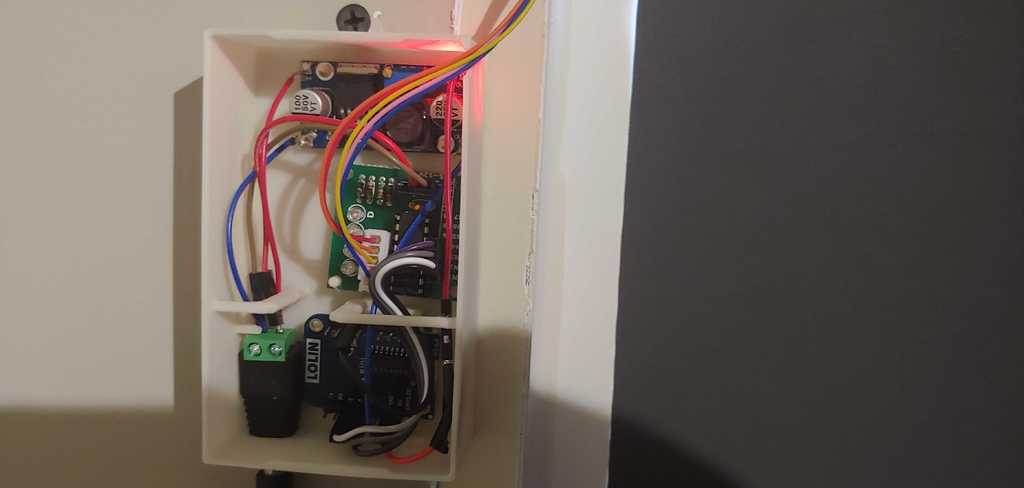
A gear and female wall mount part for the iFit roller shade. The iFit model comes with its own mounting hardware that doesn't work with this project. These 2 items should allow you to mount the roller shade w/o using the existing iFit mounting hardware. This was designed for in window installation. To use this remix you need to remove the spring assembly from the roller shade, I included the directions provided by the manufacturer on how to replace the spring assembly. Roller Shade Model: https://www.homedepot.com/p/iFit-Cut-to-Size-Dark-Gray-Cordless-Blackout-UV-Protection-Roller-Shades-45-in-W-x-73-in-L-47026/308304067 Note: I found that my roller shades are slightly too thick to use the motor cover from the original project. When I added the cover, it caused the shade to get stuck when fully rolled up, however it was fine when the shade was lower. It may still work fine if you plan on not rolling up all the way. Remixed from the original Fusion360 project to fit the roller shades I have. These are the roller shades: https://www.homedepot.com/p/iFit-Cut-to-Width-47-in-W-x-73-in-L-Charcoal-Cordless-Blackout-Polyester-Fabric-Roller-Shade-47026/308304067 #Electronics case I created a custom electronics case for my setup. It holds: - buck converter - motor board - wemo d1 mini - female terminal block barrel jack After using this for a bit I recommend using at least 9v to power the motor. 5v doesn't have quite enough torque for these heavier rollers. 12v recommended for the longer models (72in length). I'm currently using both 9v and 12v power supplies with the same motors listed below. Specific hardware used: - motor: https://www.amazon.com/gp/product/B015RQ97W8/ref=ppx_yo_dt_b_search_asin_title?ie=UTF8&th=1 - buck converter: https://www.amazon.com/gp/product/B01GJ0SC2C/ref=ppx_yo_dt_b_search_asin_title?ie=UTF8&psc=1 - female power plug: https://www.amazon.com/gp/product/B07GJ43VKS/ref=ppx_yo_dt_b_search_asin_title?ie=UTF8&psc=1 - Wemo mini d1: https://wiki.wemos.cc/products:d1:d1_mini - Short jumper wires (10cm): https://www.amazon.com/gp/product/B07GD1XFWV/ref=ppx_od_dt_b_asin_title_s00?ie=UTF8&psc=1 - end stop button: https://www.amazon.com/gp/product/B00UBWSMKC/ref=ppx_yo_dt_b_search_asin_title?ie=UTF8&psc=1 Case is designed to hang on the wall with the female barrel jack pointing the floor and the small wire slot pointed towards the ceiling. All sizing of parts seems correct, I'm currently working on possible ways to improve wire routing. Wires press on the lid and cause the lid to be a little lose # Change Log *3/15/2020* - I found that almost any pressure from the wires caused the snap fit top to not snap properly. Updated the case bottom to include some wire routing bars. These help prevent stiff wires from getting in the way of the snap fit top. Not perfect, and sort of make wire routing a bit more of a pain tho. It does seem to solve the issue though. Open to suggestion on how better to achieve the same results - Added end stop mini case. Case is designed to use a small wedge to keep the switch in place *12/3/2019* - Added custom wall case for that holds the motor board, buck converter, wemo d1 mini and a hole for the female power plug. The case is snap fit top.
With this file you will be able to print iFix Roller Shade Gear and Mounting Hardware with your 3D printer. Click on the button and save the file on your computer to work, edit or customize your design. You can also find more 3D designs for printers on iFix Roller Shade Gear and Mounting Hardware.