IGUS drylin Y-axis upgrade for Ender 3
thingiverse
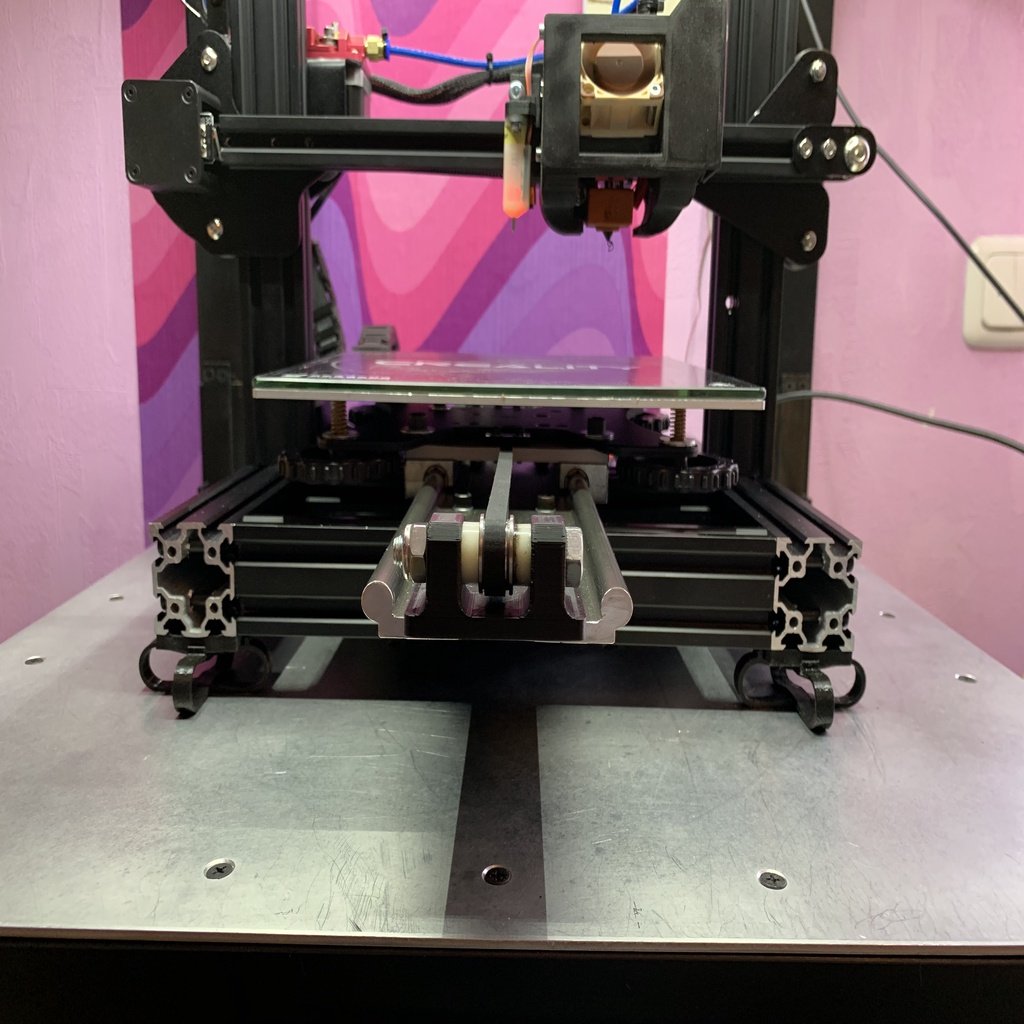
EDIT: I previously upgraded the parts to a new Version 2 due to issues with them. Hi Makers! This upgrade enhances the stiffness of your Y-axis-carriage on your Ender 3. It's built on a standard Ender-3 and should work well on an Ender-3 Pro too. I created this upgrade because I wasn't satisfied with the wobbly bed of my Ender from day one. On your stock bed, you can easily push down any corner. Even if this isn't a problem, I didn't want to live with it and found a solution. What you need to get: 450mm of WS-10-80S https://www.igus.com/product/732 (without holes) 1pc of WW-10-80-15 https://www.igus.com/product/933 1m of any GT2 timing belt, e.g. https://www.amazon.de/Anyasen-zahnriemen-Riemenscheibe-Umlenkrolle-Inbusschl%C3%BCssel/dp/B07ZGLQXVZ/ref=sr_1_3_sspa?__mk_de_DE=%C3%85M%C3%85%C5%BD%C3%95%C3%91&crid=II3VERUS5APG&keywords=gt2+zahnriemen&qid=1577306542&sprefix=gt2+%2Caps%2C182&sr=8-3-spons&psc=1&spLa=ZW5jcnlwdGVkUXVhbGlmaWVyPUFQNjhQSUMwT0JPTUUmZW5jcnlwdGVkSWQ9QTA3MjM1NjAzTU9LS1JNNUdJSTE4JmVuY3J5cHRlZEFkSWQ9QTA4NjYxNjczQlhKSFdLRFVaUEFaJndpZGdldE5hbWU9c3BfYXRmJmFjdGlvbj1jbGlja1JlZGlyZWN0JmRvTm90TG9nQ2xpY2s9dHJ1ZQ== 6pc EU-20-M5 fasteners https://www.amazon.de/gp/product/B075WVP4S8/ref=ppx_yo_dt_b_search_asin_title?ie=UTF8&psc=1 If you want maximum stiffness, consider getting 250mm extrusion as shown in my pictures to set the IGUS-rail onto. This is not necessary and may cause problems if installed incorrectly. I only suggest it for those who can drill precise holes into their original extrusions. You'll also need to place your mainboard-case at the back of your printer. https://de.banggood.com/Machifit-100-1000mm-Black-2040-V-Slot-Aluminum-Profile-Extrusion-Frame-for-CNC-Tool-DIY-p-1342020.html?rmmds=myorder&ID=515968&cur_warehouse=CN You'll also need some bolts and washers in various sizes from M4 to M6. I don't have any documentation for them since they were lying around. You'll figure it out! While everything is being shipped, print the parts uploaded. I printed them with PLA and 100% infill. When all the drilling is done, put everything together as shown in the pictures. Place 4 of the M5 nuts into the extrusion to attach the rail to the existing frame. Measure to have it in the middle. Adjust the endstop to a proper position. Tighten the belt with the two bolts of the front belt-mount. You want to put the slide onto the rail first without the carriage-plate attached so you can loosen and tighten the bolts for the 4 guiding pieces of the slide. You'll need to try a couple of times to get the slide moving easily without being too loose or too tight. There's one configuration of the guides where this will be the case. It may take some time. When everything is built together, edit your firmware to the new endstop positions and you're done! Enjoy!
With this file you will be able to print IGUS drylin Y-axis upgrade for Ender 3 with your 3D printer. Click on the button and save the file on your computer to work, edit or customize your design. You can also find more 3D designs for printers on IGUS drylin Y-axis upgrade for Ender 3.