Ikea Antifoni Lamp (99-07ish) switch housing 120V conversion & hinge replacement
thingiverse
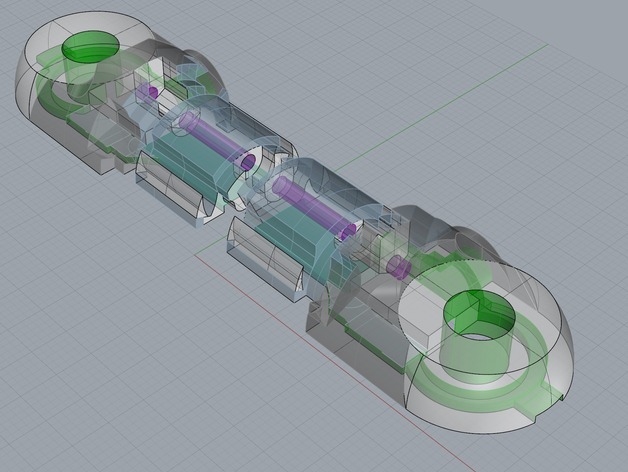
Human: 120V DC adapter replaced burnt out 12V AC original piece that cracked from excessive heat. I crafted a customized upgrade with improved performance and efficiency. Update 2017-01-16: The hinge on my design cracked off due to high stress, so I created a replacement hinge to ensure structural integrity. Update 2017-06-17: To minimize power consumption, I redesigned the housing to support a longer LED bulb (Photo 9). This modification prevents the bulb from extending beyond the lip of the lamp. STL files can be mirrored to produce a full set. Print Settings Resolution: .2 to .1 Infill: Maximum Supports: Yes Notes: For optimal results, use at least three outlines and remove supports underneath. You may need to carefully dislodge these supports during printing due to their location. I used silver ABS from MakerGeek with a print temperature of 216c to prevent sludginess. A raft was necessary to prevent curling. I utilized dual extrusion (PLA and PVA) for dissolvable support in the new design. For wire conduits clips, I printed them using white PLA for ease of use. One nut holder was lost during printing, so I created a replacement using silver ABS to test the filament. Post-Printing This highly customized piece requires post-printing cleaning and fine-tuning. Specifically, the cable conduits inside the switch housing need widening to accommodate thicker wires. The wires from the ceramic bulb holder must be routed intelligently to fit within the smaller design. I used a Dremel, air mask, and periodic vacuuming to achieve this. I employed two pairs of wires: one white pair for aesthetic purposes and another black pair with a plug leftover from an Ikea TERTIAL work lamp I refurbished. The meet point occurs at the bottom of the lamp above the connection to the base weight (7th Photo). This setup works flawlessly, providing ample light and heat during winters. I positioned the switch on the underside for simultaneous on/off functionality and directional control. Update 2017-06-17: To enable LED glow while the lamp is off, wire the outer switch pin to the hot end, leaving the center pin connected to the bulb. Design Process I incorporated component dimensions into my CAD program in a logical manner. I upgraded screw lengths to enhance heat extraction from the bulb, exposing it to air beyond the lamp shade. The original design used 12V AC, which is why there were no wires between the base and head; electricity was conducted through the frame itself, coated with insulating paint. This approach led to the burning out of the constantly-hot-brick of an AC adapter. I replaced it with another adapter that didn't like being connected to power continuously, so I opted for a direct 120V connection via an electric wire neatly clipped to the frame. In the ceramic bulb holder design, I ensured airflow support by drawing cool air from inside the housing and expelling it through cooling ducts (like the original) and screws acting as heatsinks. The prototype (4th Photo) showcases the size difference after acetone vapor treatment for shine, which I later chose not to apply for the reprint.
With this file you will be able to print Ikea Antifoni Lamp (99-07ish) switch housing 120V conversion & hinge replacement with your 3D printer. Click on the button and save the file on your computer to work, edit or customize your design. You can also find more 3D designs for printers on Ikea Antifoni Lamp (99-07ish) switch housing 120V conversion & hinge replacement.