IKEA Longitud Night Light - Redux
thingiverse
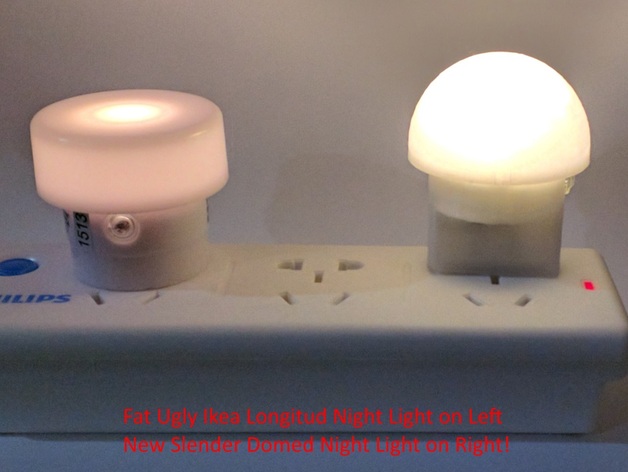
If you were unlucky enough (as I was) to get a hold of some of these IKEA Longitud night lights, you quickly discovered that the base was so fat that it didn't allow anything to be plugged in next to it. I've come to discover that they don't sell these items anymore (thank God) and that those sold in other countries had an extension with a narrow base so you could plug in other stuff next to it. So Ikea thought it was OK to screw the 1.5 billion people in this country only...but I digress. This is a redesign of the Longitud night light with a narrow base and also a dome top for better light distribution and color. Although the original had a white top, it gave off a yucky pink glow - bla.NOTE: You basically need to destroy your existing Longitud night light to free the electronics inside. It's not meant to be opened or user serviced. You'll void the warranty on this cheap-a$$ part and it will no longer be UL, CE, CCC approved (or any other national approval code). You're messing with 110-220 Volts AC, so don't attempt if you don't know what you're doing. I assume NO RESPONSIBILITY WHATSOEVER IF YOU BUILD THIS. If you're still here, proceed to 'Print Settings'. I HIGHLY recommend you read all the instructions before attempting. Print Settings Printer Brand: RepRap Printer: JG Aurora A3 Prusa I3 Rafts: No Supports: Yes Resolution: .2mm Infill: 100% Notes: You can print this is just about any color for nice effects. I did mine all in Blue Glow, but it doesn't really show. Some colors probably won't let any light through (like Black, duh), but others might work nicely (Red, Yellow, White, etc) There are four pieces (5 as one is doubled) to be printed. All were printed with 1.2mm walls (top, bottom, shell) and 100% infill. I have additional print notes on each:Base: This requires supports (touching buildplate). I hate supports, but couldn't figure a way around it on this one. No platform adhesion required. Choose whatever color you like. No light comes out the base.Bracket: Print two (2) of these. They hold the metal prongs in place that plug into the wall. Best to print them with the same color as the base. No support and no platform adhesion required.Plate: This separates the electronics from the light and holds the electronic board in place. This could be the same color as the base or the dome. No support and no platform adhesion required.Dome: This is where all the light comes out. If you print in white or a glow color, the standard print setting about should be fine (1.2mm and 100% fill). But any other color might be too thick (Red, Yellow, Green). You can try a single thickness wall (.4mm or .3mm) and zero (0)) infill to make it more translucent. Don't print in black or Gray or Bronze - won't won't get hardly any light out (unless that's what you want...but why?) No support and no platform adhesion required. Post-Printing Some Post-Processing and Assembly Required Test fit all the pieces. When you are ready to commit to this, destroy your Ikea Longitud night light: Pry off the top. It does not come off easily as it was never meant to be disassembled. Remove the plate via the two screws and KEEP THE SCREWS - you'll need them later. Also pop out the clear lens for the light detector diode by pushing it out from the inside - KEEP THIS TOO! To remove the electronics board, you'll need to break free the metal plug prongs. I found gripping them with a pair of pliers on their long sides and working them back and forth (or forward/backward, but not side to side or you'll bend them) until they broke free of the plastic worked best. Then just push them up through the base and remove them along with the electronics board. See photo of electronics board and plug prongs. Pop the clear lens in the new base, it just snaps into place from the outside. Test fit the plate and the screws into the base. You'll see the design is very much like the original, so reassembly it pretty much the same. Test fit the plug prongs in the base to ensure they go through with little effort. Filing may be needed depending on the quality of your printer and filament. And if you have burrs now in the plug prongs from the pliers, you might want to file that smooth too. It makes plugging/unplugging into the wall easier. Test fit the dome to the base. You'll notice there are two small bumps on the lip of the base. Those align with slots in the dome. The dome just slides onto the base, bumps to slots, and then turns slightly to lock it in place. You can remove the dome by just turning it back and lifting off. You may need to file the lip of the base a bit to get the dome to fit easily depending on the quality of your printer and filament. You could print different dome colors for the holidays: Halloween, Christmas, Bordello... You notice that the two bracket pieces have a notch in their slots. These fit in the metal prongs of the night light to hold it in place. You may need to do a little filing on these to get them to fit flush together and to ensure the final assembly fits in bottom of the base nice and snugly. Align the slots with the notches in the plug prongs and glue the two brackets together. See Photo above. You should clamp these overnight to ensure an very strong bond. I used Superglue for PLA. Now that the bracket has dried and is nice and strong, its time to insert the electronics into the new base. Put a good amount of Superglue in the bottom of the base as we'll be gluing the brackets to the bottom. Then push the plug prongs with the attached brackets into the base and out the slots at the bottom. You'll also want to clamp the bracket down to the bottom of the base so the adhesion is very strong. I stuck a bit of plastic inside to clamp to as the clamp end was too fat to fit inside the base. See photo above. Let this set at least a few hours (preferably overnight) for a good strong bond. After all is dry and strong, you can fit the electronics board in place. Align the light sensitive diode with the clear lens and fit the board around the posts and down into the body. It only goes down a few millimeters. Then you cover it with the plate, letting the LED poke through the center hole and screw the plate into place. See photo above. Now just screw on the dome, aligning the bumps on the lip of the base with the slots in the dome and give it a slight twist to lock it into place. You're done!! Enjoy!!!
With this file you will be able to print IKEA Longitud Night Light - Redux with your 3D printer. Click on the button and save the file on your computer to work, edit or customize your design. You can also find more 3D designs for printers on IKEA Longitud Night Light - Redux.