Impact Wrench Valve Seal
prusaprinters
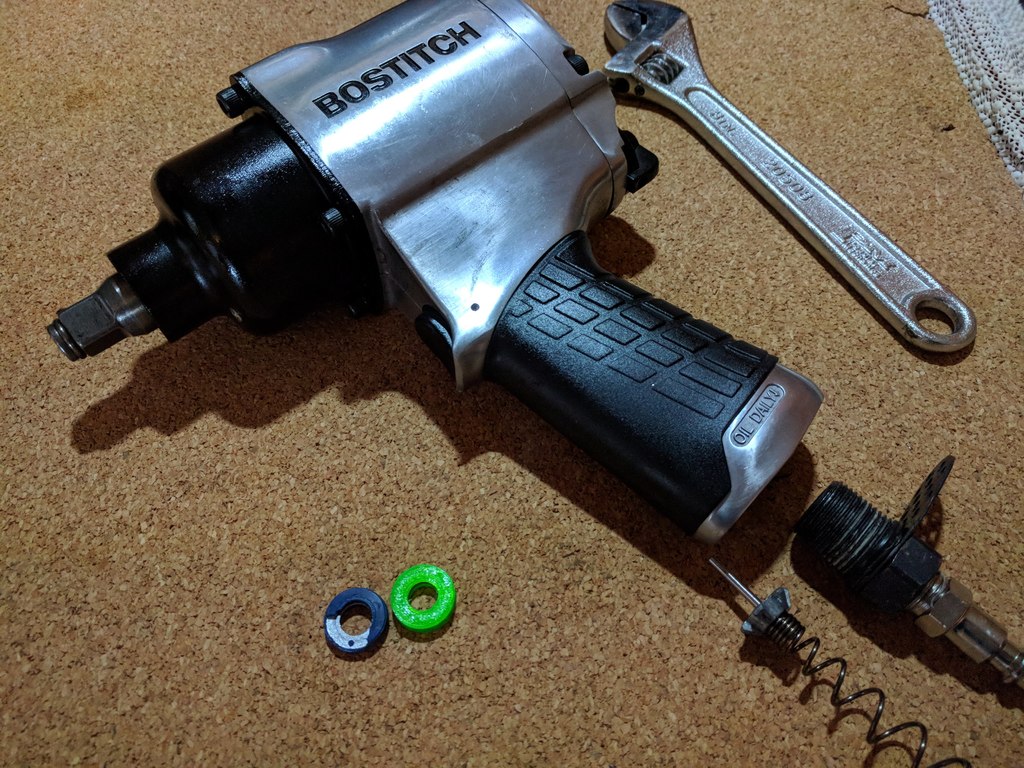
<p>My Bostitch impact wrench quit working or rather wouldn't stop working. Whenever I attached the air hose it would immediately start spinning and wouldn't stop. I disassembled the air valve mechanism and discovered that the valve seal deteriorated, some of the plastic coating had chipped away. I had trouble finding a replacement part that didn't come with a bunch of other parts and decided to try and make my own.</p> <p>IT WORKED! My Impact wrench is back to working like it should. This design was a bit tricky since it's a re-enforced valve seal that uses an M8 washer embedded inside of it.</p> <p>IMPORTANT: After slicing the model, I uploaded my gcode file to <a href="https://www.prusaprinters.org/color-print">https://www.prusaprinters.org/color-print</a> and told it I wanted to change color at 3.2mm then downloaded my modified file. Remember that the printer will unload the filament and you need to cut it on an angle and reload it. Read the notes in the Print Settings section below for more information on how I prepared the washer to be embedded in the print.</p> <h3> Print Settings</h3> <p><strong>Printer Brand:</strong></p> <p>Prusa</p> <p><p class="detail-setting printer"><strong>Printer: </strong> <div><p>i3 MK2S</p></div><strong>Rafts:</strong></p> <p>No</p> <p><p class="detail-setting supports"><strong>Supports: </strong> <div><p>No</p></div><strong>Resolution:</strong></p> <p>.2mm</p> <p><p class="detail-setting infill"><strong>Infill: </strong> <div><p>100%</p></div><br/> <strong>Filament:</strong><br/> Yoyi TPU Translucent green <br/> <p class="detail-setting notes"><strong>Notes: </strong> </p><div><p>Cleaning the bed thoroughly and then adding some glue stick works best for TPU on my printer. I also roughed up the M8 washer with sand paper, cleaned it with IPA, and put it on the bed next to the print to keep it warm. I also dabbed a little glue stick on top of the washer before starting the print. </p> First layer 220/50, other layers 230/50.</div></p> <h3> Post-Printing</h3> <p><strong>Post-Printing and re-assembly...</strong></p> <p>Hit it with a little heat gun action to remove any stringing. I placed the new 3d printed valve seal back into the impact driver with the smooth bed side of the print against the inside of the tool. I used a wooden dowel to push it down into place, added a few drops of air tool oil, and then reassembled the tool. Fired up the compressor, connected the hose and the tool was silent and not spinning. I then pulled trigger and it came to life. Rev'd it on and off several times and the tool works as intended now.</p> <h3> How I Designed This</h3> <p><strong>About the design process...</strong></p> <p>This valve seal is reinforced with an embedded washer, the breakthrough was finding the correct size washer since the I.D. of a 1/4" is too small and a O.D. of a 5/16" was too big. After checking the rough dimensions of a Metric M8 washer I went down to my local hardware store and bought some M8 washers @ $0.25 ea. These definitely matched what's inside the original valve seal.</p> <p>I designed this in FreeCAD since I run Ubuntu as my primary desktop and there is a native Linux version.</p> </p></p></p> Category: 3D Printing
With this file you will be able to print Impact Wrench Valve Seal with your 3D printer. Click on the button and save the file on your computer to work, edit or customize your design. You can also find more 3D designs for printers on Impact Wrench Valve Seal.