Improved Extruder, Hotend and Fan Mount for rp3d Pangu Wooden i3
thingiverse
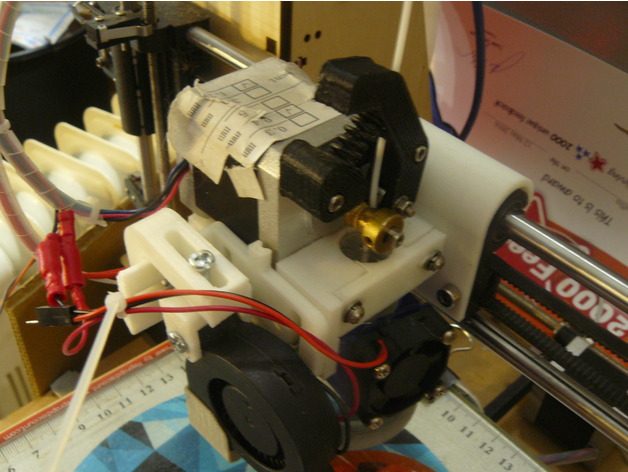
This mount is designed for the rp3d Pangu Wooden i3, that have an X carriage with 2.5 inch (63.5mm) mounting hole spacing and radiused top and bottom. I'll cut to the chase, the original mount for the Pangu i3 is flimsy, unstable, it doesn't have good places for support fan (or anything else) mounting, and it can not take the cheap all metal hotends from china. This mount is not flimsy, it has a number of attachment points to add future things, it takes an all metal hotend, and the included fan mounting allows for easy alignment of the eesteven's ( http://www.thingiverse.com/thing:11797370 ) no notch fan with a blower. Note that you MUST use a hot-end cooling fan (clips on the hotend heatsink) as well as the layer cooling (blower) fan, as long as you use the hot-end cooling fan, the mount can be printed in PLA and it will work just fine (for PLA printing, perhaps not for ABS or other high-temp printing. Such hot ends can be found on Aliexpress for a few dollars. For sake of clarity, these Aliexpress sellers I have purchased hotends from, you want a "Short Distance" or "Direct" head, not "Long Distance" or "Bowden". Hotend With Fan, MT Technology Co., Ltd. Hotends Only, 3C Mall Center Hotends Only, ANYCUBIC 3D-Printer Store Fans Only - search Aliexpress for the rather obscure keywords "reprap injection fan" is the best way to find them for under $2 USD, the seller I bought only a fan from is no longer around but there's plenty of them. Again, you MUST have a cooling fan, the only reason I listed a couple listings for hotends only, is they are so cheap you might as well replace just the hotend if you have a problem. Print Settings Printer: rp3d Pangu Wooden i3 Rafts: No Supports: Yes Resolution: 0.35 Infill: 20% Notes: The main mount should be printed end-on, The clamp should be printed flat side down. The Fan Bracket Part A should be printed on it's edge (in the same orientation as it's going to b used (so that the right angle is strong and not a layer adhesion line). The Fan Bracket Part B should be printed flat, again so that the right angle is not a weak spot. The Fan Bracket Part C (U bracket) can be printed upside down (U facing up). The Fan Bracket is made principally to hold a blower motor which has a suitable fan duct hanging off it. Post-Printing You will need M3 screws, washers and nuts, M4 screws and nuts. At least two M3 screws will need to be at least 30mm long (for the clamp and motor mount). Insert two M3 nuts in the back side of the front face of the main mount, use some superglue or something to hold them in place (it can be helpful to first apply a drop of superglue and dry it in the receptacle to "seal it", then insert nut, and put a drop of glue on the edge of the nut so it seeps down and glues it in place, try not to get any in the thread!) Assemble the main mount on the existing X carriage, you will note that the main mount has a valley (inverse ridge if you like) in the back, this corresponds to the left edge of the X carriage looking from the front and allows for "elephant foot" which probably is present on your X carriage from the factory. Anyway, the screws align it. Now snap in your metal hotend and put the extruder motor on the platform, thread in filament now so that the alignment is correct to get a reasonable filament feed path, put screws through the clamp and into the extruder motor to fix everything in place. Insert two M4 nuts into the Fan Bracket Part C in the appropriate places, glue in place. Attach Fan Bracket Part B onto Part A in the appropriate manner. Attach Part C onto Part B in the appropriate manner so the U hangs down. Screw the Fan Bracket Part A onto the mount but not so tight as you can't move it, just snug. Lower the Z axis and set your Z limit switch so the nozzle is in the appropriate place. Raise the Z axis a bit and insert your blower fan with it's fan-duct attached into the now downward facing Part C and attach with an M4 screw. Lower the Z axis back to the stop and adjust the fan into the desired position and height off the bed by moving Part A up and down, part B in and out and rotationally in the Y axis, part C left and right and rotationally in the Z axis, and the fan itself rotationally in the X axis and tightening the screws. With only a little fettling you can get the fan duct flat, centered, and raised just as much as you wanted it (I use about 0.8mm off the deck, you just have to remember it needs to be high enough that it won't catch on any of those possibly lumpy first layers). And with that you should be ready to roll. How I Designed This This was made in OnShape, you can copy and edit it here if you so wish. https://cad.onshape.com/documents/1547b2f56d0c2dfd879d9975/w/ff77f306ff4641e6ca6954c1/e/2af2120246292a6d2c065ea9
With this file you will be able to print Improved Extruder, Hotend and Fan Mount for rp3d Pangu Wooden i3 with your 3D printer. Click on the button and save the file on your computer to work, edit or customize your design. You can also find more 3D designs for printers on Improved Extruder, Hotend and Fan Mount for rp3d Pangu Wooden i3.