Improved Hotend Shroud for Ender 3 / Ender 3 Pro, FreeCAD Files Included
thingiverse
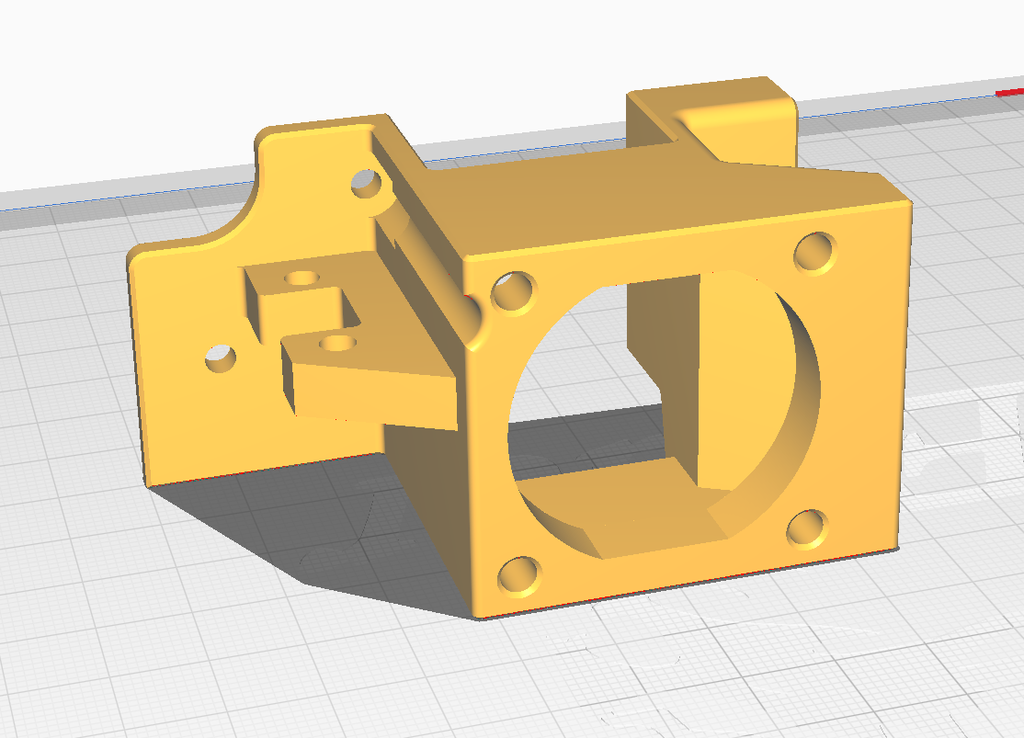
2/25/23: Lowered shroud a bit more and changed shape of the inside of the shroud to direct more air at the heatsink. Increased radius of fillet around the edges that are likely to contact wires. I'm pretty satisfied with it at this point, so it's probably the final change I'll make. 2/18/23: Small adjustment to fan adapter to make the fan clear the heads of the belt tensioner's bolts on the stock ender 3. Update 2/17/23: Adding a small glue-in fan duct for the common blower-style fan that I use. The user should now have everything they need to replace the stock hotend shroud, not including hardware (the blower fan and m3 brass inserts). Update 2/13/23: Some small changes. The shroud sits a few mm lower now, though still above the heat block. There's a cutaway on the right so I can access a set screw on my heatsink, feel free to remove it if you don't need it. This is a replacement fan/hotend shroud for the ender 3 and ender 3 pro. It sits above the heat block itself and affords better access to various parts of the hotend without having to be removed. It also directs less air downward from the heatsink cooling fan, compared to the stock fan shroud. I designed this because a hex-stud thermistor I bought did not clear the stock fan shroud, and while I tried the "herome" shroud on thingiverse, it did not afford enough clearance for my aftermarket heatsink. It is one of the first things I've designed using a CAD program and I tried to parameterize it sensibly, but changing one of the spreadsheet values may require additional manual changes here and there, so look the model over before you print it. VERY IMPORTANT: The height of the probe mount is an important dimension. While this model works fine on my printer, it may need slight adjustment for others as there seems to be some variation. Too high and the nozzle will crash into the bed and keep pushing it downward while the probe never contacts. Too low and it may sit below the nozzle, collide with clips during travel, etc. Before anything else, please manually verify that the probe height is within acceptable bounds: Fit the shroud and probe, then with the probe deployed slowly lower the hotend, being careful not to crash the nozzle. If 1) the probe triggers before the nozzle hits the bed (preferably still with a small amount of clearance) and 2) there is a bit of clearance between the bed and probe when the probe is retracted, then it should be okay. Otherwise adjust the dimension or if the probe is too high, one can use a shim or some washers. Also, avoid using a glass- or carbon-filled material. These have a rough surface and I noticed after some time that it was slightly abrading the insulation on the heater cartridge wiring as the wires moved against the shroud with the back-and-forth motion of the x-axis. It is highly recommended that the user first print a disposable prototype using a cheap material and test it for fit before printing the model with anything more costly. Some of the dimensions are based on the drawings creality published, but the user may still have to adjust them slightly. It goes without saying that a heat-resistant plastic (not PLA) should be used for the final print. Polycarbonate, ABS, or ASA would all probably work fine. Print settings: Print the model upside down using 100% infill, tree supports with 20% support infill 70% top support surface density, a .2mm z support gap, and a brim. Make sure that the bottom of the support only touches the build plate and that all the horizontal overhangs (except perhaps the screw holes) are supported. This may take some fiddling with Cura's tree support settings. Specifically, I used a "Tree Support Branch Angle" of 55.0, "Support Overhang Angle" 75.0, though your settings may need to be different. The structure generated by Cura's tree support seems to vary quite a bit depending on various things, so examine the slicing solution before printing. It's a bit of work to remove the support but it shouldn't be too much trouble. Use cooling fan speed override at 100% within the support settings to make the support easier to remove. I've observed that, when printing using 100% infill, it's very important to get the printer's nozzle-to-bed height correct because any extra material has no place to go. It really does have to be tuned correctly down to within one or two hundredths of a millimeter. Other notes: The part cooling fan mounts to the side. Rather than designing the shroud to accept a specific type of fan, I've designed it with two columns of five holes. The user should make a small adapter bracket for their fan, and an example is included. This way, one only needs to design and print a new bracket if they want to swap the fan for a different model. All the holes for screws (except the ones attaching it to the printer) are sized to take an m3 brass insert, and the diameter (on the spreadsheet) may have to be adjusted very slightly if they are too tight or too loose for your insert (another reason to print a prototype first). About the FreeCAD file: While I consider the model itself to be complete, the FreeCAD file, particularly how dimensions are parameterized, are a bit messy. Consider the FreeCAD file a work in progress, though I may not get around to refactoring it, as it were, unless there is significant interest.
With this file you will be able to print Improved Hotend Shroud for Ender 3 / Ender 3 Pro, FreeCAD Files Included with your 3D printer. Click on the button and save the file on your computer to work, edit or customize your design. You can also find more 3D designs for printers on Improved Hotend Shroud for Ender 3 / Ender 3 Pro, FreeCAD Files Included.