Improved Needle Cutter
prusaprinters
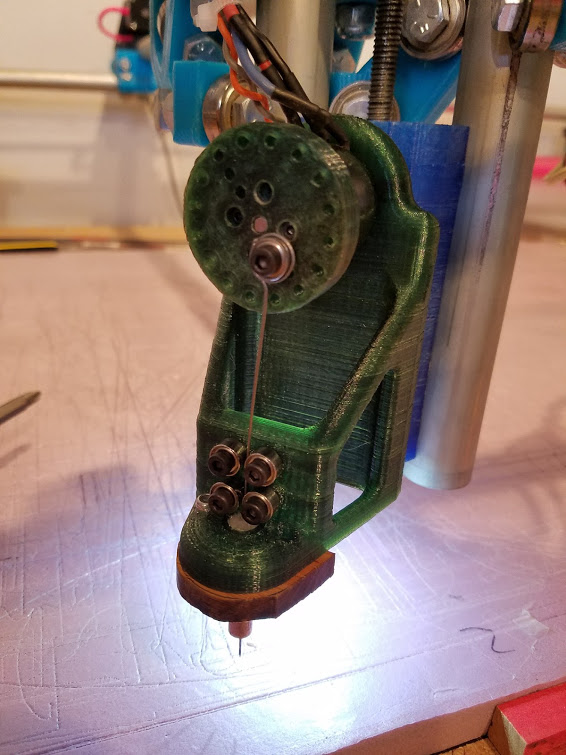
<p>Based on djk4linux's work as discussed in the FliteTest Forums here: <a href="http://forum.flitetest.com/showthread.php?24251-Cutting-foam-sheets-with-a-needle">http://forum.flitetest.com/showthread.php?24251-Cutting-foam-sheets-with-a-needle</a></p> <p>My work on this version starts at this post: <a href="http://forum.flitetest.com/showthread.php?24251-Cutting-foam-sheets-with-a-needle!&p=356850&viewfull=1#post356850">http://forum.flitetest.com/showthread.php?24251-Cutting-foam-sheets-with-a-needle!&p=356850&viewfull=1#post356850</a></p> <p>I'm using the cutter_body.stl version which is designed to work with hicwic's quick change mount. I've also included a hacked up cutter_body-525.stl which should mount to the new stock 525 style tool mount...however since I haven't upgraded my MPCNC yet I have not tested that particular mount. When I do upgrade my machine (or when I get bored) I'll draw up a nicer optimized mount for the 525...unless someone beats me to it :D</p> <p>Introduction to this version:<br/> <a href="https://www.youtube.com/watch?v=nYEQ5p_Yi5k">https://www.youtube.com/watch?v=nYEQ5p\_Yi5k</a></p> <p>Cutting a full sheet with this cutter:<br/> <figure class="media"> <oembed url="https://www.youtube.com/watch?v=eCKBj7OnG7o"></oembed> </figure> </p> <p>Onshape project:<br/> <a href="https://cad.onshape.com/documents/0b010a7a70bd0183d800fa80/w/2427c16d54be94a0c0fb03df/e/6104b1396ce31afa164ac429">https://cad.onshape.com/documents/0b010a7a70bd0183d800fa80/w/2427c16d54be94a0c0fb03df/e/6104b1396ce31afa164ac429</a></p> <p>9/20/17 - Added "cutter_body - New-mount-52.stl" version with the distance between the motor mounting face and the needle guide stretched to 52mm to allow more motor options with dkj4linux's original "prop saver" mount style flywheel.</p> <h3>Print instructions</h3><h3>Category: Machine Tools Print Settings</h3> <p><strong>Printer:</strong> Folgertech 2020 i3</p> <p><strong>Rafts:</strong> No</p> <p><strong>Supports:</strong> Yes</p> <p><strong>Resolution:</strong> 0.25</p> <p><strong>Infill:</strong> 25%</p> <p><strong>Notes:</strong></p> <p>The cutter body prints without supports at 15-20% infill and at least 3 perimeters for strength. It's pretty forgiving how you print it.</p> <p>The flywheel however needs support and at least 25% infill and 5 perimeters for best performance. I print it with the four small mounting holes facing down (180 degrees from the default orientation) and slic3r set to give 0.5mm XY spacing on support to make the little support pieces easier to remove after printing.</p> <h3> Post-Printing</h3> <p><strong>Required parts</strong></p> <p>Small piece of hardwood for insulator<br/> Length of 0.62mm/0.025" music wire (at least 6" long)<br/> 5 - 693ZZ - 8mm OD x 3mm ID x 4mm thick bearings.<br/> 5 - 2.5mm washers with ID drilled out to 3mm. (3mm washers with an OD that doesn't interfere with the outer race of the bearings would work as well.)<br/> 9 - M3 x 10mm machine screws<br/> Assorted M3 screws/washers for counterweight<br/> 2 - M3 x 16mm machine screws (for mounting insulator)<br/> 2 - M3 nuts (nyloc prefered but regular probably ok.)<br/> 4 - M2 x 6mm screws (for attaching the flywheel to the motor)<br/> 2212 sized 850kv motor and ESC to control it - needs 2mm holes in face for mounting the flywheel.</p> <p>Optional - strip of 3 12v LED's.</p> <p><strong>Flywheel assembly</strong></p> <p>The holes in the flywheel are sized so M3 screws can self-tap. You can use a tap to start the threads but I suggest NOT tapping the full depth with a tap so the screws fit tighter.</p> <p>The holes around the outside of the flywheel are so you can balance it before fitting the bearing/needle if necessary.</p> <p>I use the inner most of the 3 possible locations to mount my bearing - on my flywheel this is 7mm from the center so gives 14mm of stroke on the needle (djk4linux's original design was 6mm from the center for 12mm of stroke - but I needed to move mine out so the flywheel could fit closer to the motor.)</p> <p>Behind the bearing you'll want a washer that fits over an M3 screw but which does not rub against the outer race. The M3 washers I was able to find locally were not suitable for this as their OD was too large. So I opted to drill out an M2.5 washer so it fit over a M3 screw.</p> <p>djk4linux suggests grinding a groove into the outer race of the bearing to help retain the needle - I tried this but damaged my bearing in the process. I'm currently using an ungrooved bearing and it's working fine for me I just made sure the coils on my needle were undersized so it fits VERY snugly on the bearing. A 623vv grooved bearing may be another good option but it's 10mm OD instead of 8 so a little bigger. Moebeast is using a 10mm bearing on his and has also created a printable needle retainer that he's testing: <a href="https://www.thingiverse.com/thing:2429886">https://www.thingiverse.com/thing:2429886</a></p> <p>Once the bearing/washer/needle are mounted the flywheel should be placed on a shaft and balanced. I used a shorter 8mm M3 screw with 2 M3 washers in the outside hole which seemed to balance out perfectly against my needle.</p> <p>The flywheel is then mounted to the motor with 4 2M screws these can be hard to find...I used mounting screws that came with a 1806 brushless motor that I had worn out. Another option may be to disassemble an older notebook as M2 screws are sometimes used for assembly on notebook computers.</p> <p><strong>Needle Details</strong></p> <p>The needle is made from a length of 0.25"/0.62mm music wire (sometimes called piano wire). It's best to start with a piece that's longer than you'll need since it makes forming the attaching coil easier.</p> <p>When bending the wire it's best to use round nosed jewelers pliers to avoid putting any stress risers into the wire. I formed mine by selecting a drill around 4mm (roughly half the size of the bearing) and just grabbing it about 6" from either end and twisting it around the drill shaft twice then trimming it off. I then used the round nosed pliers to slightly tighten the coils and to put a small bend where the needle comes off the bearing so the wire leaves the bearing centered instead of off to one side. This turned out to make a BIG difference in how smoothly the cutter runs - but if not done carefully can create a stress in the wire making this the most likely place the needle will break.</p> <p>The needle is then installed into the cutter and trimmed to length before sharpening. I like to sneak up on the length since I usually loose a bit of length while sharpening. For cutting foamboard you only need about 6.5-8mm of needle protruding from the guide. The less that protrudes the more accurate your cutter will be. The needle should retract fully into the guide on the upstroke.</p> <p>I sharpen the needle by removing it from the cutter and rotating it in my fingers while holding it against a cutoff disc in a dremel at a sharp angle. It doesn't take much and even a fairly dull needle cuts well.</p> <p><strong>Needle guide</strong></p> <p>The two most popular needle guides are either a MIG welder tip or an sports ball inflation needle. In my experience the sports ball inflation needle runs cooler - but wears out quicker and is more likely to deflect in use and cost accuracy.</p> <p>Because the guide can get warm from the friction of the needle running inside of it it's best to use a heat resistant insulator to mount the guide to the 3D printed cutter body. I originally used soft pine but had my guide come loose mid-cut and ruin a sheet of foam so have since switched to hard oak. I cut the insulator from a piece of 1/4" x 1" wood which I hold up to the cutter then trace around the cutter body so I can cut it to final shape on a bandsaw (or just sand it down to match.) The guide hole should be drilled to a size that allows your guide to self-tap (or you can tap it if you know what size tap matches your guide.) The guide should be centered under the needle. The two retaining screws get their holes drilled using the cutter body as a guide to position them.</p> <p><strong>Guide Bearings.</strong></p> <p>These are optional but highly recommended. They help straighten the motion of the needle before it enters the guide greatly reducing the friction in the guide itself. They are mounted with M3 x 10mm screws self-tapped into the cutter body with M3 washers behind them. Drilled out M2.5 washers would probably be better but I haven't had any issues with M3 washers on these.</p> <p>Depending on the dimensions of your motor and how your needle mounts to the flywheel bearing you may need to adjust the washers behind these or the flywheel bearing to make sure the needle runs as close to centered as possible through the bearings. The printed bearing standoffs should allow bearings to be mounted with no washers if the need arises.</p> <p><strong>LEDs / Wiring</strong></p> <p>The LED's were simply stuck to the bottom and then wired to the power input connections on the ESC for the brushless motor.</p> <p>I'm using a 25a ESC but this is overkill, the motor draws very little current so even a 6a ESC is more than enough for this application.</p> <p><strong>Motor Considerations</strong></p> <p>My original cutter used a higher kv motor which I had to run off 7.4v to keep it at the ideal RPM range. For this cutter I switched to a slower 850kv motor so I can run it directly off 12v (the same as the LED's require and what the rest of my MPCNC runs on) This cutter body is really designed around the motor. The motor came from a bin of parts I have but is most likely this one: <a href="http://store.jdrones.com/AC2830_358_Motors_p/ac2830358.htm">http://store.jdrones.com/AC2830\_358\_Motors\_p/ac2830358.htm</a> However similar motors are available from a number of other sources. While jdrones refers to it as a 2830 motor (because they measure the bell) most other manufacturers/retailers classify this as a 2212 motor (based on the size of the stator) There is a model of the motor included in the Onshape document so you can confirm dimensions.</p>
With this file you will be able to print Improved Needle Cutter with your 3D printer. Click on the button and save the file on your computer to work, edit or customize your design. You can also find more 3D designs for printers on Improved Needle Cutter.