Induction Heater IHMini for Dynavap
thingiverse
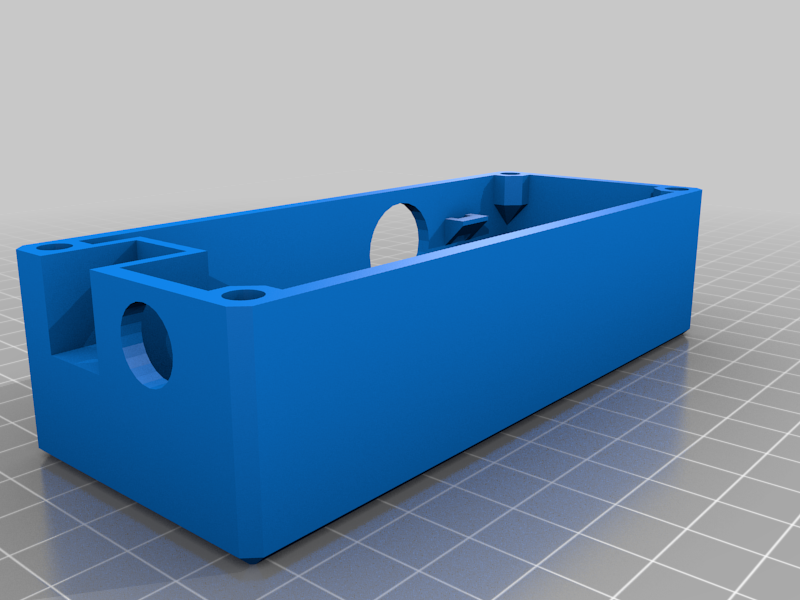
Induction Heater IH-Mini I designed this IH with the right measurements for the Mini ZVS 12v board and the Mosfet. It has a switch to activate the external current input (can be omitted). The measurements of the IH-Mini are 126x51x35mm. It takes a minimum of 6 amps to discharge and a maximum of 12.6v, if you add more voltage it will burn. The Mini ZVS board has been modified by changing the 2 induction coils for two smaller ones and removing a capacitor, the other must be changed to the opposite side. The heating coil must be soldered to the board, do not use the connectors it comes with for this, they must be removed. I recommend reviewing the board and at least soldering the junctions of the 2 mosfets it has. I have added 2 covers with different holes to better place and see the multicolor led light, choose the one you prefer. If you want it with an internal battery, I have designed this same model with a hole for the battery, measuring 126x85x35mm, you have it here: https://www.thingiverse.com/thing:6016217 Required Components: - 1u Mini ZVS Module 5-12v ( https://es.aliexpress.com/item/1005001398172061.html ) - 2u Induction coil 47UH 3A ( https://es.aliexpress.com/item/32805045399.html ) - 1u Mosfet 15amp 400w ( https://es.aliexpress.com/item/32807056033.html ) - 1u Replacement Glass Tube of "Cloudpor Cloutank M3" (OD 16mm x ID 12mm x Length 35mm) ( https://es.aliexpress.com/item/4001042224823.html ) - 1u Ultra-thin momentary push button switch (19mm x 14mm) (you have to dip the tabs towards the center to take up less space) ( https://es.aliexpress.com/item/1005003426685155.html ) - 1u Led multicolor RGB slow change for glass tube ( https://es.aliexpress.com/item/4001118365019.html ) - 1u normal Led (color to be chosen by the user) to indicate when the current input is activated (it goes at the height of the switch, in a small hole on the side) - 2u Resistors 680 Ohm (one for each led) - 1u ON-OFF-ON switch MTS-202 ( https://es.aliexpress.com/item/32916657592.html ) - 1u Female Connector 5.5mm x 2.5mm ( https://es.aliexpress.com/item/1005004073647480.html ) - Wire AWG 18 or thicker for power - Fine cable for LEDs and activation button - 2u Silicone O-ring ID 14mm ( https://es.aliexpress.com/item/32915436213.html ) - 1u Silicone stopper to stop the glass tube with a piece of cork on top so that it does not burn with the Dynavap hood ( https://es.aliexpress.com/item/1005003669284388.html ) - Cork stopper cut to size to put on top of the previous silicone stopper inside the glass tube. - 4u OD 5mm brass insert nuts and 5mm length for M3 screws ( https://es.aliexpress.com/item/1005004535859664.html ) - 5u M3 6mm screws (4u for the cover and 1u to hold the Type-C load plate) and 1u M 2.5 5mm screw to hold the mosfet. Many components are from the same store, you can save extra shipping costs if you select the same type of shipping on all items from the same store. If you liked it, please click Like and you can make a donation here: http://www.paypal.me/zaar137 ------------------------------------------------------------------------------------------------------------------ Inductión Heater IH-Mini He diseñado este IH con las medidas justas para la placa Mini ZVS 12v y el Mosfet. Tiene un interruptor para activar la entrada externa de corriente (se puede omitir). Las medidas del IH-Mini son de 126x51x35mm. Se necesitan como mínimo 6 amperos de descarga y maximo 12,6v, si metes mas voltage se quemará. La placa Mini ZVS ha sido modificada cambiando las 2 bobinas de induccion por otras dos mas pequeñas y quitando un condensador, el otro hay que cambiarlo a la cara opuesta. La coil de calentamiento debe ir soldada a la placa, no utilizar los conectores que trae para esto, hay que quitarlos. Recomiendo revisar la placa y resoldar al menos las uniones de los 2 mosfet que tiene. He añadido 2 tapas con distintos orificios para colocar y ver mejor la luz del led multicolor, elige la que prefieras. Si lo quieres con batería interna, he diseñado este mismo modelo con el hueco para la batería, quedando en unas medidas de 126x85x35mm, lo tienes aquí: https://www.thingiverse.com/thing:6016217 Componentes necesarios: - 1u Módulo Mini ZVS 5-12v ( https://es.aliexpress.com/item/1005001398172061.html ) - 2u Bobina de induccion 47UH 3A ( https://es.aliexpress.com/item/32805045399.html ) - 1u Mosfet 15amp 400w ( https://es.aliexpress.com/item/32807056033.html ) - 1u Tubo de cristal Repuesto de "Cloudpor Cloutank M3" (OD 16mm x ID 12mm x Long 35mm) ( https://es.aliexpress.com/item/4001042224823.html ) - 1u Interruptor momentaneo pulsador ultrafino (19mm x 14mm) (hay que undir las pestañas hacia el centro para que ocupe menos espacio) ( https://es.aliexpress.com/item/1005003426685155.html ) - 1u Led multicolor RGB cambio lento para el tubo de cristal ( https://es.aliexpress.com/item/4001118365019.html ) - 1u Led normal (color a elegir por el usuario) para indicar cuando está activada la entrada de corriente (va a la altura del interruptor, en un pequeño agujero lateral) - 2u Resistencias 680 Ohm (una para cada led) - 1u Interruptor ON-OFF-ON MTS-202 ( https://es.aliexpress.com/item/32916657592.html ) - 1u Conector Hembra 5,5mm x 2,5mm ( https://es.aliexpress.com/item/1005004073647480.html ) - Cable AWG 18 o mas grueso para la corriente - Cable fino para Leds y boton de accionamiento - 2u Junta tórica de silicona ID 14mm ( https://es.aliexpress.com/item/32915436213.html ) - 1u Tapon de silicona para hacer de tope en el tubo de cristal con un trozo de corcho encima para que no se queme con la capucha del Dynavap ( https://es.aliexpress.com/item/1005003669284388.html ) - Tapón de corcho cortado a medida para poner encima del tapón de silicona anterior dentro del tubo de cristal. - 4u Tuercas de insertos de laton de OD 5mm y 5mm de longitud para tornillos M3 ( https://es.aliexpress.com/item/1005004535859664.html ) - 5u Tornillos M3 de 6mm longitud (4u para la tapadera y 1u para sujetar la placa de carga Tipo-C) y 1u tornillo M 2.5 5mm para sujetar el mosfet. Muchos componentes son de la misma tienda, te puedes ahorrar los gastos de envío extras si seleccionas el mismo tipo de envío en todos los articulos de la misma tienda. Si te ha gustado, por fabor dale al Like y puedes hacerme una donacion aqui: http://www.paypal.me/zaar137
With this file you will be able to print Induction Heater IHMini for Dynavap with your 3D printer. Click on the button and save the file on your computer to work, edit or customize your design. You can also find more 3D designs for printers on Induction Heater IHMini for Dynavap.