Industrial design furniture
prusaprinters
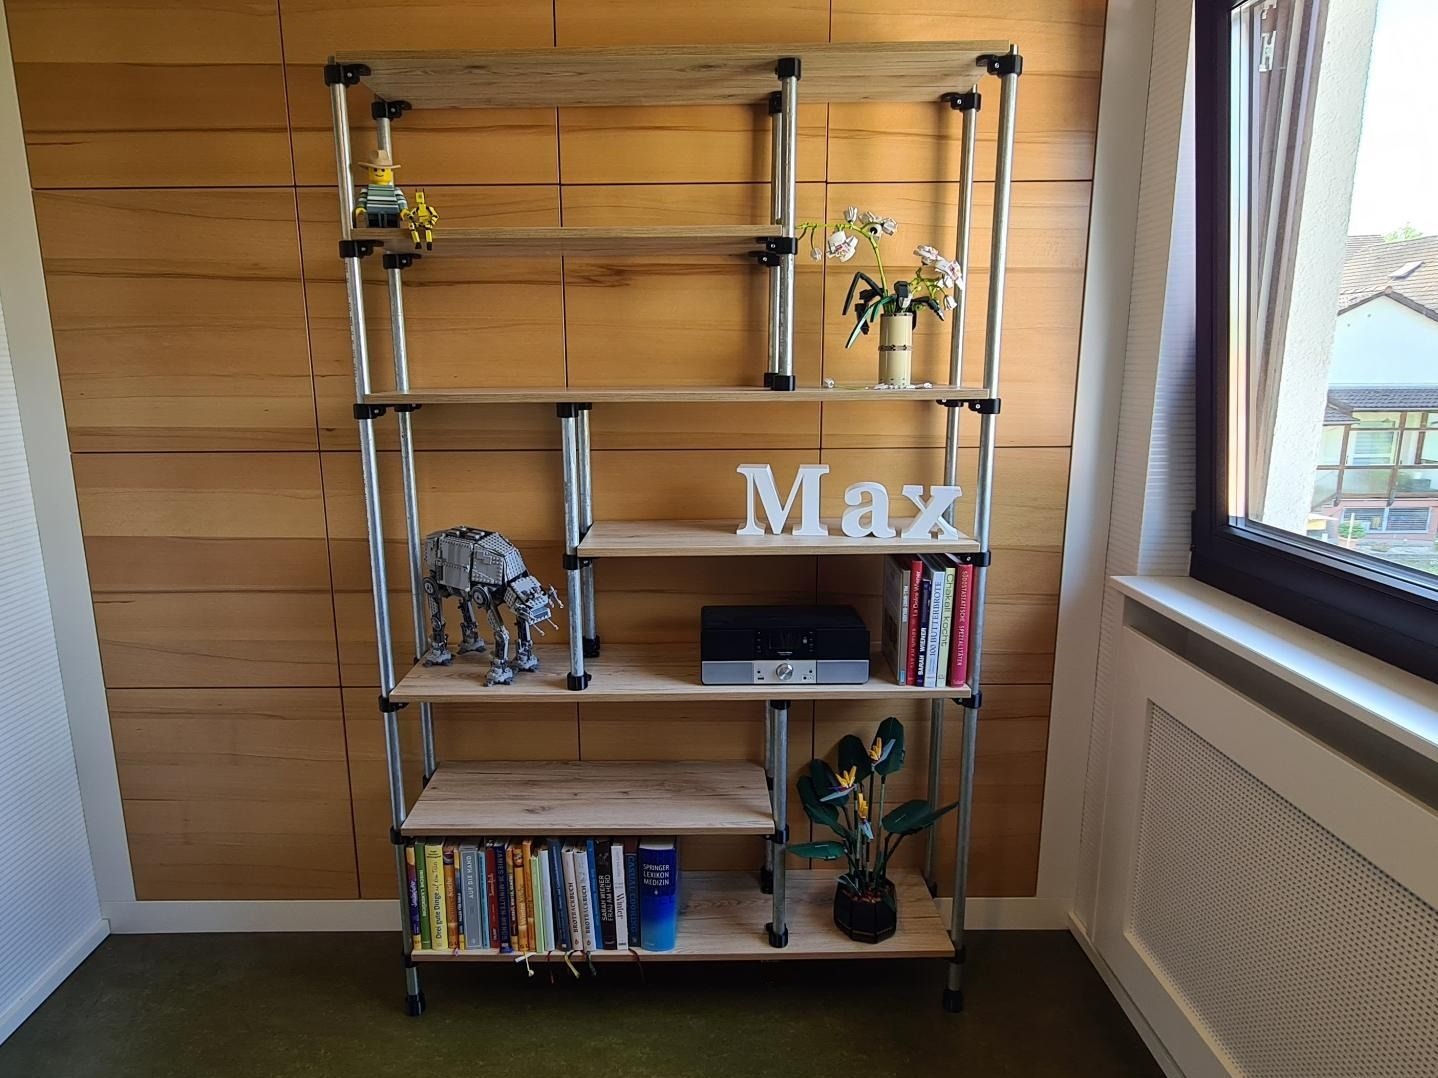
<h3><strong>Industrial design furniture made from 3/4 inch water pipes.</strong></h3><p> </p><p>With these connectors, different types of furniture can be built from commercially available water pipes and wooden boards.<br>The 3/4 inch water pipes (26.3mm) are available in DIY stores almost all over the world, very stable and relatively cheap.<br>The easiest way to cut the water pipes is with a pipe cutter. You can also use a saw, but it takes longer<br><br>Depending on how the use changes, the furniture can be easily redesigned.</p><p>There is a one-sided and a two-sided connector.<br>The connector for the panels brings more stability to the construction - similar to a back panel on a cabinet.<br>The feet are height-adjustable to compensate for unevenness.</p><p> </p><h5>Printing instructions:</h5><p><br>Print in PETG, ABS or ASA.<br>Please do not print in PLA, it will not last in the long run.</p><p>Wall thickness 5 layers<br>Layer height 0.2 mm<br>Infill min. 25%<br>No support</p><p> </p><h4>Material:<br> </h4><p>You need a hexagon bolt M8 x 30 and a nut M8 for each foot.<br>For each connector you need a hexagon socket screw M5 x 20 and a nut M5 and wood screws to attach the boards.<br>M5 x 20 means that the thread length is 20mm. The total length of the M5 screw with head is 25mm. The total length of the M8 screw is approx. 35mm.</p><figure class="table"><table><tbody><tr><td><figure class="image image-style-align-right image_resized" style="width:66.17%;"><img src="https://media.printables.com/media/prints/201938/rich_content/cc89300c-6f69-470c-9dd0-4012206766b4/signal-2022-05-15-101015_003.jpeg#%7B%22uuid%22%3A%2259d5a635-9b9a-4488-bd97-970fe0132e43%22%2C%22w%22%3A868%2C%22h%22%3A702%7D"></figure></td><td><figure class="image image-style-align-left image_resized" style="width:66.81%;"><img src="https://media.printables.com/media/prints/201938/rich_content/e74faec8-cf21-40e5-bf31-44f557cadb27/signal-2022-05-15-102316_001.jpeg#%7B%22uuid%22%3A%22c002c83c-69f6-48a3-831b-39b1b353440c%22%2C%22w%22%3A1123%2C%22h%22%3A894%7D"></figure></td></tr></tbody></table></figure><h4> </h4><p> </p><p> </p><figure class="image"><img src="https://media.printables.com/media/prints/201938/rich_content/2db072b8-51ed-46ab-92bb-2296de1b8851/signal-2022-05-15-101015_001.jpeg#%7B%22uuid%22%3A%2291df9d38-ece9-4f59-91b9-ef153c9b1fbc%22%2C%22w%22%3A1153%2C%22h%22%3A2048%7D"></figure><p> </p><h4><br> </h4><h4>Assembly instructions for a shelf:</h4><p> </p><figure class="image"><img src="https://media.printables.com/media/prints/201938/rich_content/df121086-1b77-4fd8-8a28-31b3b5eae282/wpc1.jpeg#%7B%22uuid%22%3A%22efdec683-7c35-4580-b8b5-44200f28c2cc%22%2C%22w%22%3A1320%2C%22h%22%3A2048%7D"></figure><p> </p><p> </p><p>There are several ways to mount the connectors. I found this one the easiest.</p><p>Press the nuts and the screw into the parts for the foot.<br>Both parts are screwed together.</p><figure class="table"><table><tbody><tr><td><figure class="image image_resized" style="width:81.44%;"><img src="https://media.printables.com/media/prints/201938/rich_content/89c15059-e501-43f7-aaff-816fb89decbb/signal-2022-05-10-202106_016.jpeg#%7B%22uuid%22%3A%224556eda4-d8cb-456b-8f01-26d2a4663af7%22%2C%22w%22%3A1952%2C%22h%22%3A2048%7D"></figure></td><td><figure class="image image_resized" style="width:80.77%;"><img src="https://media.printables.com/media/prints/201938/rich_content/e9dbf0fe-ad63-41bd-ac9f-21f2b62f6575/signal-2022-05-10-202106_015.jpeg#%7B%22uuid%22%3A%22186460a2-e3b5-4ea0-b9dd-dd16df61465d%22%2C%22w%22%3A1944%2C%22h%22%3A2048%7D"></figure></td></tr></tbody></table></figure><p> </p><p> </p><p>Fit all connectors with screws and nuts. Do not tighten the screws - we will do that later.</p><p> </p><figure class="image image-style-align-center image_resized" style="width:74.05%;"><img src="https://media.printables.com/media/prints/201938/rich_content/8cdd374a-cccc-4d97-9bb2-215cbe5147e2/signal-2022-05-10-202106_014.jpeg#%7B%22uuid%22%3A%226dae6b3e-271c-4a46-ba0f-31130ba1c8db%22%2C%22w%22%3A2048%2C%22h%22%3A1153%7D"></figure><p> </p><p> </p><p>Now insert the upright tube into the foot and push on all the necessary connectors according to the plan.<br>Bring the lowest and the highest connector to the respective height, align and tighten.</p><figure class="image image_resized" style="width:79.22%;"><img src="https://media.printables.com/media/prints/201938/rich_content/572e5ea6-7170-4c1b-ab03-482f2a0134be/signal-2022-05-10-202106_010.jpeg#%7B%22uuid%22%3A%2245f0a6b3-ee6d-4502-90c9-2d62ca73c29c%22%2C%22w%22%3A2048%2C%22h%22%3A1153%7D"></figure><p> </p><p>Now screw down the bottom and the top shelf. Let someone help you, it works better with two people.<br><strong>Very important: First tighten the M5 screw and then screw down the board.</strong></p><figure class="table"><table><tbody><tr><td><figure class="image image_resized" style="width:80.41%;"><img src="https://media.printables.com/media/prints/201938/rich_content/c463f634-8f0d-41ca-98cb-42aa5bbb2361/signal-2022-05-10-202106_009.jpeg#%7B%22uuid%22%3A%2285380d23-f039-4fb0-b034-076e31bfe41c%22%2C%22w%22%3A1601%2C%22h%22%3A2048%7D"></figure></td><td><figure class="image image_resized" style="width:80.43%;"><img src="https://media.printables.com/media/prints/201938/rich_content/6c1091df-f3f1-4a23-ab29-05e31860f747/signal-2022-05-10-202826_009.jpeg#%7B%22uuid%22%3A%2282594d8e-b91b-4bf7-bdc3-191a8cd7fa1f%22%2C%22w%22%3A1711%2C%22h%22%3A2048%7D"></figure></td></tr></tbody></table></figure><p> </p><p> </p><p>When the bottom and top boards are screwed in place, the shelf can be set up and aligned with the spirit level. Simply turn the feet.</p><figure class="table"><table><tbody><tr><td><figure class="image image_resized" style="width:88.65%;"><img src="https://media.printables.com/media/prints/201938/rich_content/02aea776-1b2f-4db5-8e0f-39a6da7efc01/signal-2022-05-10-202106_007.jpeg#%7B%22uuid%22%3A%22a660453b-40fa-48c0-b4cc-bbf24bad1fd7%22%2C%22w%22%3A1768%2C%22h%22%3A2048%7D"></figure></td><td><figure class="image image_resized" style="width:85.31%;"><img src="https://media.printables.com/media/prints/201938/rich_content/94566dc5-7493-4111-b114-f4582a70752f/signal-2022-05-10-202106_006.jpeg#%7B%22uuid%22%3A%22e2d10f36-c799-46c8-affe-b50b038a0b31%22%2C%22w%22%3A1345%2C%22h%22%3A2048%7D"></figure></td></tr></tbody></table></figure><p> </p><p>Now bring all the other connectors to the correct height and tighten the M5 screw. Then place the boards on top and screw them together from below.</p><figure class="table"><table><tbody><tr><td><figure class="image image_resized" style="width:87.6%;"><img src="https://media.printables.com/media/prints/201938/rich_content/431f797c-7fc1-4ae6-9e52-ad17184e0355/signal-2022-05-10-202106_004.jpeg#%7B%22uuid%22%3A%220d79a244-13f9-4a7b-b901-c67e62721cc2%22%2C%22w%22%3A1729%2C%22h%22%3A2048%7D"></figure></td><td><figure class="image image_resized" style="width:87.91%;"><img src="https://media.printables.com/media/prints/201938/rich_content/10c94919-bbd6-4ebf-84fe-01c3ae756f6b/signal-2022-05-10-202106_003.jpeg#%7B%22uuid%22%3A%229a6f2171-965c-4660-bd67-b1d142a8c391%22%2C%22w%22%3A1840%2C%22h%22%3A2048%7D"></figure></td></tr></tbody></table></figure><p> </p><p><strong>The more connectors you use, the more stable the shelf will be.</strong><br><strong>Nevertheless, I always recommend to fix the furniture on the top of the wall.</strong></p><p> </p><figure class="image image_resized" style="width:41.84%;"><img src="https://media.printables.com/media/prints/201938/rich_content/b36e07af-37bf-428c-83eb-2e0ee5287bf6/wpc1.jpeg#%7B%22uuid%22%3A%2259833e2b-b980-4e8b-8715-05cd768129c8%22%2C%22w%22%3A1320%2C%22h%22%3A2048%7D"></figure><p> </p><p>For this shelf 40 connectors and four feet were needed - this corresponds to approx. 1,5 kilo of filament.<br>The printing time was 156 hours.</p><p> </p><p><strong>Happy furniture assembly :-)</strong></p><p> </p><p> </p>
With this file you will be able to print Industrial design furniture with your 3D printer. Click on the button and save the file on your computer to work, edit or customize your design. You can also find more 3D designs for printers on Industrial design furniture.