Infill and Density
thingiverse
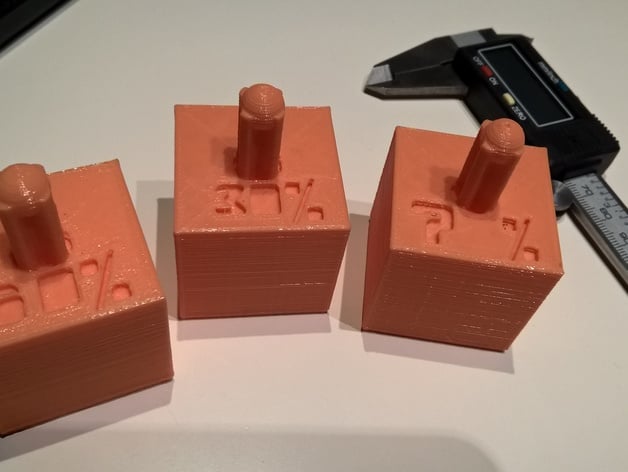
This is an activity that has two objectives: First to become familiar with 3D printing time, material consumption etc, as well as how we can have different properties in the printed object, and second, to experiment with the physics of density and buoyancy (Archimedes principle). It proposes to print 3 "identical" cubes with different infill values, 2 of them have a known infill value, because it is indicated on the top face, but it is up to you to define the infill of the third cube, which will indicate "? %" on its top face. Students will have to guess the infill percentage used. Print Settings Printer Brand: RepRap Printer: PowerCode Rafts: No Supports: No Resolution: 0.248 Infill: variable Notes: In printed in PLA at 0.248 layer thickness, but layer tickness is not a key parameter for this activity How I Designed This Designs in this project have been made with #Sketchup Make (free). I have very basic skills, so I went for a very simple design, because design itself is not the focus of this activity. I created 3 identical cubes with the only difference among them being the text on the top side, that indicates either “30%”, “60%” or “? %”. I added a vertical rod on top to be able to hold the cubes vertical while in water. Since this tip is rather small in section, it might be troublesome to print, so I included also a cylindrical prism of the same height so that you can print it at the same time, and allow time to cool down the previous layer of the cube’s tip. The activity document (infill and density.pdf) was created with Excel. Project: Print infill & Object density Objectives • Become familiar with key 3D printing parameters (mainly infill) • Become aware of 3D printing time, material use, cost… • Understand how you can modify physical properties of 3D printed objects • Science: Understand Archimedes principle Audiences • Any 3D printing student (beginners level) • Any school student who has studied Archimedes principle Preparation • Students will need access to computers and a 3D Printer in the classroom • Computers will be equipped with the necessary 3D printing software. Recommendation is CURA. • No previous 3D design experience is required for the students, although familiarity with Sketchup (free) could be good if someone wants to modify the model. • It is helpful to have students form into working groups of two or three so that they can collaborate on the design process. Having students work in groups is also helpful if you have a limited number of computers and/or limited 3D printer access. Part 1: 3D Printing the cubes Open your slicer application (CURA), and set all the printing parameters that will be the same for all the three cubes that you will print. I suggest 0.2 to 0.25 layer thickness, no support, brim or raft is needed, select the printing speeds you usually do. Make sure that bottom and top layers are configured to be solid (click on the "..." button to the right of the infill value) Load "30 infill cube.stl", select 30% infill. Note in the sheet the printing time predicted, as well as the material used (in grams). If you have trouble printing the top part, you may also open "support cylinder.stl" an print both things at once. This will help cooling the holding tip of the cube after each layer is printed. Note also the dimensions by clicking of the object, and then on scale (Just note the values on the sheet, but do not modify them). Print the cube and note how long it took to print. Load "60 infill cube.stl", select 60% infill. Note in the sheet the printing time predicted, as well as the material used (in grams). Dimensions will be the same as in step 2. Print the cube and note how long it took to print. Load "Unknown infill cube.stl", select your desired % infill (My suggestion is less than 60%, to save time, filament, and to avoid an printing an object that sinks in water). Note in the sheet the printing time predicted, as well as the material used (in grams). Dimensions will be the same as in step 2. Print the cube and note how long it took to print. 5: Measure the sides of the cube, and note them, they should all be nearly identical and similar to the ones indicated by CURA. 6: If you have a scale, weigh and note the weight of each cube. Part 2: Buoyancy test (Archimedes principle) Take a glass of water in which you can dip each cube Hold the first cube by the tip and slowly dip it in water until it floats, avoid pushing it downwards and pulling it upwards, just try t keep it vertical without applying vertical force. Note the wet height, i.e. how many mm stay in the water. If you prefer, measure the dry height and subtract it from the total edge height. when the cube is floating that means that its density is lower than water density (which happens to be 1 g/cm3) and its actual density will be equal to the ratio wet height/edge height. Repeat with the 60% cube and the unknown infill cube. Plot on a chart the data of the know cubes: infill % on the X axis and wet height on the Y axis. draw a straight line connecting the two points. On the Y axis of the chart mark the wet height of the unknown % cube. From that point move horizontally to the right until it intersects the previous line, then go down vertically to the X axis and note the infill percentage . Confirm that it is similar to the actual one defined in CURA. Results: At the end of this project, each group of students should have: • 3 3D printed objects • filled in Activity sheet • Comprehension on how infill and other parameter may affect printing time, material usage, printing cost, object density, weight, etc… • Comprehension of Archimedes principle
With this file you will be able to print Infill and Density with your 3D printer. Click on the button and save the file on your computer to work, edit or customize your design. You can also find more 3D designs for printers on Infill and Density.