InMoov - Advanced Eye Mechanism
thingiverse
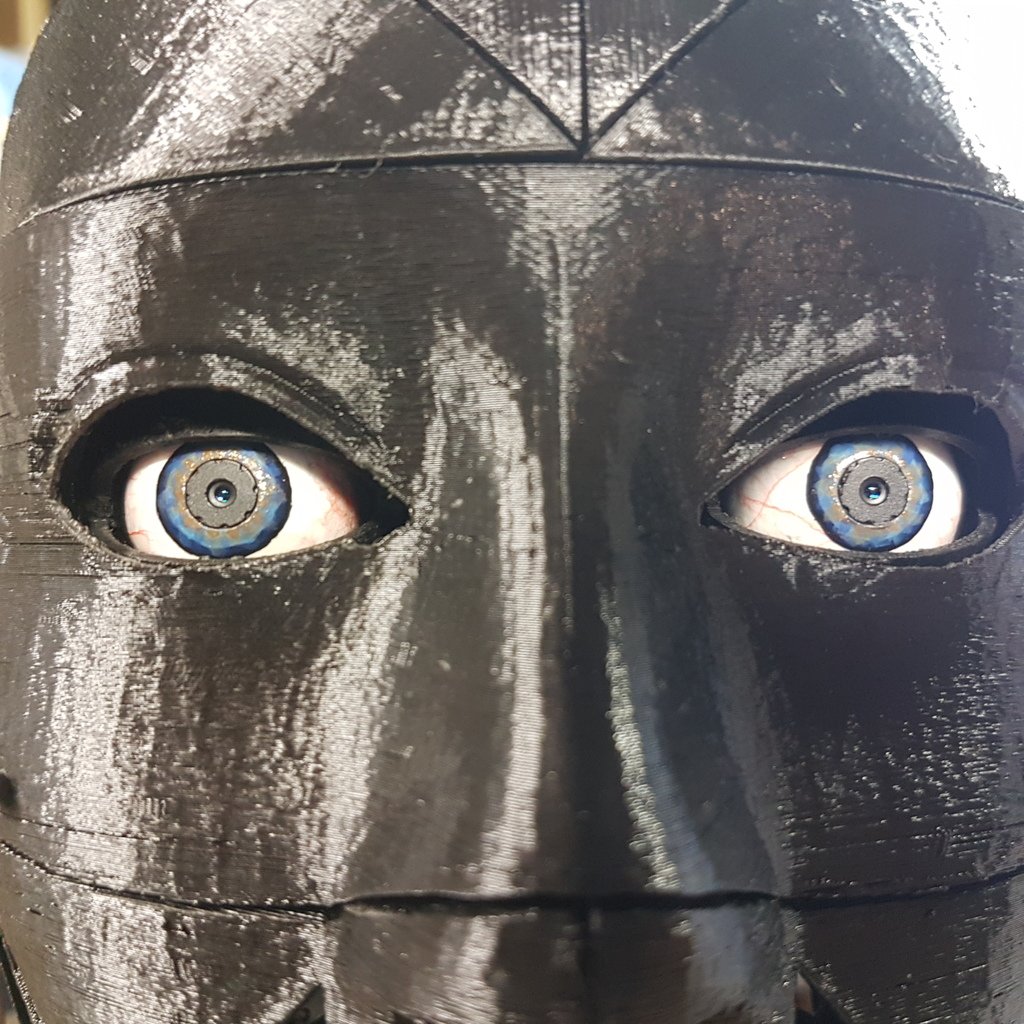
This is an advanced eye upgrade for the InMoov robot that features eye lids and independent movement of each eye. The design files include a drill mount for sanding and painting eye balls. Demonstration videos are available at: https://www.youtube.com/channel/UC-TVs2NgcdnF-nCaefCc6zg, https://www.youtube.com/watch?v=2tN2dbpm3rc, and https://www.youtube.com/watch?v=9xMmtNk8nvE. Note that this is a difficult build as clearances are small and some specialized tools may be required for assembly. To complete this project, you will need: 6 x SG90 servos with related hardware and horns (available at https://www.amazon.com/J-Deal%C2%AE-Micro-Helicopter-Airplane-Controls/dp/B00X7CJZWM/ref=sr_1_3?ie=UTF8&qid=1506426852&sr=8-3&keywords=sg90) 2 x 2-56 threaded ball joints (available at https://www.amazon.com/Great-Planes-Threaded-2-56-Ball/dp/B001BHEFUM/ref=sr_1_sc_3?s=toys-and-games&ie=UTF8&qid=1506223441&sr=1-3-spell&keywords=2-56+thraded+ball+links) 2 x 2-56 threaded 12" long pushrods (available at https://www.amazon.com/Du-Bro-801-2-56-Threaded-6-Pack/dp/B0006O4HQS/ref=sr_1_1?s=toys-and-games&ie=UTF8&qid=1506224591&sr=1-1&keywords=du-bro+rod) 4 pushrod to servo horn couplers (available at https://www.amazon.com/Du-Bro-Connectors-Re-Usable-Nylon-12-Pack/dp/B0006O8U0M/ref=pd_bxgy_21_img_3?_encoding=UTF8&psc=1&refRID=T6TWGRKJFR511VMMFAY5) 2 x cameras (available at https://www.amazon.com/Small-Camera-micro-security-Surveillance/dp/B00WSJIMJC/ref=sr_1_12?ie=UTF8&qid=1506426350&sr=8-12&keywords=600+tvl+camera) Monofilament or braided fishing line in 6 to 8lb test Forceps - The non-toothed type used for stitches (used to aid installation of fishing line without damaging it) Small bit of pushrod from the last step You will also need a hacksaw or jewelers saw, a small bit of CA glue, and hot glue. To complete the project, follow these steps: 1. Using a hacksaw or jewelers saw, cut and chamfer ends of two 8mm, four 6mm, and four 5mm pieces from the non-threaded end of one of your pushrods. The 8mm are used for eyeball gimbal to servo frame attachment, the 5mm are used to mount the eyeballs to the eyeball gimbal, and the 6mm are used to attach the eyelids to servo frame. 2. Using a small bit of pushrod from the last step, attach the gimbals to servo frame with 8mm length rods. You will need forceps to hold rods for insertion into holes without damaging them. Next mount eyeballs to gimbal using 5mm rods taking note of camera orientation for correct image. 3. Install ball part of linkage on the beam between eyelids on both pairs, then install eyelids to servo frame using the 6mm rods. 4. Install servos, horns, printed servo horns, and linkages as pictured. Bending of connecting rods is necessary to make connections. 5. Use 6-8LB test monofilament fishing line or similar diameter braided line in four 12" sections. This will leave a lot of excess but will be easier to work with in this length. Using forceps to help, use Rapala knots (google it) to tie the four sections of string to each of the side holes in eyeballs. 6. Fish the four lines up through the holes in the servo frame. Wrap the lines around printed servo horns of upper servos a couple times and affix them using servo horn holes. 7. Position completed mechanism behind mask and glue in place (I recommend hot glue so it can be removed later if needed for maintenance or upgrades as I refine the mechanism).
With this file you will be able to print InMoov - Advanced Eye Mechanism with your 3D printer. Click on the button and save the file on your computer to work, edit or customize your design. You can also find more 3D designs for printers on InMoov - Advanced Eye Mechanism.