Insectivorous Fan
thingiverse
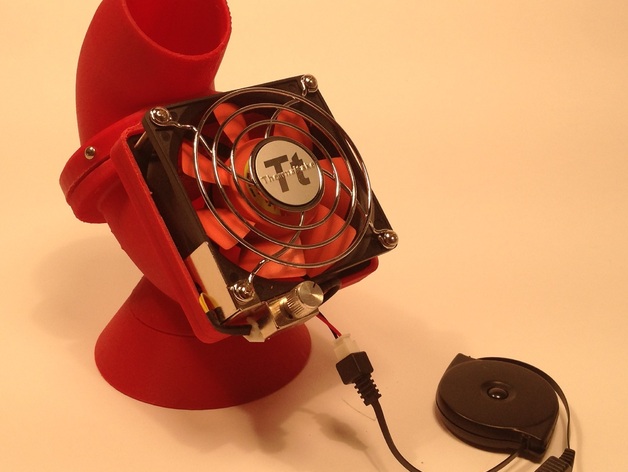
This is a fan I built to move the air around my potted plants, which have been supporting a burgeoning population of thrips, whiteflies, aphids, or some other tiny winged pests. Much like some of the larger non-chemical insect traps out there, this moves air through a mesh screen (from a 2.5" diameter mesh tea ball) that traps the insects in a breeze they can't fly free from. Then, if they stay there long enough, they die. The bottom base pops off to allow you to empty the fan of their little carcasses. If you want to hasten them along, you can add water or some scented oil that they can drown in. I ran the first version overnight and it trapped about fifty of the little suckers. It also makes a nice desk fan; the exit spout is orientable, so you can direct the breeze away from the intake, and it has a fun form that looks nice on a desk. I printed this one in red but I plan to make the ones for my windowsills in green so it blends into the foliage better. Alternatively, if you're not trying to kill bugs, you can fill the tea ball half-full with potpourri to scent the air, or add liquid potpourri to the base. If you use any of that serious air freshener juice, put it in a small tin inside the base because that stuff melts plastic. Please don't ask me how I know this. Instructions Order a USB ventilation fan and tea ball:http://www.amazon.com/Thermaltake-Mobile-Fan-External-Cooling/dp/B00080G0BKhttp://www.amazon.com/gp/product/B0000DE7P1/ref=oh_details_o00_s00_i00?ie=UTF8 Print and deraft the three parts. Tap the three holes in the exit spout to 4-40, and thread in three 4-40 screws. Drop the tea ball into the socket in the intake, and assemble the spout to the intake to sandwich the flange of the tea ball (if you make multiples, you might be able to use just half of the tea ball, allowing you to buy half as many tea balls). Tighten down the three screws until they drop into the spin groove and the spout spins with some resistance but won't come off. Disassemble the fan,by un-nutting the four perimeter screws. Take a grille, the fan, and the speed control subassembly, and fit them into the square socket in the intake, with the spider in the fan facing in. Drop the four screws through the stack, and insert the nuts into the hexagonal sockets in the back. Tighten. Pop the base cap on, and set the fan down on it. Plug it in to your nearest USB socket, and fire it up. Adjust the flow direction to your liking by rotating the exit spout.
With this file you will be able to print Insectivorous Fan with your 3D printer. Click on the button and save the file on your computer to work, edit or customize your design. You can also find more 3D designs for printers on Insectivorous Fan.