Intelligent charger for 9V NiMH rechargeable batteries V1
thingiverse
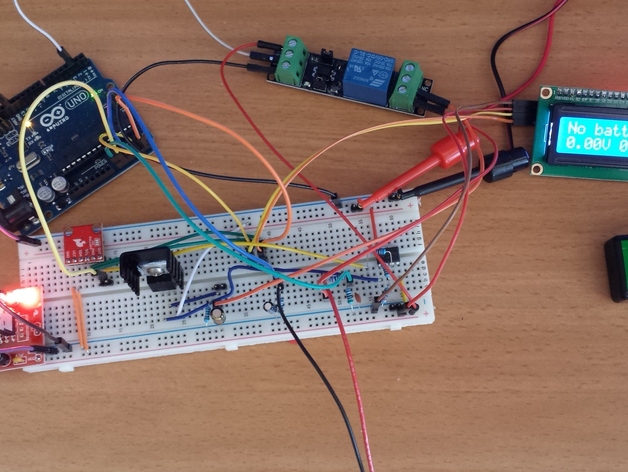
I looked for smart charger chat can charge 9V NiMH battery in couple of hours and didn't found one. Moreover all chargers I found was really "dumb". Charging current unknown and no function to terminate charging after battery fully charged. Problem with such chargers that they can overcharge battery and significantly reduce lifespan. So I decided to create "smart" charger using Arduino. First version I intend to keep simple, so it allows basic things like charging with constant current, automatic charging termination after battery fully charged, trickle charge, measurement of charge transferred to battery. In next version I will add couple of additional useful features like discharge, capacity measurement and cycling. All sketches inside charger.zip schematic.pdf - schematic of circuit not including LCD connection Warning: Charging battery with high current may cause battery explosion or fire. Please don't leave charger unattended. Also please don't try to charge battery don't intended to be charged as Alkaline. This charger tested only with NiMH batteries (and still you are using it at your own risk and I am absolutely have no any responsibility if any damage caused because of bugs in desigh or code). Chagrin of other types of batteries will require code modification. How I Designed This Parts list You will need following parts: Arduino UNO SparkFun I2C DAC Breakout - MCP4725 LM317 Linear Regulator with Adjustable Output LM358 opamp Resistor 6.8k ohm x2 Resistor 3.3k ohm Resistor 5.1k ohm Resistor 20k ohm Resistor 1k ohm Resistor 10 ohm Relay SparkFun Breadboard Power Supply 5V/3.3V YwRobot I2C SERIAL LCD 1602 MODULE Power supply 17V Theory Some useful facts to remember that will help to understand needed parameters of charger. C - current equal to nominal capacity of battery When charged at the C rate single cell voltage may reach 1.6V. This voltage may be higher for old batteries. Nominal voltage of single cell is 1.2V, but fully charged cell has an open-circuit voltage up to 1.5 volt. Trickle charge rate of less than 0.025 C (C/40) is recommended after battery fully charged. It is generally two options to charge NiMH battery: Fast charging. Charging current 0.5C-1C. Charge state must be monitored and terminated by dV/dt (voltage change rate) or dT/dt (temperature change rate) Slow charging. Charging current 0.1C. Charging time 14-16 hours. Charge termination by timer. dT/dt charge termination impossible for low currents. dV/dt termination may be not reliable for currents below 0.5C according to literature. Basic parameters of charging circuit 9V battery usually has 7 serially connected sells, but in some cases it may have 6 or 8 cell. Voltage regulator should be able to provide charging voltage at least up to 8*1.6=12.8V. Dropout voltage of LM317 regulator up to 2V, so supply voltage need to be ~15V (this not takin to account voltage drop on current sensing resistor) For maximum charging current of 200mA and current sensing resistor 10 Ohm additional drop on current sensing resistor is 2V, so 17V supply voltage needed. Fully discharged cell may have very low, even negative voltage. Minimum voltage of regulator ideally should be 0, but using LM317 it may be as low as 1.2V. Circuit explanations The basic idea is to measure charging current and adjust voltage of regulator until desired current reached. Current measured by measuring voltage drop on current sensing resistor R5. I=V/R SparkFun I2C DAC Breakout - MCP4725 - 12 bit digital to analog converter used to control voltage. Output voltage cam be configured via I2C between 0 and 5V. Because we need to be able to adjust voltage in wider range, from 0 to 15V operational amplifier LM358 used to amplify output voltage of DAC. Amplification of operational amplifier set by resistors R4 and R3. Gain=1+R4/R3=1+6800/3300=3.06 so output voltage of operational amplifier approximately 0 to 15V Maximum output current of LM358 is 50mA, so LM317 adjustable voltage regulator used to control higher current. Output of operational amplifier connected to ADJ terminal of LM317. LM317 will maintain 1.2V between ADJ and OUT terminals, so actual voltage on battery can be configured between 1.2 and 16.2V. LM317 need minimum 3.5mA current to maintain regulation. So 1kOhm resistor R6 used to ensure regulation if battery not connected. Capacitor C1 used to filter output voltage and improve stability of LM317. Voltage measured at two different points. Resistor R5 connected to pin A2 of Arduino. Voltage on resistor measured and than charging current calculated as Icharging=V/R Voltage on battery can be up to 16.2V, so resistive divider R1,R2 used to bring voltage below 5V, allowed by Arduino. For R1=5.1k Ohm and R2=20kOhm Vout=Vin/(20000+5100)*5100=0.2 So battery voltage divided by 5. Relay used to disconnect battery from charging circuit. You can see on photo relay I used, but generally any relay with 5V control can be used. It is more safe to connected battery to normally open contacts of relay. I used YwRobot I2C SERIAL LCD 1602 MODULE to display status of charger, but any other I2C controlled LCD module can be used. It seems like YwRobot LCD module not supported by standard LiquidCrystal_I2C library, so I used New LiquidCrystal library If you are using different LCD module you will need to change this line:LiquidCrystal_I2C lcd(0x27, 2, 1, 0, 4, 5, 6, 7, 3, POSITIVE); To power Digital to analog converter and LCD I used SparkFun Breadboard Power Supply 5V/3.3V. It is probably will be ok to use 5V from Arduino board. You also will need to supply 17V to charging circuit. If you don't have power supply, you can use adjustable DC/DC converter like this Functionality I don't wanted a lot of wires, so there are no buttons to configure charging. Chagrin current configured only in code. You need to set desired charging current in charger.ino //* Charging parameters *** // float target_current_mA=30; //Charging current mA float battery_nominal_capacity_mA=170; //Nominal capacity of battery mA float max_time_for_trickle_charge=6; //Maximum trickle charge time in minutes // //***** target_current_mA - constant charging current max_time_for_trickle_charge - maximum number of minutes for trickle charging, can be set up to 600 (10h) battery_nominal_capacity_mA - battery capacity used to calculate trickle current Generally charging current can be up to nominal capacity. For battery with nominal capacity of 170mAh maximum charging current is 170mA. Minimum charging current usually C/10 - 17mA for 170mAh battery. After power is up charger will check if battery connected. If battery connected battery will be charged with configured constant current until fully charged. Charging terminated by detecting negative dV/dt during 5 minutes. After charging completed charger will switch to trickle charging with current C/40. Charger will disconnect itself from battery after maximum trickle charging time elapsed. 1 - dV/dt 2 - charging time in minutes 1 - Charging time 2 - Charge transferred to battery Additional information about NiMH batteries: http://data.energizer.com/PDFs/nickelmetalhydride_appman.pdf http://batteryuniversity.com/learn/article/charging_nickel_metal_hydride http://batteryuniversity.com/learn/article/how_to_restore_nickel_based_batteries
With this file you will be able to print Intelligent charger for 9V NiMH rechargeable batteries V1 with your 3D printer. Click on the button and save the file on your computer to work, edit or customize your design. You can also find more 3D designs for printers on Intelligent charger for 9V NiMH rechargeable batteries V1.