Interchangeable Mickey Ears
prusaprinters
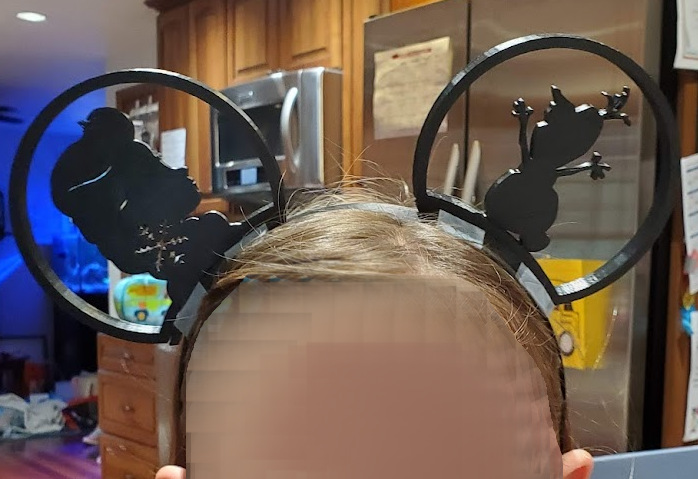
<p><strong>Summary</strong></p><p>This is a customizable and interchangeable Mickey Mouse headband and ears. The "bases" get superglued to a store-bought headband of your choosing. The "ears" are held to the base using 6x3mm magnets. All 3D models were created in TinkerCAD (my go-to DIY CAD program). Instructions will be included how to create your own custom ear designs since that piece was missing from every other similar "Mickey Ear" concept I've seen.</p><p>There were at least 2 examples of this project elsewhere on Thingiverse and the great wide internet. However, there were several shortcomings that I wanted to overcome including: I wanted to use magnets (not velcro), there weren't as many designs as I desired, some designs required payment, the size of magnets were not specified, the ability to create your own designs wasn't apparent from the available models (no center points, trim objects), etc.</p><p><strong>Print Settings</strong></p><p>All models are designed for simple printing as most are just flat silhouettes. I print in PLA or PETG at 0.2mm layers, 20% infill, no supports. Some 3D models such as the Yoda and Vader busts may require supports (will update when I finally print a prototype).</p><p><strong>Model Specific Print Settings</strong></p><ul><li><i>Yoda Bust:</i> Detail is better with 0.1mm layers. If desired, the "back" can be printed separately and then glued to the front.</li><li><i>Yoda Bust Back:</i> 0.1mm layers.</li><li><i>Vader Bust:</i> Detail is better with 0.1mm layers. If desired, the "back" can be printed separately and then glued to the front.</li><li><i>Vader Bust Back:</i> 0.1mm layers. Supports needed to print back of helmet correctly.</li></ul><p><strong>Required Tools/Supplies</strong></p><ol><li>headbands. These work well enough but don't extend very far down the head and are very wide. My wife wants to try a plain plastic headband. The only requirement is that the bases are 1cm (7/16") wide so the headband should be at least that wide.</li><li>superglue gel. Gel works great.</li><li>strong clamps. Used to clamp bases to headband while the superglue dries. I picked up a few $1 clamps at Lowes which clamp very strong and were cheap.</li><li>6x3mm magnets. Magnets are pressed into both the bases and ears. I use 3 in each but there are holes for 5 if you require extra holding force. No matter how many you use, depending on the number of ears you print, you need a lot of magnets. WARNING: Keep magnets out of reach of small children! NOT A TOY!</li><li>(only for 3D hanging models) A paperclip and needle nose pliers.</li><li>If you are girly, you may want to glam up your headband.</li></ol><p><strong>Assembly</strong></p><ol><li><i>Mark the Headbands:</i> I found that placing the bases approximately 6cm (2.25" - 2.5") ( from each other looked good. Mark the middle of the headband (mid-way between both ends). Place two more marks 3cm (1 1/8") on either side of the middle mark.</li><li><i>Glue the Bases:</i> Add a dab of glue to each end of the bottom of the base and one in the middle. (I also found a small bead down the entire length of the base bottom also works well.) Place the edge of one base at the outermost mark on the right and use two clamps to hold the base temporarily. Repeat for the left base. Leave clamps in place until glue sets (about 10 minutes should be ok).</li><li><i>Press Magnets Into Bases:</i> Using pliers (channel locks work best), press the magnets into the bases. Make sure that the magnets are all oriented with their poles in the same direction. Recheck the magnet orientation before pressing and everytime you place another magnet. <strong>WARNING: Magnets pose a danger to small children. The magnets hold very firm with just a press fit. However, you may want to use some glue to hold the magnets in place for extra reassurance.</strong></li><li><i>Press Magnets Into Ears:</i> Remember to check the magnet orientation to ensure the magnet poles are aligned correctly to the base. <strong>WARNING: Magnets pose a danger to small children. The magnets hold very firm with just a press fit. However, you may want to use some glue to hold the magnets in place for extra reassurance.</strong></li><li><i>Attach Ears to Bases:</i> So simple, just put them close and the magnets will do the rest.</li></ol><p>(Optional) Some of the 3D models and busts require additional assembly due to how they print. Get familiar with the silhouettes and then when you're ready for the 3D stuff, you'll figure it out.</p><p><strong>Creating a New Ear Design</strong></p><p>Tools needed: A <a href="https://www.tinkercad.com/">TinkerCAD</a> account, <a href="https://inkscape.org/">InkScape</a> (to create vector graphics), <a href="https://www.gimp.org/">GIMP</a> (or any graphics editor, to touch up images if needed)</p><p>For Silhouettes:</p><ol><li>Search the internet for a decent silhouette that conveys your concept clearly. Sometimes you have to create your own collage so you may need to get multiple silhouettes on the same theme (see any of the collage ears such as Peter Pan, Moana, Nemo, etc.). Most likely, the silhouettes you find will be in a common bitmap format such as jpg, png, gif, etc. All are useable.</li><li>Create a vector graphics file (.svg) from the silhouette. There are numerous tutorial how to do this with a free program called Inkscape (i.e. <a href="https://logosbynick.com/inkscape-convert-png-to-svg/">this</a>, <a href="https://by-pink.com/using-inkscape-convert-image-svg/">this</a>, <a href="https://inkscape.org/doc/tutorials/tracing/tutorial-tracing.html">this</a>) using the auto-tracing tool. Don't be intimidated, it's very easy to do once you get the hang of it. If you have a complicated or full-color image, you may have to manipulate the image in a free graphics editor program such as GIMP. You may be able to edit with Inkscape but I find GIMP easier since I'm familiar. Also, after doing the auto-trace, your vectors may need touched up. See <a href="https://www.youtube.com/watch?v=7PmCx1ur5-Q">this tutorial</a>, or search the internet for any similar and freely available guide/tutorial.</li><li>I can't share the TinkerCAD blank model so I'll walk you through setting up the blank so you can use it as you see fit. You can search the internet for a tutorial on TinkerCAD basics if you are unfamiliar.<ul><li>In TinkerCAD, create a new project. Use metric grid settings.</li><li>Place a measurement tool in the center of your workspace. Change the measurement to to "Use Midpoint".</li><li>Import the MickeyEar_Blank.stl into your project. Place the blank model so there is 0mm offset in the X axis and -6.96mm offset in the Y axis.</li><li>At this point you could use the blank as is and it is centered as if it was a full 100mm circle. If you use a large silhouette, or you create a collage, the silhouette images may extend beyond the ear or into the magnet cutouts in the bottom of the ear. What I do is create a two "hole" objects to trim the silhouette objects, to be within the extents of the ear, before I merge the whole ear into a single object.<ul><li>Create a solid cylinder centered on the measurement tool. I usually make the height 10mm with a 200mm diameter. Change the number of sides to the maximum of 64. Next, make a "hole" cylinder, also centered on the measurement tool with a 11mm height, and 64 sides; but make this hole cylinder 100mm in diameter. Join the two cylinders but not the ear blank. Now change that "donut" cylinder into a hole. This hole object will trim your silhouette if it extends beyond the ear outline.</li><li>Create another hole cylinder, increase to 64 sides, make 10mm height, 100mm in X axis, 50mm in Y axis. Center object in X axis but make a -50.5mm offset on the Y axis. This object will trim your silhouette objects so they do not interfere with the magnet holes. It will leave a 0.5mm solid roof for the magnet holes.</li></ul></li><li>Save this project. This is now your "Mickey Ear Blank" project. Never edit this project when you create a new design. Rather, create a copy of this blank project and edit the copy.</li></ul></li><li>In TinkerCad, duplicate your Mickey Ear Blank project. If you rely on the measurement tool as I do, you may have to re-place it in the project center after duplication. Import a silhouette svg file that you created in step 2. Make the height 5mm and adjust your image size to fit within the ear. It may extend past the ear if you need it to because we will trim it after everything is place. Import any additional images and place them as needed. One interesting aspect is that if you place multiple characters into an ear, as long as the touch the blank ear object (the outline), then you can create interesting characters that seem to fly (see Peter Pan ear). Once you're happy with the collage, you have to merge everything EXCEPT the blank ear outline. This will trim your collage or characters using the "trim" objects we created in step 3. Then merge the ear outline with your trimmed silhouette object.</li></ol><p><strong>Tips and Tricks</strong></p><ul><li>Review all ear prototypes in the slicer for thin lines. Through my prototyping, I found that some silhouettes have unprintable features because the feature creates thin and unconnected lines. For example, when I ran the Olaf ear prototype through a slicer, the twigs on Olaf's head were a single strand think and not well attached to the head. When I realized that, I had to go touch up the vector graphic to make the twigs a bit thicker. As a rule of thumb, I ensure that every extremity has at least 2 shell lines in order to print well.</li><li>To date, I only put 3 magnets in each ear and base (leaving the outermost magnet holes empty). 3 magnets have plenty of holding force for normal wear. I intended to create "registration pegs" for the outermost holes. Placing pegs in some of the holes would ensure correct orientation and aid in aligning the ears if placing them while wearing the headband. Results may vary and I leave it up to you to use all 5 holes with magnets, or to design and place pegs as you see fit.</li><li>My wife likes to finish the ears with a little bit of paint. Paint doesn't have to be super detailed; sometimes it just enhances the abstract nature of the silhouette.</li></ul><p>Credits</p><ul><li><a href="https://simplymadefun.com/interchangeable-mickey-ears">https://simplymadefun.com/interchangeable-mickey-ears</a></li></ul>
With this file you will be able to print Interchangeable Mickey Ears with your 3D printer. Click on the button and save the file on your computer to work, edit or customize your design. You can also find more 3D designs for printers on Interchangeable Mickey Ears.